Testing with Talos Linux
Create a Kubernetes cluster to run in local docker/podman using Talos Linux. This is a quick way of testing tings before going for a full production install.

Create a Kubernetes cluster in docker quickly with Talos Linux. Also works for podman. We can use Docker-CE or Docker-Desktop for it.
I happen to have Docker-Desktop on both my Linux rig and my MacBook Pro.
I have a few Ubuntu VM running Talos using Docker-CE.
Installing Talos
Prerequisites
- Install Docker Desktop
- Homebrew, follow this post
- Using a VM from a Remote VM is discussed in this post
Install kubectl
Download kubectl via one of methods outlined in the documentation.
brew install kubectlCheck for success
kubectl version --clientInstall talosctl (macOS / Linux)
brew install siderolabs/tap/talosctlI have Homebrew on all my machines.
curl -sL https://talos.dev/install | shWithout brew on Linux, macOS and WSL.
Create the Cluster
Now run the following to create 1 controlplane and one worker
talosctl cluster createFor more workers do talosctl cluster create --workers 3
ℹ️ If you are using Docker Desktop on a macOS computer,
you need to enable the default Docker socket in your settings.
You can explore using Talos API commands:
talosctl dashboard --nodes 10.5.0.2Verify that you can reach Kubernetes:
kubectl get nodes -o wideYou can also use the kubectl get nodes for a shorter output

List all your nodes by docker ps.
Using the Cluster
The controlplane will be 10.5.0.2 and the workers 10.5.0.3 →
If you want to move the kubeconfig to another place, use the following command talosctl kubeconfig '.kube/talaos-default' -n 10.5.0.2 to extract it. Now go to the .kube directory export KUBBECONFIG and use kubctl get nodes to show the nodes.
The Dashboard
To see what going on, Talos has an amassing TUI Dashboard, exit with [Ctrl]+C.
talosctl dashboard -n 10.5.0.2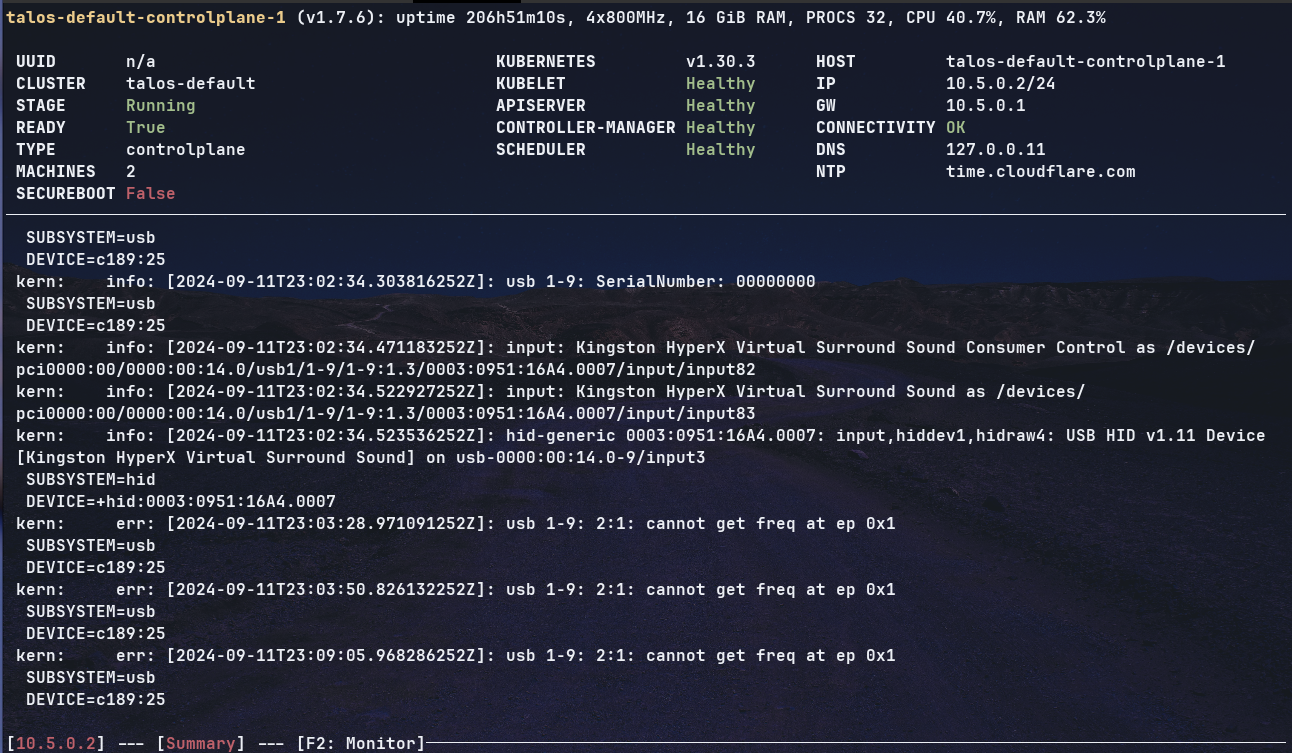
Other useful commands
talosctl services -n 10.5.0.2
Add Functionalities
See the Boot Assets Guide for pre-built images and also change the configuration.
Destroy the Cluster
When you are all done testing, remove the cluster:
talosctl cluster destroy
Using multiple Clusters
Create a new cluster
talosctl cluster create --name cluster2 --cidr 10.6.0.0/24
Destroy a specific cluster
talosctl cluster destroy --name cluster2
Switch between clusters, use --context flag
talosctl --context cluster2 version
kubectl --context admin@cluster2 get nodes
Install Docker Desktop on Ubuntu
This page contains information on how to install, launch and upgrade Docker Desktop on an Ubuntu distribution.
Prerequisites
⚠️ To install Docker Desktop successfully, you must meet the general system requirements.
- Have a 64-bit version of either the LTS or the current non-LTS version of
Ubuntu Jammy Jellyfish 22.04.
- Docker Desktop is supported on amd64 architecture (Intel and AMD ).
⛔ The latest Ubuntu 24.04 LTS is not yet supported.
Docker Desktop will fail to start. Due to a change in how the latest Ubuntu release restricts the unprivilegednamespaces,sudo sysctl -w kernel.apparmor_restrict_unprivileged_userns=0needs to be run at least once. Refer to the Ubuntu Blog for more details.
For non-Gnome Desktop environments
The gnome-terminal must be installed:
sudo apt install gnome-terminal
Install Docker Desktop
Recommended approach to install Docker Desktop on Ubuntu:
Add Docker's official GPG key
sudo apt-get update && sudo apt-get install ca-certificates curl -y
sudo install -m 0755 -d /etc/apt/keyrings
sudo curl -fsSL https://download.docker.com/linux/ubuntu/gpg -o /etc/apt/keyrings/docker.asc
sudo chmod a+r /etc/apt/keyrings/docker.asc
Add the repository to Apt sources
echo \
  "deb [arch=$(dpkg --print-architecture) signed-by=/etc/apt/keyrings/docker.asc] https://download.docker.com/linux/ubuntu \
  $(. /etc/os-release && echo "$VERSION_CODENAME") stable" | \
  sudo tee /etc/apt/sources.list.d/docker.list > /dev/null
sudo apt-get update
Install Docker Packages
sudo apt-get install docker-ce docker-ce-cli containerd.io docker-buildx-plugin docker-compose-pluginCheck for Success
sudo docker run hello-worldDownload and Install the Docker-Desktop
If you prefer the Docker Desktop, you may install it by:
Download
wget https://desktop.docker.com/linux/main/amd/docker-desktop-amd64.debInstall
sudo apt-get install docker-desktop-amd64.debLaunch the Docker Desktop
systemctl --user start docker-desktopStart the Docker-Desktop from a terminal
systemctl --user enable docker-desktopAutomatically start Docker-Desktop at login
systemctl --user stop docker-desktopStop the Docker-Desktop from a terminal
Update Docker-Desktop
- Remove the old installation file
- Download the new one
- Do the installation. The PC will reboot
References
Talos Distro [1] Talos on Proxmox [2] Homebrew [3] Docker [4] Remote Usage [5]


