Install Docker and Dockge
The workhorse on any lab is Docker. With Dockge the stacks are easy to deploy and manage. I run this as a script when I need a Docker VM.

This post is about installing Docker on Ubuntu 22.04 or 24.04 LTS. We also utilize the Dockge instead of Portainer. Dockge has some unique features and is extremely well suited for use in a home lab. Portainer can do more but, it's not always needed,
Installation
Run as root sudo -s or use sudo as in the guide.
If you need to add a user, adduser <user_name> and fill in data or not.
Then add the user to the sudo group if needed usermod -aG sudo <user_name>
Update your package list
sudo apt update && sudo apt upgrade -yInstall prerequisite
sudo apt install apt-transport-https ca-certificates curl software-properties-commonAdd the GPG key for the official Docker repository
curl -fsSL https://download.docker.com/linux/ubuntu/gpg | sudo gpg --dearmor -o /usr/share/keyrings/docker-archive-keyring.gpgAdd the Docker repository to APT
echo "deb [arch=$(dpkg --print-architecture) signed-by=/usr/share/keyrings/docker-archive-keyring.gpg] https://download.docker.com/linux/ubuntu $(lsb_release -cs) stable" | sudo tee /etc/apt/sources.list.d/docker.list > /dev/nullUpdate your list of packages again
sudo apt updateMake sure you are about to install from the Docker repo instead of the default Ubuntu repo!
apt-cache policy docker-ceYou’ll see a long output something like this, although the version number for Docker may be different:
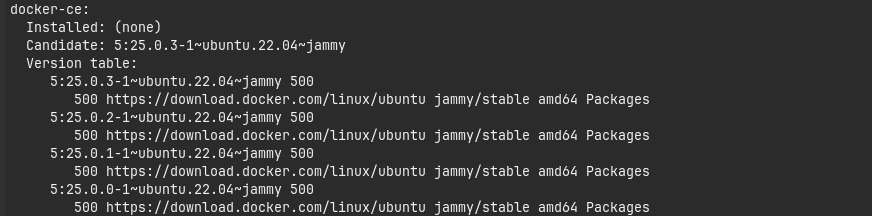
Notice thatdocker-ceis not installed, but the candidate for installation is from the Docker repository for Ubuntu 22.04 (jammy).
Install Docker-ce
Installing Docker-ce, and it's dependable including docker-buildx-plugin, docker-ce-cli, docker-ce-rootless-extras and docker-compose-plugin.
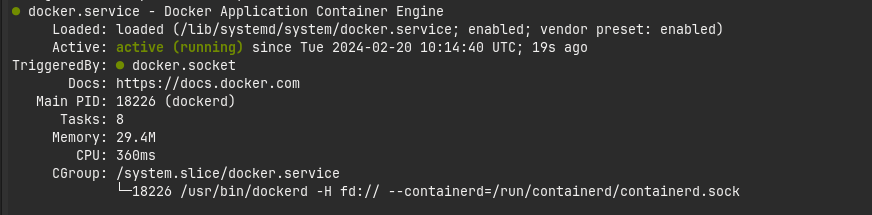
sudo apt install docker-ce -yDocker should now be installed, the daemon started, and the process enabled to start on boot. Check that it’s running:
sudo systemctl status dockerThe output should be similar to the following, showing that the service is active and running:
Installing Docker installs the Docker service daemon, but also: containerd.io, docker-buildx-plugin, docker-ce-cli, docker-ce-rootless-extras, docker-compose-plugin.
Elevate a normal user's privileges. Remember the security aspect of doing so.
sudo usermod -aG docker $USERActivate exec su -l $USER
Check if Docker is running sudo docker ps.
Add Dockge
Run as the normal user
Add the working directory mkdir -p /home/$USER/docker/.
sudo docker run -d -p 5001:5001 --name Dockge --restart=unless-stopped -v /var/run/docker.sock:/var/run/docker.sock -v /home/$USER/docker/dockge/data:/app/data -v /home/$USER/docker/stacks:/home/$USER/docker/stacks -e DOCKGE_STACKS_DIR=/home/$USER/docker/stacks louislam/dockge:latestservices:
dockge:
ports:
- 5001:5001
container_name: Dockge
restart: unless-stopped
volumes:
- /var/run/docker.sock:/var/run/docker.sock
- /home/$USER/docker/dockge/data:/app/data
- /home/$USER/docker/stacks:/home/$USER/docker/stacks
environment:
- DOCKGE_STACKS_DIR=/home/$USER/docker/stacks
image: louislam/dockge:latest
networks: {}Check if it's running sudo docker ps.
Connect to the Dockge in your VM <IP>:5001
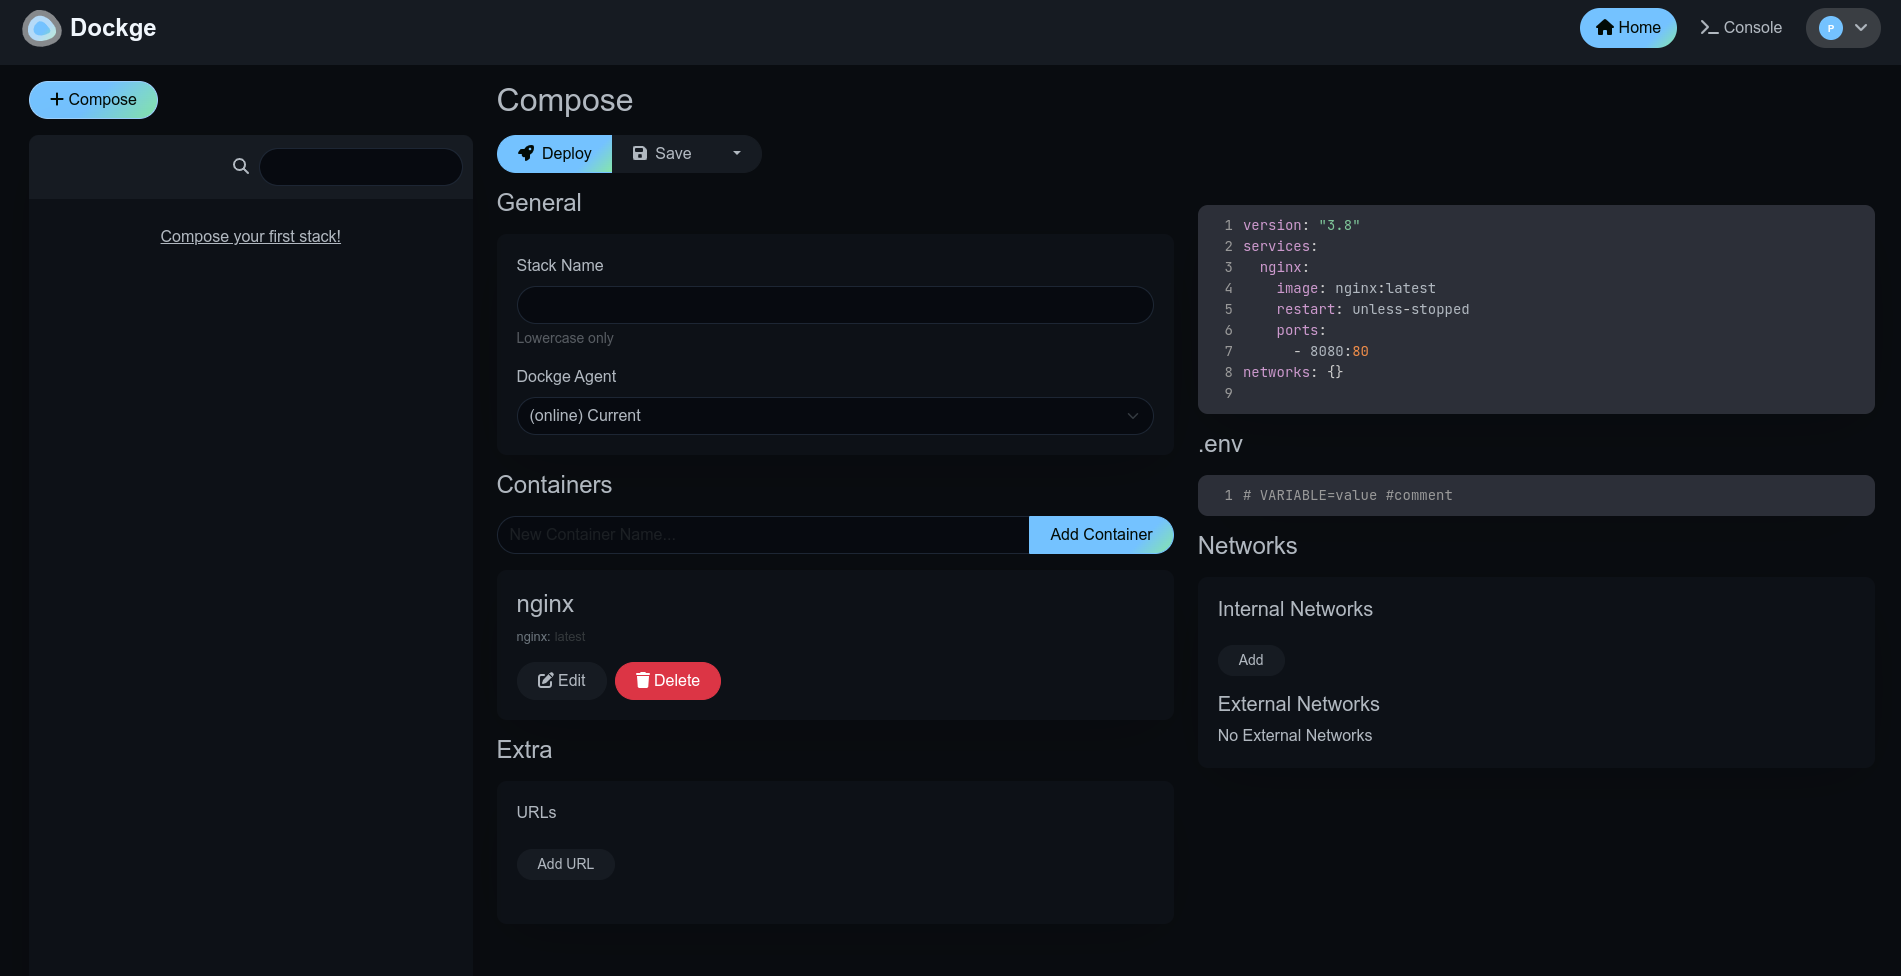
Now start creating those stacks.
A More complex Dockge
If you need a more customized Dockge, you can create your own YAML file and start it with docker compose up -d.
version: "3.8"
services:
  dockge:
    image: louislam/dockge:latest
    restart: unless-stopped
    ports:
      - 5001:5001  # Host Port:Container Port
    volumes:
      - /var/run/docker.sock:/var/run/docker.sock
      - ./data:/app/data
      # If you want to use private registries, you need to share the auth file with Dockge:
      # - /root/.docker/:/root/.docker
      # Your stacks directory in the host  (The paths inside container must be the same as the host)
      - /my-stacks:/my-stacks
    environment:
      - DOCKGE_STACKS_DIR=/my-stacks  # Tell Dockge where is the stacks directory
To run Docker as a non-privileged user, consider setting up the
Docker daemon in rootless mode for your user:
dockerd-rootless-setuptool.sh install
Visit https://docs.docker.com/go/rootless/ to learn about rootless mode.
To run the Docker daemon as a fully privileged service, but granting non-root
users access, refer to https://docs.docker.com/go/daemon-access/
Access to the remote API on a privileged Docker daemon is equivalent to root access on the host. Refer to the
Docker daemon attack surface documentation for details see: https://docs.docker.com/go/attack-surface/Run Docker in Rootless mode
Rootless mode allows running the Docker daemon and containers as a non-root user to mitigate potential vulnerabilities in the daemon and the container runtime.
Rootless mode does not require root privileges even during the installation of the Docker daemon, as long as the prerequisites are met.
How it works
Rootless mode executes the Docker daemon and containers inside a user namespace. This is very similar to userns-remap mode, except that with userns-remap mode, the daemon itself is running with root privileges, whereas in rootless mode, both the daemon and the container are running without root privileges.
Rootless mode does not use binaries with SETUID bits or file capabilities, except newuidmap and newgidmap, which are needed to allow multiple UID/GID to be used in the user namespace.
References
Docker documentation, install GitHub and the script ↩︎


