Start using Proxmox
Set up basic services on Proxmox and its VM/CT like personal Add-ons, NTP Chrony, E-mail alerts, Firewall settings, Networking, Users and Pools, Templates Docker, Backup Strategy and DOCUMENTATION.


These are my routines setting up an Proxmox node. I have my script for it but this is what I do. Some are for the looks and comfort but some are essential for running a cluster and for security.
Setup Bash and Add-Ons
At start your bashrc is populated put all is commented out, that's fine for now. We will add one line and two files to change this.
If the file .bash_aliases exist start using it
Add this line to bashrc if its missing. It's missing out of the box.
echo "[[ -f ~/.bash_aliases ]] && . ~/.bash_aliases" >> .bashrcOr download my preferences
wget https://raw.githubusercontent.com/nallej/MyJourney/main/BashAddon.sh

chmod +x BashAddon.sh

./BashAddon.sh
If you need IOMMU
See my post on IOMMU and Dark mode link.
Your MB and it's Firmvare as do your CPU needs to support it.
Get bat
Bat is installed with BashAddon.sh otherwise just apt install bat and add a alias bat='batcat' to your bash (Debian uses a strange command batcat).


Setup NTP
NTP is one critical thing with databases, backups and cluster setups. Especially important to have the correct time is on High Availability setups, you just need to have the correct time all over the cluster. The NTP daemon listens on the 123 port. For security reasons use only one with access to the internet.
Some networks do not allow use of external NTP server. In that case you have to to setup your own. The time on these networks need to be controlled and set manually from time to time.
By default all Proxmox nodes do their own thing as stand alone servers and goes constantly out for a NTP sync. They use the pool 2.debian.pool.ntp.org as default and with the iburst setting.
I prefer to have one to act as the local NTP server and the rest as configured as clients. Proxmox uses Chrony as the NTP client, it can also be used as an NTP server.
Installing a separate NTP server(s)
# If you plan to help the NTP pool Community by shareing it
sudo apt install ntp

# This is what Proxmox uses
sudo apt install chrony
Check your NTP status by these commands
chronyc activity

chronyc tracking

chronyc sources

chronyc sources -v # Verbose
By checking performances you will find your best set for accuracy and stability. My ISP's are the best so I stick to them. They are loaded by default by the /etc/chrony/chrony.conf, please read it before adding anything.
Add your own settings and best NTP servers
nano /etc/chrony/conf.d/chrony.conf
# As example only

server time.cloudflare.com
pool   pool.ntp.org iburst maxsources 3
The iburst is for your best one. Use Stratum 1 or 2 servers for best results.
Setting up a local NTP server
Using the node facing the interweb as a local source of NTP.
- Open the port
UDP 123 - Deal with the DHCP for NTP
- Configure the Chrony
- Allow it as a local server
- Configure the other nodes to us it
Setup the NTP server on Pve-1 at 192.168.1.123
# Minimum changes

nano /etc/chrony/chrony.conf

# Allow NTP client access from local network.
allow 192.168.1.0/24

# Restart the service
systemctl restart chronyd
Setup the other Proxmox nodes as clients
# Minimum changes
# Comment out any severs or pools

# Add this line

nano /etc/chrony/chrony.conf

server 192.168.1.123 iburst

# Restart the service

systemctl restart chronyd
systemctl status chrony
chronyc sources
Setup Email Alerts
This is a strangely complicated process in Proxmox -why?
This procedure is following the Proxmox guides and articles on the Forum.
I will quickly go thru the steps.
- First setup a gmail account for sending Alerts, get a Application Password for it
DO NOT USE the account password - it will not work that way, I did test
You do not want them in your daily mail, tested that too - Setup postfix to send them
- On Proxmox 8 I use Gotify
Add some utilities for postfix
apt update
apt install libsasl2-modules mailutils postfix-pcre -y
cp /etc/postfix/main.cf /etc/postfix/main.cf.bak
Create the password
nano /etc/postfix/sasl_passwd
# Add the password info
smtp.gmail.com [email protected]:YourApplicationPassword

postmap hash:/etc/postfix/sasl_passwd
# Is it sucessfully created
cat /etc/postfix/sasl_passwd.db
Edit the postfix configuration
nano /etc/postfix/main.cf

# Add this for your mail
# Comment out the old relayhost =

# gmail configuration
relayhost = smtp.gmail.com:587
smtp_use_tls = yes
smtp_sasl_auth_enable = yes
smtp_tls_security_level = encrypt
smtp_sasl_security_options = noanonymous
smtp_sasl_password_maps = hash:/etc/postfix/sasl_passwd
smtp_tls_CAfile = /etc/ssl/certs/Entrust_Root_Certification_Authority.pem
smtp_tls_session_cache_database = btree:/var/lib/postfix/smtp_tls_session_cache
smtp_tls_session_cache_timeout = 3600s
smtp_header_checks = pcre:/etc/postfix/smtp_header_checks
Add the smtp header
nano /etc/postfix/smtp_header_checks

/^From:.*/ REPLACE From: pve-1--Alert [email protected]

postmap hash:/etc/postfix/smtp_header_checks

postfix reload
Test message
echo "This is testing Alert-messages from pve-1" | mail -s "Test email from pve-1" [email protected]
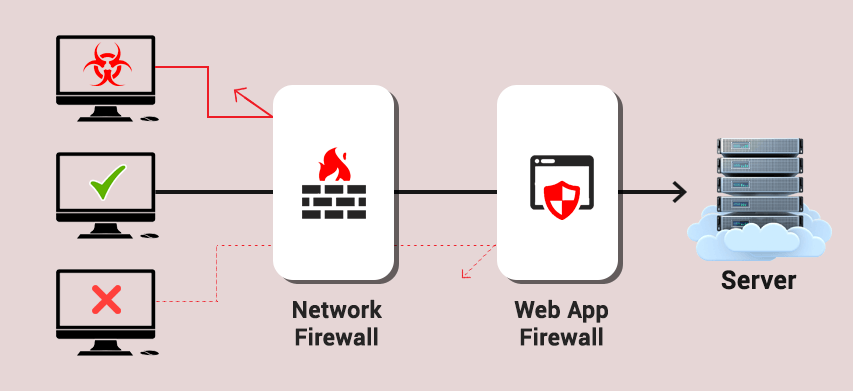
Configure your Firewall
Do NOT set it on before editing - you may be locked out! 👈
Before you switch on the Firewall from the Datacenter it will not work at the VM level. You can set rules on Datacenter, Node and VM level. This means you need to plan in detail what to use and why.
Remember it's extremely dangerous out there 😈
- Proxmox ports needed for operation, open at setup please
- Other ports needed on VM's - only open if needed
- Plan on what node a VM can run - open or close the ports accordingly
- Use the Macros
- Remember to Enable if you want the rule to work
Cluster Wide Setup
Cluster-wide firewall configuration is stored at: /etc/pve/firewall/cluster.fw
Host Specific Configuration
Host related configuration is read from: /etc/pve/nodes/<nodename>/host.fw
VM/Container Configuration
VM firewall configuration is read from:` /etc/pve/firewall/<VMID>.fw`
Firewall Rules
Firewall rules consists of a direction (IN or OUT) and an action (ACCEPT, DENY, REJECT). You can also specify a macro name. Macros contain predefined sets of rules and options. Rules can be disabled by prefixing them with |.
Security Groups
A security group is a collection of rules, defined at cluster level, which can be used in all VMs' rules. For example you can define a group named “webserver” with rules to open the http and https ports.
IP Aliases
IP Aliases allow you to associate IP addresses of networks with a name. You can then refer to those names:
- inside IP set definitions
- in source and dest properties of firewall rules
Default firewall rules
The following traffic is filtered by the default firewall configuration:
Datacenter incoming/outgoing DROP/REJECT
If the input or output policy for the firewall is set to DROP or REJECT,
The following traffic is still allowed for all Proxmox VE hosts in the cluster:
- traffic over the loopback interface
- already established connections
- traffic using the IGMP protocol
- TCP traffic from management hosts to port 8006 in order to allow access to the web interface
- TCP traffic from management hosts to the port range 5900 to 5999 allowing traffic for the VNC web console
- TCP traffic from management hosts to port 3128 for connections to the SPICE proxy
- TCP traffic from management hosts to port 22 to allow ssh access
- UDP traffic in the cluster network to ports 5405-5412 for corosync
- UDP multicast traffic in the cluster network
- ICMP traffic type 3 (Destination Unreachable), 4 (congestion control) or 11 (Time Exceeded)
The following traffic is dropped, but not logged even with logging enabled:
- TCP connections with invalid connection state
- Broadcast, multicast and anycast traffic not related to corosync, i.e., not coming through ports 5405-5412
- TCP traffic to port 43
- UDP traffic to ports 135 and 445
- UDP traffic to the port range 137 to 139
- UDP traffic form source port 137 to port range 1024 to 65535
- UDP traffic to port 1900
- TCP traffic to port 135, 139 and 445
- UDP traffic originating from source port 53
The rest of the traffic is dropped or rejected, respectively, and also logged. This may vary depending on the additional options enabled in Firewall → Options, such as NDP, SMURFS and TCP flag filtering.
Ports used by Proxmox VE
- VNC Web console: 5900-5999 (TCP, WebSocket)
- SPICE proxy: 3128 (TCP)
- sshd (used for cluster actions): 22 (TCP)
- rpcbind: 111 (UDP)
- sendmail: 25 (TCP, outgoing)
- corosync cluster traffic: 5405-5412 UDP
- live migration (VM memory and local-disk data): 60000-60050 (TCP)
Proxmox Management Web Interface
- Proxmox VE Server 8006 (TCP, HTTP/1.1 over TLS)
- Proxmox Backup Server 8007 (TCP, HTTP/1.1 over TLS)
Other port you might need open - Use the Macros if possible
- HTTP: 80 (UTP, TCP)
- HTTPS: 443 (UTP, TCP)
- FTP: transfer 20, control 21 (TCP, SCTP)
- FTPS: data 989, control 990 (TCP, UDP)
- Secure Shell: SSH 22(TCP) scp, sftp
- DHCP: 67, 68 (UDP) and failover protocol 647, 847 (TCP)
- DHCPv6: client (TCP/UDP) 546 server 547 (TCP/UDP)
- Node-RED: 1880 (UDP, TCP)
- MQTT: 1883 (UDP, TCP)
- RADIUS: radius 1812, radius-act 1813, radsec 2083 (UDP, TCP),
change of authorization 3799 (UDP) - CUPS: admin, IPP 631(TCP/UDP)

Setup your Networks
An ideal cluster have a minimum of 3 (5 or more is better) identical servers.
In a homelab we tend to have a mishmash of hardware - no big problem.
On a cluster you need to have the same VMBR's on the Nodes for the VM's to be able to migrate and run. If a VMBR do not exist on a Node the VM can't run.
You group VM's by their HW needs so they can migrate within that grope.
Special Networks
There is some networks that need to be solely used for one purpose so the subsystem get access undisturbed of other apps or subsystems and there is networks that are dependent on high speed.
In a homelab environment we need to do compromises and save NIC's. We usually only have 2 or 4 NIC's. It will work. Adding a 10 G NIC and tune the network is better.
- Management: low speed access is ok, main GW for the node
- Cluster: high speed and is better with a dedicated NIC
- Migration: high speed and is better with a dedicated NIC
With Replication activated, the need for speed is not that high - Networked FS: requres high speed and a dedicated NIC's
- Bonded NIC's are good for VM Bridge and VLAN's
Special File Systems for VM/CT disks
Remember to setup NTP on the servers used in these roles.
Clusters actually need the high speed of 10 G networks.
- Shared storage, needs high speed and a dedicated network. 1 G can only support a few VM's before it's getting totally saturated. Use iSCSI or NFS, do not use SMB it'ss not recommended.
- Storage Replication - It replicates VM/CT disks to another node(s) so that all data is available without using shared storage. Replication uses snapshots to minimize traffic sent over the network. Each replications bandwidth can be limited, to avoid overloading a storage or server.
Only changes since the last replication (deltas) need to be transferred if the guest is migrated to a node to which it already is replicated. This reduces the time needed significantly. The replication direction automatically switches if you migrate a guest to the replication target node. Storage type is ZFS. - GlusterFS - Gluster can run atop LVM or ZFS to enable features such as snapshots. This design is highly redundant, and our virtual machines are highly available. Gluster sits on top of an existing file system, it is file-oriented, so we can use it with ZFS. Gluster can be installed on VM's or bare metal.
When we have a Hodge-podge setup in our labs, - Ceph - Ceph is an object-oriented file system, and it also acts as your LVM or Logical Volume Manager. This makes it largely incompatible with ZFS.
Ceph lacks performance on smaller clusters, in terms of throughput and IOPS, when compared to GlusterFS (see the pdf in the link below).
Ceph is usually used at very large AI clusters and even for LHC data collection. When we have a Hodge-podge setup in oure labs, Ceph clusters will be limited by the slowest and smallest ZPOOL's.
See the paper by Giacinto Donvito, Giovanni Marzulli, Domenico Diacono pdf link: Testing of several distributed file-systems (HDFS, Ceph and GlusterFS) for supporting the HEP experiments analysis.
Table 2. Test results using dd. MB/s see this(Cepf vs Gluster vs Hadoop)
| MB/s | Ceph CF | Gluster 3.3 | HDFS |
|---|---|---|---|
| read | 126.91 | 427.30 | 220.05 |
| write | 64.71 | 268.57 | 275.27 |
All disks are not equal either

High availability without 10 G Networks
If you don't have 10 G or faster implemented, you need to consider how to do it.
You can work around this by using Replication on 1 G networks, the changes to a VM's disk are not usually that big. Replication keeps the VM's disk updated on all nodes assigned to the group for quick redeployment of the VM on an other node.
Disk speed is important. Use 6 or 12 G/s SAS drives rather than 3 G/s SATA SSD's or HD's. SAS drives are also faster because they are full duplex devices.
Planning and documentation is key to success
Setup your Groups, Users and Pools
You can create many users and groups to minimize the threat vector and/or make things easier to operate. On corporate clusters there is many layers upon layers.
Each user can be a member of several groups. Groups are the preferred way to organize access permissions. You should always grant permissions to groups instead of individual users. That way you will get a much more maintainable access control list.
A resource pool is a set of virtual machines, containers, and storage devices. It is useful for permission handling in cases where certain users should have controlled access to a specific set of resources, as it allows for a single permission to be applied to a set of elements, rather than having to manage this on a per-resource basis.
Resource pools are often used in tandem with groups, so that the members of a group have permissions on a set of machines and storage.
Start creating your groups and then create the users
Create basic Templates
Create a set of Templates to spin up VM's fast. I have some scripts for it.
See my blog Proxmox Automation about it and also the Update - Proxmox Automation.
wget https://raw.githubusercontent.com/nallej/MyJourney/main/myTemplateBuilder.shCreate a basic Docker VM
Make a basic Docker VM where you can test tings before you set them live.
See my blogs Docker and Dockge, Docker and Proxmox and the old The Docker stack - the journey starts
wget htps://raw.githubusercontent.com/nallej/MyJourney/main/myVMsetup.sh
Create a Backup Strategy and Tactics
This is perhaps the most important thing to do. Take time and plan well. Remember the 3-2-1 rule.
- Keep at least three (3) copies of data.
- Store two (2) backup copies on different storage media.
- Store one (1) backup copy offsite.
Remember to use logs and automatic email services.
Physical threats
In the corporate world we start with total destruction of the city, building and all the way down to the individual server components. Earthquakes and wildfires, terrorist attacks and accidents do happen.
Consumer grade is short lived and have low MTBF. Enterprise grade has much higher MTBF and hot standby units and redundant sub systems.
What will break in a server? Answer: everything.
- Servers have dual power supply's, hot standby memory and hot standby disks - dos that give us a hint. Also all fans are easy to replace without any tools.
- RAID controllers used to be really bad and their batteries or super caps are still bad - may lead to loss of data. And there is a large number 0f factory refurbished cards on the market, an other hint?
- RAID systems are more or less a flavor of the past. Many problems like 'bit rot' and trusting disks reporting of OK state. ZFS is way better in storing data.
- SSD's have a limited usage and can stop working suddenly.
- SATA disks are found in large quantities as factory refurbished, guess why.
- SAS disks are usually the best choice. They are long lived, but not for ever.
People
Create a plan for missing human resources: totally absent, short handed situations and holidays. Prepare for the worst. anyone can end up in hospital for a long time.
This is true for us homelabbers to.
Resources
Also make a plan for lack of utilities, total, out for a day or whatever is feasible.
Some years ago we had power outages weekly when it snowed, today maybe one time per year or less. The lesson here is that things change - so should our strategy.
I need to start my servers with delays otherwise the fuse will blow due to inrush current.
- Do your AC cope during a extended heatwave?
- Is the area warm in the winter?
- Do your Backup server have many storage pools?
Locations
It's common practice to have backups at multiple locations. Large corporations may request to have them in different counties or even on different continents.
We could have one set in the lab, one at a friends house and one on cloud storage.
Disaster recovery
Make a rock solid plan for recovery, it's better to have a plan to follow than try to do it blindfolded. A plan ensures you do things and in right order.
A good way to make recovery is to make special scripts that are stored on media in the lab and the files are backup on GitHub, GitLab and/or some cloud storage sites. Same apply to all installation medias.
Your main tool is bash and you need to run commands in the CLI
Documentation, documentation, documentation...
All IT relays heavily on documentation. Without documentation you are lost.
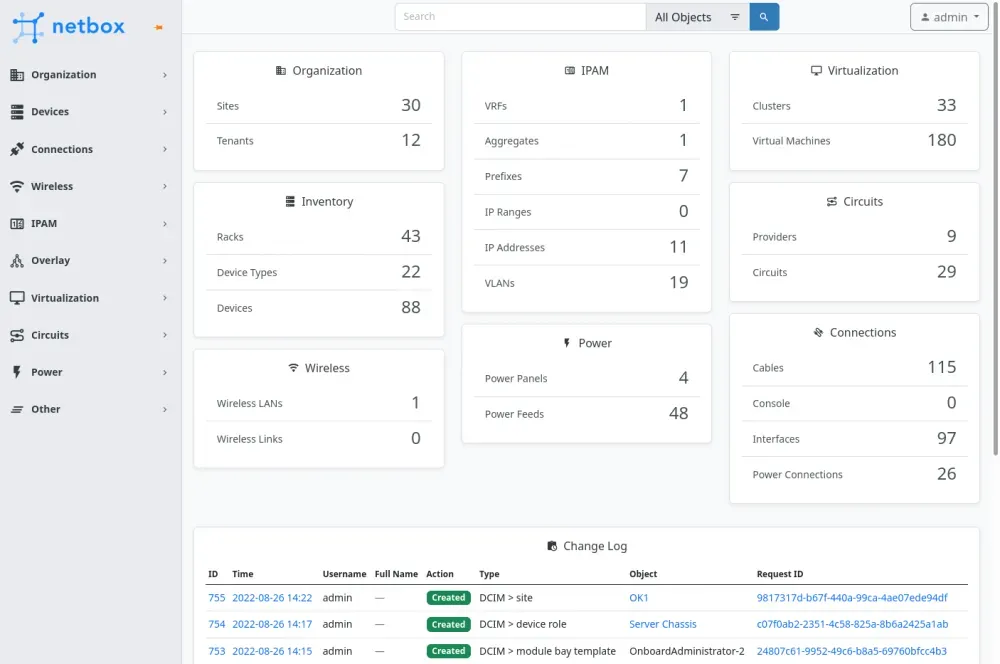
See my post about NetBox Link 👈
Create a good documentation and print it out,
one by the servers one on your desk.
References
Bat: A cat clone with wings or a cat on steroids [1]
What is and how does NTP work. How to install your own. [2]
NTP more info and it's history. [3]
Chrony is a versatile implementation of the Network Time Protocol (NTP). [4]
Gluster is a scalable network filesystem for large, distributed storage solutions for data- and bandwidth-intensive tasks, using common hardware. [5]
List of TCP and UDP port numbers. [6]
Netbox home page [7]
Proxmox documents:
Networking, virtual switches and networks [8] Firewall wiki. [9] Admin Guide. [10] Opt-in Linux 6.1 Kernel for Proxmox VE 7.x available. For some functions you may need the new kernel. [11]
The 3-2-1 strategy [12]
The Gluster project home page and the documentation is found at this page ↩︎
The Proxmox admin guide ↩︎


