Photon OS
Sometimes it's a better to have an easy-to-use system rather than one with everything. We need a secure VM and that's why we run Proton OS. Using the recommendations of the KSPP (Kernel Self-Protection Project), the Photon OS Linux Kernel is secure from the start.

Today, we will use Proton OS from VMware as the secure OS for our VM.
As Flatcar can't have stuff added to, it's good for a lot of my VM needs. Sometimes I need a secure VM with the option of adding stuff during its lifetime.
It also includes Docker out of the box.
Photon OS
A Lightweight Container Host
Photon OS delivers just enough of a Linux operating system to efficiently run containers on VMware, TrueNAS, LXD and Proxmox. See this link.
The minimal version of Photon OS contains around 50 packages. As it is installed, the number of packages increases to nearly 100 to fulfill dependencies. The full version of Photon OS adds several hundred packages to those in the minimal version to deliver a more fully featured operating system.
Photon OS uses c. 750M out of the box and updated it uses less than 1 G.
Security
Using the recommendations of the KSSP (Kernel Self-Protection Project), the Photon OS Linux Kernel is secure from the start.
Installing Photon OS
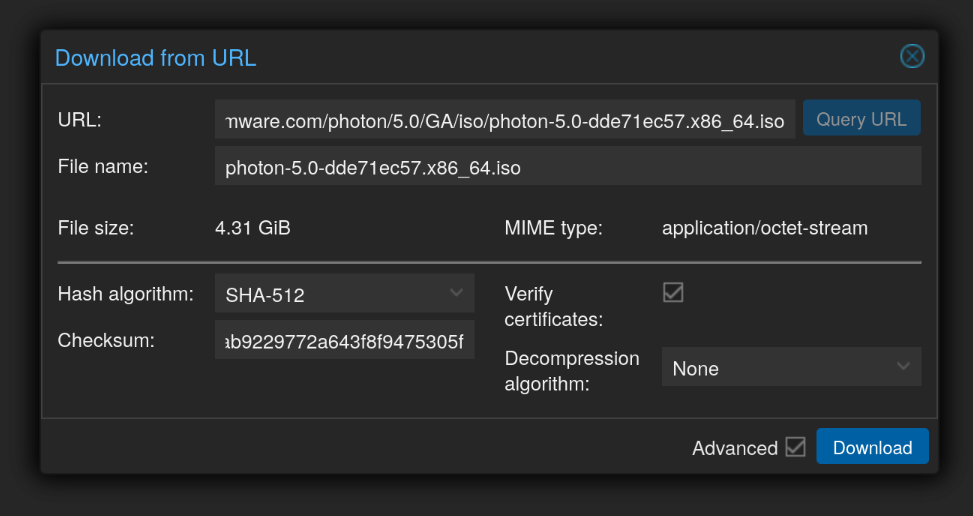
First, we need the ISO. Copy the link and the SHA512 checksum from Download and use Download from URL, remember to tick on the Advanced and there Verify.
Create a VM
We use Photon OS, as it let us add stuff later, compared to Flatcar.
The size of resources depends on the use case, here we do not need much.
- General: set according to your standard of naming
- OS: tick the
Do not use any media, we will return to the ISO later. - System: leave as is
- CPU: we do not need much for this system
- Memory: we do not need much for this system
- Network: set according to your network, I use the management VLAN as it's for me only
When the VM is ready, we add the CD/DVD Drive, it has to be SATA.
- For the media, we use the ISO we just downloaded.
- In
Options→Boot Orderset the scasi0 as 1 and sata0 as 2.
Meaning, if there is no system on the disk, boot from the DVD.
Photon OS installation
My system uses DHCP for all servers. Copy the MAC address and setup in your DHCP and choose an appropriate, free IP for this kind of appliance we are to run on this VM.
When you see the boot screen, use Install, (hit Enter):
- Accept the terms (hit
Enter) - Select
1. Photon Minimal - Select a disk, you might have several. Use
<Auto>or<Custom>partitioning - Configure your Network according to your setup
- Set the
hostname - Set the
root password, use a generated password
After the VM starts, login as root and update it by tdnf update and hit y to perform the upgrade. For more information about tdnf, see Tiny DNF for Package Management, and the tdnf documentation. See References for links to more information.
Reboot systemctl reboot.
Check your IP: ip r or ip a or ifconfig -a
Set up the VM
SSH into the VM using the command below:
ssh -o PubkeyAuthentication=no -o PreferredAuthentications=password root@<VM-IP>Configure the file /etc/ssh/sshd_config to use SSH keys, for improved security, and then restart it systemctl restart sshd
Add a new user useradd <name> and password passwd <name>. Add the home directory mkdir /home/<name>. Always avoid using root.
Add (optional): useradd -aG docker <name> and useradd -aG sudo <name>
Start Docker
Execute sudo systemctl enable docker --now and sudo docker ps to check.
Portainer Installation
As Photon OS can't use Docker Compose, we need to use Portainer.
docker run -d -p 8000:8000 -p 9443:9443 --name portainer --restart=always -v /var/run/docker.sock:/var/run/docker.sock -v portainer_data:/data portainer/portainer-ce:ltsChecky for success by logging in to Portainer <VM-IP>:9443
When Portainer starts, it will request for a password for the admin user.
openssl rand -base64 32An example of how to generate random passwords.
You need to restart Portainer docker restart portainer and log in.
Go to Environment → Environment-related → Environments and set up the local environment
- Name: <your nickname for it> – e.g.:
Local-123, where 123 is the VM-IP - Public IP: <VM IP> – e.g.:
192.0.2.123
Security of Containers
The specific way to implement root and privilege escalation disallowance varies by tool. The Linux kernel provides the “No New Privileges” flag, upon which all tools are built.
security_opt:
  - no-new-privileges:true
Run as non-root user: set environment variables PUID=1000 and PGID=1000
References
Proton OS [1] KSSP [2] TDNF [3]
Proton OS Photon OS is a Linux based, open source, security-hardened, enterprise grade appliance operating system that is purpose built for Cloud and Edge applications. homepage, Documentation, GitHub, homepage, GitHub, ISO and SHA512 checksum Download ↩︎
Kernel Self-Protection Project (KSPP) Documentation ↩︎
Tiny DNF (tdnf) Package Management Documentation. And on Photon OS Docs ↩︎


