
Private Domain with Technitium
To use friendly names instead of IPs. Set up a Private Domain with Technitium. We set up a Domain Name Server ns1 and configure it to handle our domain, example.com or mylab.lan. Options for later: DHCP, a cluster with at least ns1 and ns2 for redundancy, and add ad-blocking if that's needed.


At some point you would like to have friendly names for all the things on your home network instead of dealing with IP addresses. There are many ways to do it, but one of the most common approaches is to create a private domain.
A Private Domain
A private domain is simply a domain name that you like to use on your internal network, and it is not visible from the outside world. You can create a private domain by running local DNS and DHCP services and pointing your internal devices at them. You can use a Firewall for this like pfSense or OpenSense or an Ad-blocker like AdGuard Home or Pi-hole.
If AdGuard Home and Pi-hole are ad-blockers with some DNS functionality attached. AdGuard Home and Pi-hole are a DNS forwarder and can be a pseudo-resolver for custom local DNS names, but it’s not a real recursive DNS resolver without the addition of some additional software like unbound to do the recursive resolving and by adding even more apps they can be synchronized.
Why using Technitium
Technitium is a full fledge DNS that has clustering out of the box. It can be expanded to do DHCP (not clustered yet) and ad-blocking.
Why not usin a Firewall or an Ad-blocker with DNS/DHCP extensions.
The ultimate goal is to have the Firewall doing firewalling, DNS as DNS, DHCP as DHCP and Ad-blockers to block adds. As this brings some complexity we can compromise and combine some actions.
That said, the firewall should be left doing just that because it is essential for the security of our entire network.
We can then use a cluster of DNS servers to handle both DNS/DHCP and ad-blocking as its all about DNS anyhow.
A Private Domain Name
This can be an actual domain name, but that’s not necessary, and it can be problematic if you are planning to use that same domain name for anything public-facing. Consider using a subdomain like lab.example.com.
You can use whatever domain name you want, including the TLD (the last part of the domain name). However, there are some standards, or at least conventions, that we tend to follow. Common TLDs for private networks includ: .intranet and the newer .internal, .private, .corp, .home or .lan.
.local, because that is reserved for multicast DNS, or mDNS. Using
.local as a private top-level domain conflicts with mDNS and may cause problems for users. – Multicast DNS RFC 6762, Appendix G
.home.arpa, it will work, but it’s not in common use. – Proposed as a standard in IETF’s RFC 8375.
Using a Local DNS Resolver
For typical home networks, the router will serve as the nameserver.
- The router isn’t really mapping names to IPs (known as resolving).
It’s typically just a DNS forwarder. - A DNS forwarder forwards queries to full-fledged DNS resolvers, and then it caches the results it gets back for faster look up next time.
Once you have a private domain name, you need a local DNS resolver to resolve those local addresses, because there is no upstream nameserver that know anything about your mylab.lan domain. You need something locally that can map these names to actual network IP addresses.
- The most basic solution is to create an
/etc/hostsfile with all the local names on each machine that needs them. - You might have AdGuard Home or the older Pi-hole Ad Blocker that can run DNSmasq for local DNS and even a DHCP server.
- On firewalls like pfSense and OpenSense you can run DNS and DHCP as well as Ad Blocking it you like.
A better solution is to use a DNS Server like my old favorite bind9 DNS server.
I started my homelab in the 90s running my own bind9 instance, which was the same me and my sysadmins used for our customers. Later I had a cluster of Pi-holes using Unbound. But, recently I changed to Technitium,
If AdGuard Home and Pi-hole are ad-blockers with some DNS functionality attached. They are DNS forwarders and can be a pseudo-resolver for custom local DNS names, but it’s not a real recursive DNS resolver (one which can recursively query DNS servers until it discovers the IP address) without the addition of some additional software like unbound to do the recursive resolving and by adding more apps they can be syncroniced.
Technitium is a self-contained package that does all of this, and it is a DNS server with ad-blocking capability attached.
The clarity of the GUIs of AdGuard Home, Pi-hole and Technitium are similar.
Install Technitium
Install using a LXC
As my virtualization clusters are TrueNAS and Proxmox the LXC/CT route is a easy choice as it's supported on both by KVM/QEMU.
For a production environment you probably want to use a proper VM for added security and separation. Anyway, remember hardening the VM/LXC.
I will use a Alpine 3.24 LXC, 1 Core 512 MB RAM, 512 MB SWAP and 2 G Disk
Update and Install Dependencies
First you need to run the setup-alpine command and fill in the data.
Alpine Linux requires dotnet dependencies to run the Technitium binary. Run:
apk update && apk upgrade
apk add bash curl icu-libs krb5-libs libgcc libintl libssl3 libstdc++ zlib wget
Run the Official Installation Script - Installation and Upgrade
Execute the self-contained installer script:
The secure way is to read the code before running it. Instead of running the curl -sSL <downlaod-link> | doas we do it in two steps. Read the code please.
wget https://download.technitium.com/dns/install.sh
doas install.sh
Instead, of the abow: curl -sSL https://download.technitium.com/dns/install.sh | doas bash
The installer will automatically download the assemblies, create a system daemon named systemd-dns, and expose ports 53 (DNS) and 5380 (Web UI).
Alternative Installation Setups
Technitium can run on almost anything, it's not big but remember it can be writing a lot of stuff to the disk. For the logs a spinner is better than a SSD.
Docker
Docker is a good choice for setting up network-services. Use a VM for optimum insulation.
VM
You can run it on a minimal VM. See how to quickly make a VM using templates and qm
Set up Technitium
To proceed with the DNS configuration, login to the DNS server web console using the server's IP address and port 5380. Point your browser to the IP of your VM/CT http://192.0.2.253:5380/ to initialize the Technitium server.
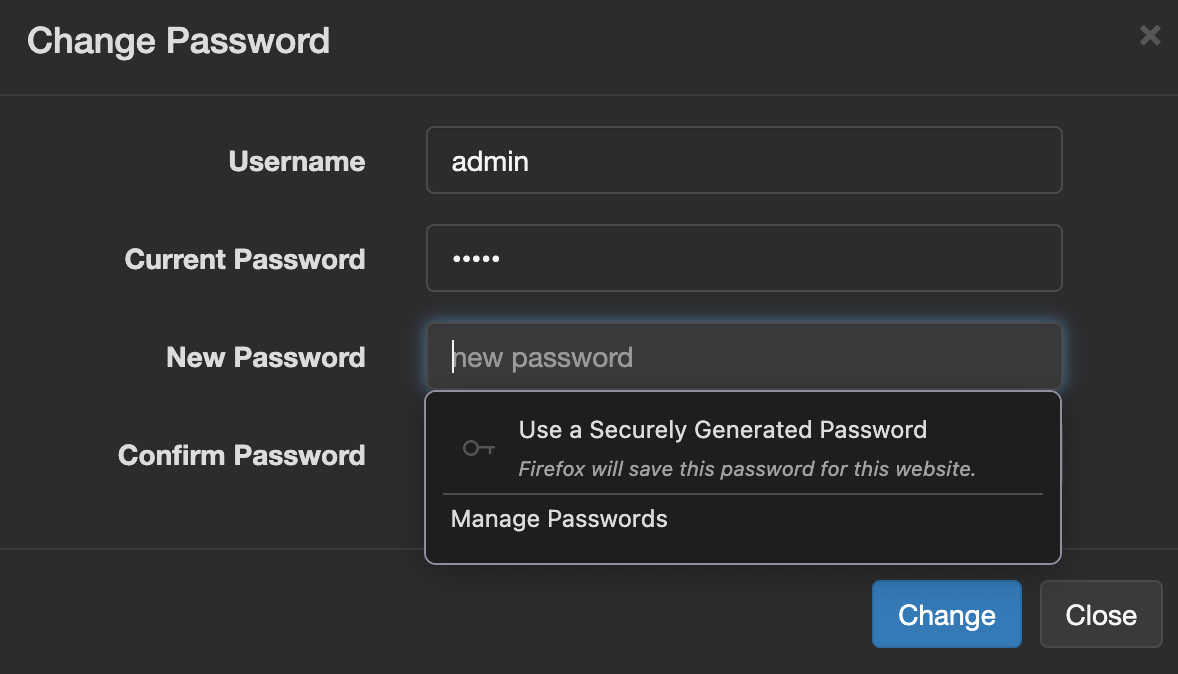
The first login is admin:admin and you automatically need to change the password before you can continue. Create a new password for admin. Later add your real users.
The Dashboard
Once you have it up and running, you can reach the dashboard.
Now, create a new secure password, the DNS server is like the key to the Castle
Make sure that your internal network clients can all reach the DNS server on UDP/TCP port 53 (DNS) as well as UDP 67 (DHCP). You may need to do some port mapping in Docker or configure some firewall rules depending on your internal network setup.
For the rest of this post, our private subnet is 192.0.2.0/24, with 192.0.2.1 as our router and 192.0.2.253 as our Primary and 192.0.2.254 for our Secondary DNS server. Replace with your prefered subnet.
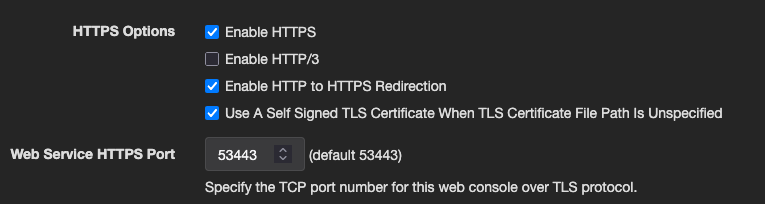
HTTPS Options
To enable HTTPS you go to Settings → Web Services and set the following:
Set up a forward zone
The next thing to do is set up your forward zone which maps names to IP addresses. Go to the Zones tab.
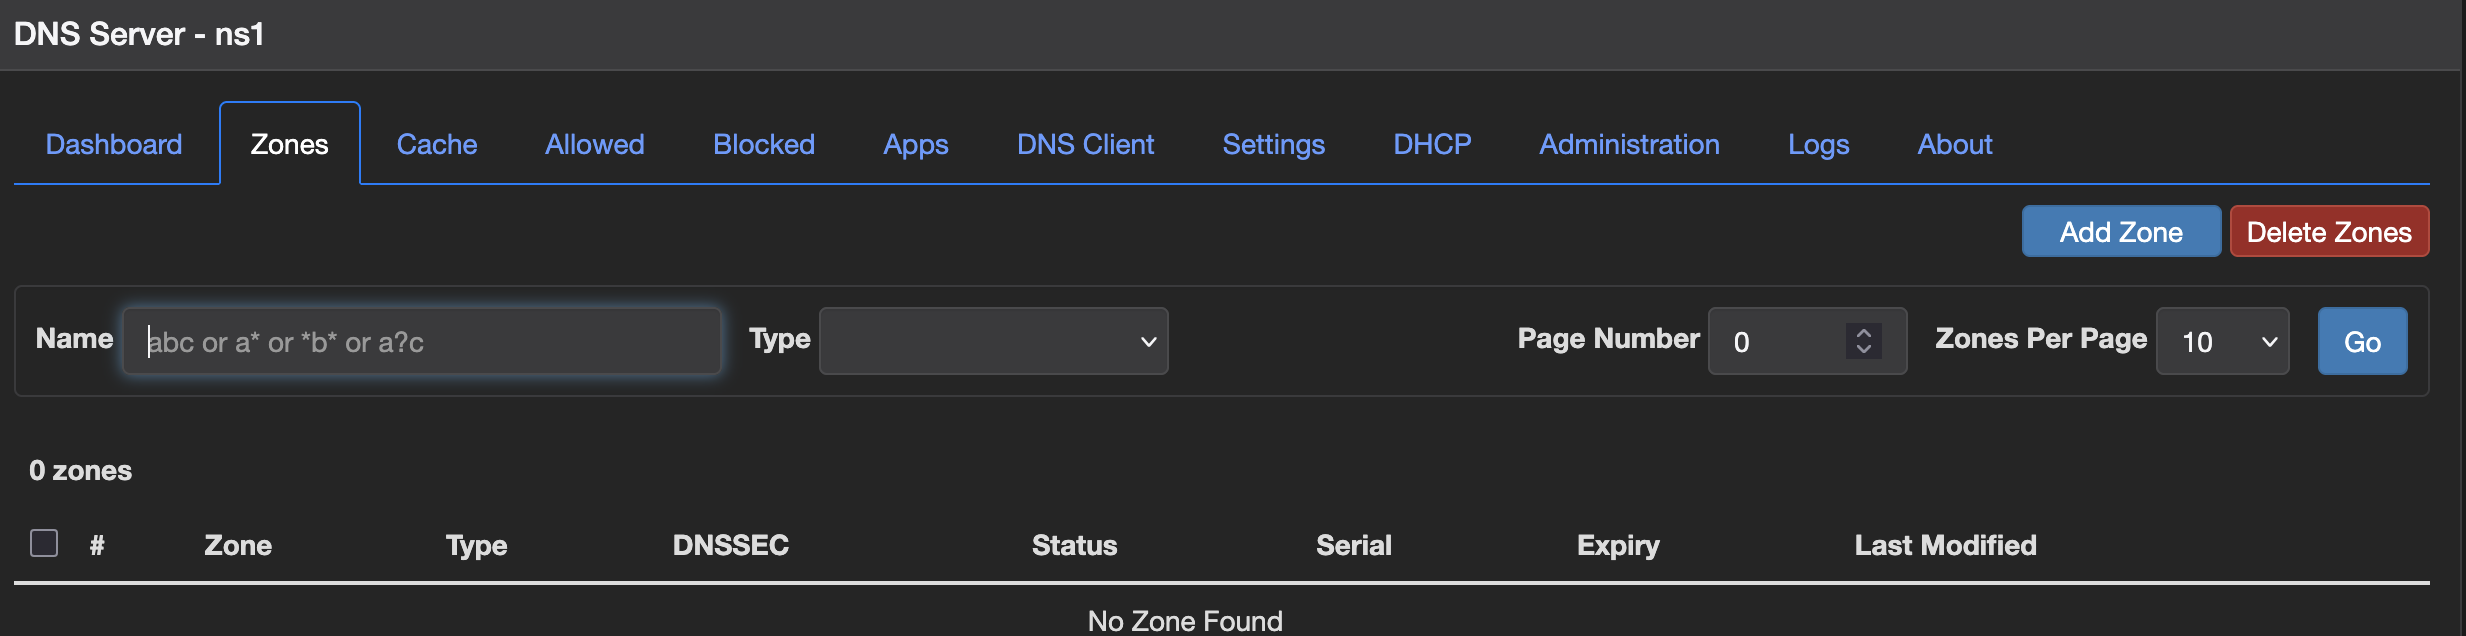
Click the Add Zone button and fill out the form to set up your zone: mylab.lan.
Adding the Primary Zone
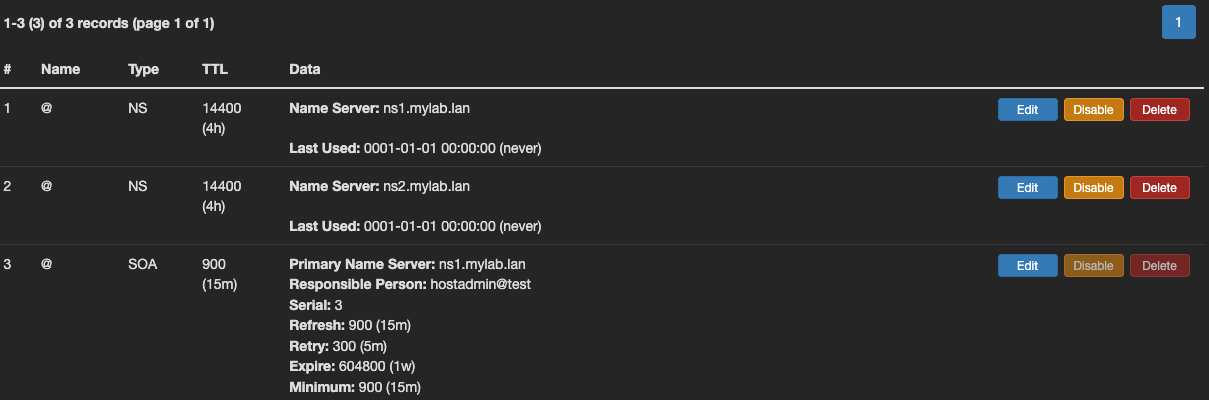
Use the default Primary Zone type. Once you create the zone, it gets some default records, like :
mylab.lan
Edit the SOA record
Once you have created the primary zone, you will see only one NS record and an SOA record. Edit the SOA record and enter a valid email address as the Responsible Person: on which you can receive emails and save the record.
Primary Name Server: ns1
Responsible Person: [email protected]
Edit the SOA record to look like this.
Clusterd NS records
The clustering will generate the NS records to all the Technitium servers.
Non-clusterd NS records
- Add NS records for all of the secondary name servers that you have planned. You do not need to enter any glue address for adding the NS records.
- Add A records for all the name servers based on the list of name servers you prepared before starting the configuration. Each NS record's domain name must have a corresponding A record in the zone. If your name servers have IPv6 address, add AAAA records too for them corresponding to each NS record.
Add or Import Other Records
Add all the other records for the primary zone manually by referring at your existing DNS provider's panel or importing them Options → Import Zone.
Add DNS entries for your systems
Let’s add a couple of records for systems on our network. Click the Add Record. Here I’m adding a record for my pve-1 server and mapping it to 192.0.2.41.
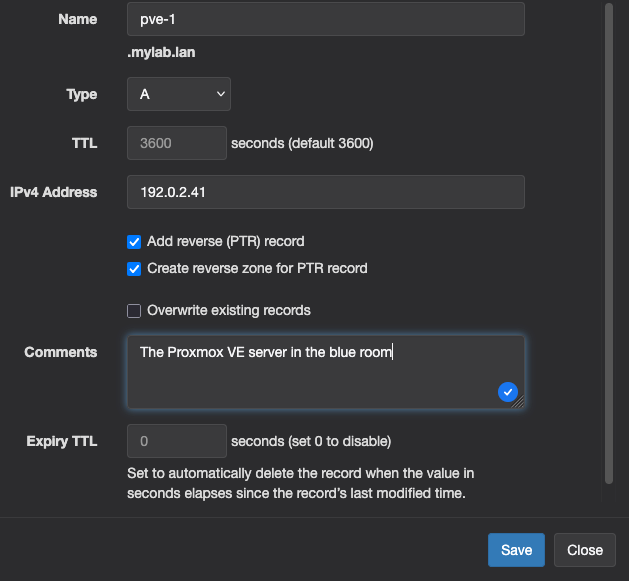
Adding a Record
An A record is the standard record to map a name to an IP address.
Using the option to create a reverse PTR record.
A PTR record maps an IP address to a name. This is a less obvious, but helpful in a few situations.
- For public DNS servers: this is one way that services like email check that the IP address trying to send the email is part of a valid domain.
- Being able to display friendly names instead of IP addresses when using troubleshooting tools like traceroute.
- Give Technitium permission to create the reverse zone, as it doesn’t exist yet.
Once add the record will be seen in the zone
And in the zone list we can see that the reverse zone is created as 2.0.192.in-addr.arpa, it's the subnet 192.0.2.0 expressed in reverse order.
If we look in that zone we can see the PTR record that was created for pve-1, with a name of 41 for the last part of its IP address.
Going back to our forward zone mylab.lan, we can continue adding A records for all of our infrastructure hosts.
CNAME
A CNAME is an alias to another name. Suppose you also want to refer to your NAS 192.0.2.40 as both nas.mylab.lan and storage.mylab.lan.
That’s all there is setting up your private DNS domain’s zones. Now any client which uses this DNS server as its nameserver will be able to resolve names like srv-42.mylab.lan to their IP addresses.
Technitium is also a full-fledged DNS resolver, it can figure out the address of any other domain name you ask about as well. We didn’t have to configure any upstream DNS nameservers, unlike with a DNS forwarder where you need to tell it to forward to a specific nameserver like Cloudflare (1.1.1.1).
Once you added all the records, the primary zone is ready for the next step.
How to Query the Logs
Please install the Query Logs (Sqlite) DNS App or any other DNS app that supports query logging feature from the Apps section.
Go to Apps and hit the App Store button to install Query Logs (Sqlite) then hit Install next to the name of thr app to install it.
- Logs all incoming DNS requests and their responses in a Sqlite database that can be queried from the DNS Server web console.
- Warning! If you set
enableVacuumtotruein the configuration, the app will run theVACUUMcommand after deletion of records which will increase disk IO and may cause the app to not respond for a while. Its recommended to enable this feature periodically, only for a while as needed, to trim the db file size on disk.
Decrease disk writes
Logging is required during the initial setup phase to ensure the system functions as intended. Once the system is stable, logging can be reduced or disabled. If you choose to modify logging behavior, make sure you fully understand the implications before doing so.
To save your disk from a lot of writes we can use the In-Memory Stats feature and still have a semi useful Dashboard. Activate it by going to Settings → Logging and the section Stats check the Enable In-Memory Stats.

Alternatively, in the Enable Logging To section, you can disable all logging, including error logs and audit logs.
Once you have added all the records, the primary zone is ready for the next step.
Option – Set up a DNS cluster
For added stability we always need at least two DNS Servers on our network.
To add a cluster we need to create a second DNS Server, ns2 and define a cluster.
For a cluster we first need to create a separate zone. It is to be used only by the cluster.
For the DNS cluster we use e.g., ns1.dns-cluster.lan, ns2.dns-cluster.lan, ns3.dns-cluster.lan. Create the DNS servers using LXC/Docker.
Create the cluster
The cluster management is handled on the Administration → Cluster tab.
On ns1 Create the cluster and on ns2 and ns3 you join them to the cluster. Easy as that.
Now you are ready to add your other zones.
Option – Set up DHCP
This is an option, but a very useful option to have.
We like the DHCP server to provide three functions for us:
- Making sure that hosts get the IP addresses we’ve assigned to them in our DNS zone. Yes you can do this manually on each host, but having it centrally managed in DHCP is more convenient and easier to change in the future.
- Making sure that all of our network devices use our new DNS server as their name server. Similarly, we can do this on each device but managing it via DHCP is far more convenient.
- Updating our DNS records as devices come and go from the network.
There are many ways to provide DHCP service on your network.
- You can use your router’s built-in DHCP service.
- Run the ISC DHCP server to complement the BIND 9 DNS server
- Run the new Kea DHCP server to complement the BIND 9 DNS server
The main reason to use Technitium for DHCP is that it integrates DHCP with DNS right out of the box, ensuring that the two stay in sync and that your private domain records are always up to date
And all is controlled from a single plane-of-glass in the Thechnitium GUI.
Set up a DHCP Scope
Go to the DHCP → Scopes tab. By default, Technitium creates a scope, the subnet 192.168.1.0. Delete it and add your own subnet/subnets.
Add the scope for the 192.0.2.0 subnet by clicking the Add Scope -button.
Define the new scope using the form presented to you.
Creating a DHCP Scope
- First the scope needs a name, and then
- Define the range of IPs we’d like the DHCP server to lease out we reserve for:
.1the router,.253the Primary and.254the Secondary DNS server.
So, e.g.,192.0.2.2–.250or rather192.0.2.50–.250for more fixed IPs - Enable the Ping Check, it's an additional safeguard to avoid introducing IP conflicts to your network if you have fixed IPs in the range.
For the Domain Name, and the Domain Search List we use mylab.lan . The Domain Search List, will be given to the clients so they know which domains to search if they have just a short name e.g. srv-42.
DNS Updates checkbox. This way the DHCP server will update any DNS records as clients come on and off the network.Entries for non-local IP-Addresses
Specify the router so that our clients will know how to route non-local network traffic, and we specify the DNS servers. You can leave the default Use This DNS Server checked, but to give it a backup uncheck it and specify the IP address of this DNS server as the primary, and then a public one like Cloudflare’s 1.1.1.1 as the secondary. This just gives clients a backup if all our DNS servers are down.
Exclusions
The IP address range/ranges that must be excluded or not assigned dynamically to any client by the DHCP server e.g., a range for fixed IP servers or a VPN IP range.
Reserved leases
The last section is where you can define reserved leases. It is important to define a reserved lease for any machine you entered as an A record in the DNS zone, so here we’ll define reserved leases for srv-42 and mynas. This means they’ll get the same IP address every time, and their IP address won’t ever be used for another machine.
Click the Save button, and you should see the new scope in the list of scopes.
Once you create the scope, it is enabled automatically. If a different DHCP server is detected, Technitium refuses to start its own DHCP server to avoid multiple DHCP servers on the network.
Success is indicated by that the Enable button is replaced with a Disable button.
Test your DHCP Clients
Now you can go to any DHCP client on your network and release and renew its DHCP lease, and it should pick up a lease from our new DHCP server. You can confirm this on the DHCP → Leases tab of the Technitium interface.
The Leases Tab
Here you will see all leases handled by Technitium. You can turn any lease from Dynamik to Reserved by hitting the 3 dots dropdown menu. Or delete it.
IP Reservations
You should add all your infrastructure devices into the Reserved Leases section.
Define DNS records and DHCP reserved leases for all servers at a minimum, as well as any other devices which need to be found by IP address, for example security cameras are added to the recording software via IP, not name.
DHCP and DNS co-operation
When a new client receives a DHCP lease, they also receive DNS entries. In a lab this is great as servers and services are generated and deleted all the time.
Edit Host Names in DHCP
If you want to chain a DHCP generated name you edit the DHCP → Scope → Edit and go to Reserveved Leases section where you change them. Having several devices called iPhone.mylab.lan is not correct, Rename adding the users name.
Option – Set up Ad-Blocking
This is optional as the main focus is to have DNS for the lab network.
A Technitium instance can also give you Ad Blocking in addition to DNS and DHCP service. Setting that up is really easy.
Go to Settings → Blocking -tab and add your favorite Blocking List from the Allow/Block List URLs and the Quick Add dropdown. Hagezi and Steven Black are industry standard what comes to block lists.
List of Apps
Advanced Blocking
Blocks domain names using block lists and regex block lists. Supports creating groups based on client's IP address or subnet to enforce different block lists and regex block lists for each group.
Advanced Forwarding
Provides advanced, bulk conditional forwarding options. Supports creating groups based on client's IP address or subnet to enable different conditional forwarding configuration for each group. Supports AdGuard Upstreams config files.
Auto PTR
Allows creating APP records in primary and forwarder zones that can return automatically generated response for a PTR request for both IPv4 and IPv6.
Block Page
Serves a block page from a built-in web server that can be displayed to the end user when a website is blocked by the DNS server.
Default Records
Allows setting one or more default records for configured local zones.
DNS64
Enables DNS64 function for both authoritative and recursive resolver responses for use by IPv6 only clients. Will cause connectivity issues for some websites without having NAT64 in place.
DNS Block List (DNSBL)
Allows creating APP records in primary and forwarder zones that can return A or TXT records based on the DNS Block Lists (DNSBL) configured. The implementation is based on RFC 5782.
DNS Rebinding Protection
Protects from DNS rebinding attacks using configured private domains and networks.
Drop Requests
Drops incoming DNS requests that match list of blocked networks or blocked questions.
Failover
Allows creating APP records in primary and forwarder zones that can return A or AAAA records, or CNAME record based on the health status of the servers. The app supports email alerts and web hooks to relay the health status.
Filter AAAA
Allows filtering AAAA records by returning NO DATA response when A records for the same domain name are available. This allows clients with dual-stack (IPv4 and IPv6) Internet connection to prefer using IPv4 to connect to websites and use IPv6 only when a website has no IPv4 support.
Geo Continent
Allows creating APP records in primary and forwarder zones that can return A or AAAA records, or CNAME record based on the continent or Autonomous System Number (ASN) the client queries from using MaxMind GeoIP2 Country database. Supports EDNS Client Subnet (ECS). This app requires MaxMind GeoIP2 database and includes the GeoLite2 version for trial.
Geo Country
Allows creating APP records in primary and forwarder zones that can return A or AAAA records, or CNAME record based on the country or Autonomous System Number (ASN) the client queries from using MaxMind GeoIP2 Country database. Supports EDNS Client Subnet (ECS). This app requires MaxMind GeoIP2 database and includes the GeoLite2 version for trial.
Geo Distance
Allows creating APP records in primary and forwarder zones that can return A or AAAA records, or CNAME record of the server located geographically closest to the client using MaxMind GeoIP2 City database. Supports EDNS Client Subnet (ECS). This app requires MaxMind GeoIP2 database and includes the GeoLite2 version for trial.
Log Exporter
Allows exporting query logs to third party sinks. It supports exporting to File, HTTP endpoint, and Syslog (UDP, TCP, TLS, and Local protocols).
No Data
Allows creating APP records in Conditional Forwarder zones to return NO DATA response for requests that match the configured query type (QTYPE) to prevent them from being forwarded.
NX Domain Override
Overrides NX Domain response with custom A/AAAA record response for configured domain names.
Query Logs (MySQL)
Logs all incoming DNS requests and their responses in a MySQL/MariaDB database that can be queried from the DNS Server web console.
Query Logs (PostgreSQL)
Logs all incoming DNS requests and their responses in a PostgreSQL database that can be queried from the DNS Server web console.
Query Logs (Sqlite)
Logs all incoming DNS requests and their responses in a Sqlite database that can be queried from the DNS Server web console.
Query Logs (SQL Server)
Logs all incoming DNS requests and their responses in a Microsoft SQL Server database that can be queried from the DNS Server web console.
Split Horizon
Allows creating APP records in primary and forwarder zones that can return different set of A or AAAA records, or CNAME record for clients querying over public, private, or other specified networks.
Enables Address Translation of IP addresses in a DNS response for A & AAAA type request based on the client's network address or configured domain names, and the configured 1:1 translation.
Weighted Round Robin
Allows creating APP records in primary and forwarder zones that can return A or AAAA records, or CNAME record using weighted round-robin load balancing.
What Is My Dns
Allows creating APP records in primary and forwarder zones that can return the IP address of the user's DNS Server for A, AAAA, and TXT queries.
Wild IP
Allows creating APP records in primary and forwarder zones that can return the IP address embedded in the subdomain name for A and AAAA queries. It works similar to sslip.io.
Zone Alias
Allows configuring aliases for any zone (internal or external) such that they all return the same set of records.
And now we have
- A private DNS for our domain
mylab.lan - Defined our hosts in our DNS zone
- Secured DNS by a cluster – option
- The DHCP server make sure that: – option
- all clients point to the right nameserver
- DNS knows about everyone on the network.
- Ad-Blocking – option
References
About IPs [1] Technitium [2] RFC 6762 [3] RFC 8375 [4] Bind 9 [5]
IPv4 Address Blocks for Documentation are by RFC 5737:
TEST-NET-1 =192.0.2.0/24, -2 =198.51.100.0/24, -3 =203.0.113.0/24↩︎Technitium DNS server has 30+ contributors homepage and on GitHub ↩︎
Proposed Standard: Multicast DNS RFC 6762 ↩︎
Proposed Standard: Special-Use Domain '.home.arpa' RFC 8375 ↩︎
The industry standard DNS Bind 9, ISC DHCP, KEA DHCP and the GUI Stork. All provided by the Internet Systems Consortiom homepage ↩︎


