Hardening Servers 3
The only secure server is: the one that has never started and never had a network cable attached to it! A list of 16 things to start with. #security #server #ssh #2fa #keys #tokens #email


Hardening Servers is like building defenses around a castle. It's a layered defense and its defenses are equally for outside (from the web) and inside (from the LAN) attacks. Why also LAN you may ask, if a laptop is plugged in you do not know where it has been used and if it's compromised, maybe yours you know but a teenagers laptop ...
Q: Will this make my server hack proof? A: Absolutely NO.
But it will make it harder to break than some other system. That is the point, hackers can't afford to waste time - they attack the weakest like the hyenas.
A To Do List of Things to Harden a Server
Prepare to be attacked and remember if it’s possible it will happen.
Successful Systems Security has 3 phases:
- Protection: Configure systems and networks correctly and ensure there are no vulnerabilities. Keep systems up to date. Keep Users up to date.
- Detection: Identify dangers before the attacker does damage or spreads through the network. Monitor our systems and identify changed behavior.
- Reaction: Quickly eliminate threats and return all systems to a safe state.
the one not ever started and never had a network cable attached!
The ISP Router box
The Router/WLAN boxes from the ISP is basically the cheapest they could get. It typically has a crappy Firewall, a Crappy WLAN and some other crappy stuff.
I called around to my local ISP's and asked them for their recommendations on router boxes: "exchange it no later than 2-4 years from install", "we have no liability what so ever" and then they wanted to sell me a new one, the same crappy one but newer, but after some discussion all had a business grade Firewall to sell - for a higher than modest price. All routers can't be replaced by the user do to some strange rules the ISP seems still use, in these cases you can add an second layer and install a Firewall of your choice after the ISP Router.This may cause a inconvenience with double NATing but usually it works well. Or buy a Business Firewall from the ISP it is costly but better.
Run LTS releases
Long Time Support releases are generally a much better and more secure choice than the latest release that may still have some more unfixed holes .
Update your Servers
Security patches need to be applied or your servers are vulnerable. You can do it manually or automatically. A auto-update strategy is good if you can reboot your server, as home users we can. Even many corporate systems have maintenance windows for servers. See Automatic Update.
sudo update && sudo dist-upgrade -yNever promote a Server to Production before it's fully updated
Automatic Updates
Unattended Updates is easy to set up and configure. It might already be installed, if so skip to config.
sudo update && sudo install unattended-upgradesCheck if its running by systemctl status unattended-upgrades.service if not start it by
sudo dpkg-reconfigure --priority=low unattended-upgrades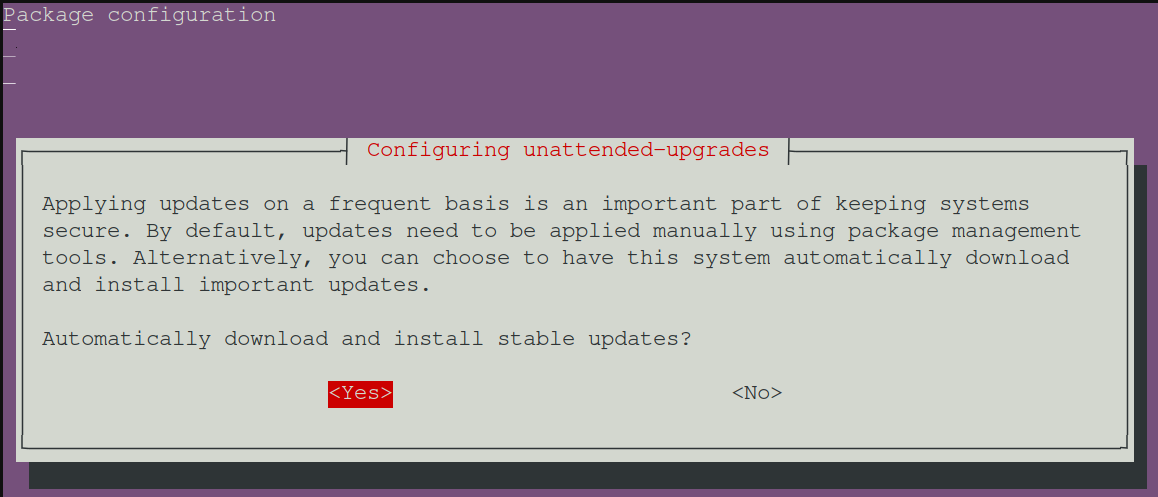
Check that its setup for automatic updates and automating upgrades:
sudo nano /etc/apt/apt.conf.d/20auto-upgradesBy default unattended-upgrades runs with cron.daily, that is at most on a daily basis. If you prefer weekly change the "1" (daily) to a "7" and disable by using a "0". After version 1.5 (to see yours apt-cache policy unattended-upgrades) it's possible to define the interval in seconds, minutes and hours by adding suffixes s, m or h, so you could change the "1" to "8h" for running it every 8 hours.

The config files will be found in: /etc/apt/apt.conf.d/
Then we need to edit the file 50unattended-upgrades and change a few settings.
sudo nano /etc/apt.conf.d/50unattended-upgradesThe section Unattended-Upgrade::Allowed-Origins is good as-is for Servers
The //Unattended-Upgrade::InstallOnShutdown "false"; // means it's commented out. If you prefer to only update at reboot , remove the // and change "false" to"true". I prefer not to alter this.
What I consider important is to change the //Unattended-Upgrade::Mail ""; and to change the following mail related parts, change to something like: Unattended-Upgrade::Mail "[email protected]";.
Set up Postfix and lock it down to ensure it's not a security risk.
To control when to send a mail, uncomment it and set this to the value to one of: "always", "only-on-error" or "on-change". Usually "only-on-error" is a good choice if you have many servers. If you want to know that a upgrade really happened you could use "on-change". //Unattended-Upgrade::MailReport "on-change";
For enterprise use where you have tens of thousands of servers this is not a practical command. ⚠️ This can also be dangerous.
Uncomment this line //Unattended-Upgrade::Remove-Unused-Kernel-Packages "true"; to ensure the boot partition isn't filled up with old kernel and can't boot.
Uncomment and set to true //Unattended-Upgrade::Remove-New-Unused-Dependencies "true"; and //Unattended-Upgrade::Remove-Unused-Dependencies "false"; It will clean out unnecessary packages to make the server more secure.
Now the following is not for servers running mission critical servers that run 24/7. For them a Live Patch solution should be considered, they do updates without reboot. Banks and ISP's do run mission critical services 24/7, but they just inform us when a maintenance will occur and tell us to "learn to live with it".
For home user uncomment this and set to "true": //Unattended-Upgrade::Remove-Unused-Dependencies "false"; It will reboot the server when needed and without confirmation.
For corporate or home office use you could do this and set the time equal the service window reserved for updates and other maintenance of the IT infra. After version 1.5 you are able to set up the cycle with h m s e.g. every "8h" instead of "01:00". Check version by apt-cache policy unattended-upgrades. Unattended-Upgrade::Remove-Unused-Dependencies "true"; Unattended-Upgrade::Automatic-Reboot-Time "01:00";
To control reboot when an admin is working on the Server during the maintenance window use the line //Unattended-Upgrade::Automatic-Reboot-WithUsers "true";
To read the logs if you do not use eMail use cat/batcat, tail or grep:
sudo cat /var/log/unattended-upgrades/unattended-upgrades.logsudo tail -f /var/log/unattended-upgrades/unattended-upgrades.logsudo grep 'linux-image' /var/log/unattended-upgrades/unattended-upgrades.log
There is many more setting you can play with. Some like black- and whitelist, download speed, on AC only and logging related settings for integration into auditing systems. Test the settings by sudo unattended-upgrade -d.
Create a non-root user
You should never ever run as root. Root access should be confined and blocked as tight as possible. Ubuntu Servers are good as the come already prepared for it.
Be aware that cloud servers have the root account unlocked at set up.
You need to add a SUDO or WHEEL user so you do not need to login as root. Logging in as root is never a good practice and is actually quite dangerously.
Add a admin user by adduser <user-name> and when prompted for it, type in the password and other info if you like.
Add the user to the superuser group usermod -aG <user-name> sudo or wheel.
Check that the user is part of the SUDO Group groups <user-name> and then test logging in with the new user as sudo, su - <user-name> and the you will see that you have the superuser $ and you can ls /etc after giving your password
Secure Passwords
Use a random password generator like this or the one supplied by Firefox or Apple. You will need a password manager, a good password cant be remembered. You can use BitWarden or even Apple Passwords to remember them.
All Machines, Servers and Desktops should have their own Passwords and all Users should have their own passwords.
Don’t Open Services to the Internet.
The basic thing is to keep the Threat Surface as small as possible
- Only expose a service to the internet if it’s business critical.
- Don't expose Dashboard to the internet - it's a very bad habit.
There is cases where you need to have access to remote servers, use a port less VPN tunnel or at least a VPN tunnel. Close the tunnel after you are finished.
Setup Fail2ban
On many server repo's it's installed by default but if not - do install it.
sudo apt update && sudo apt install fail2ban -yFail2ban will automatically set up a background service after being installed. However, it is disabled by default, because some of its default settings may cause undesired effects. Verify it by: systemctl status fail2ban.service.
You can also see what Fail2ban is protecting by: sudo fail2ban-client status.
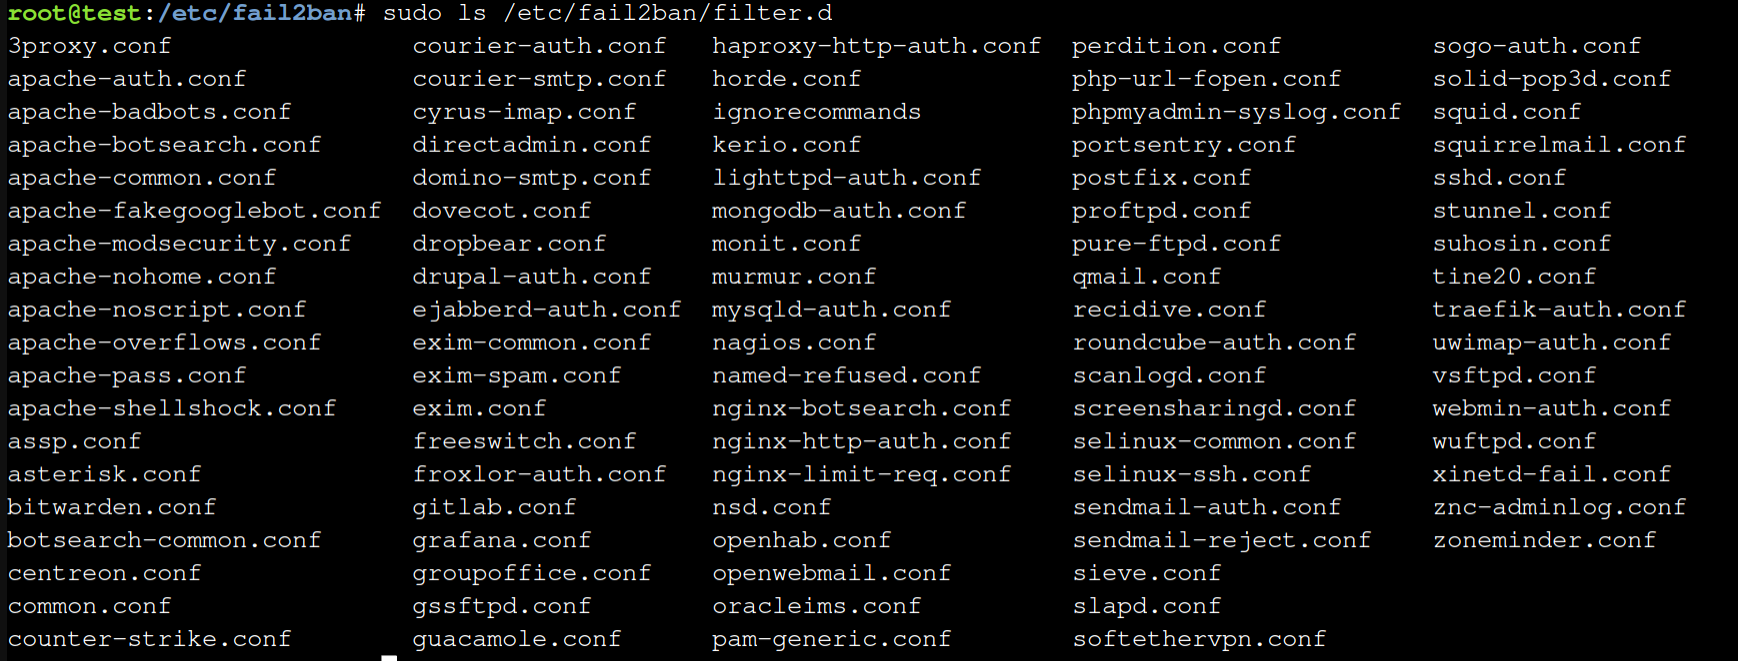
The Fail2ban service keeps its configuration files in the /etc/fail2ban directory.
Configure Fail2ban
Create your local jail fail by copying the jail.conf to jail.local: sudo cp /etc/fail2ban/jail.conf /etc/fail2ban/jail.local
Edit the configuration file by: sudo nano /etc/fail2ban/jail.local
Update the initial settings under the [DEFAULT] section.
- ignoreip – a list of ip address to ignore from ban by Fail2ban.you wish to whitelist some IP addresses, IP ranges, or hosts from getting blocked by the file2ban service.
- bantime – is the number of seconds that a host is bannedTo reduce or increase the time period, simply change the default 10 minutes to whatever you want. 10 min is default and it's okTo block the Ip-address permanently use some negative value.
- findtime – a host is banned if it has generated “maxretry” during the last “findtime” seconds. E.g. someone is trying to log in, if he made 5 attempts in stipulated 10 minutes, then his IP gets blocked for 10 min.
- maxretry – is the number of failures before a host get bannedBy default it's set to five but a number 2-5 is ok.
[DEFAULT]
ignoreip = 127.0.0.1/8 ::1 192.168.1.0/24 10.10.10.10
bantime = 10m
findtime = 5m maxretry = 5
Activate the changes by sudo fail2ban-client reload.
Next you can secure the system services. By default SSH is active but this is a list of current filters:

Activate some filters
In the Jails section services are grouped by functions like HTTP servers, locate the service and add a line under the heading enable = true. You can also create your own filters for use with fail2ban.
[nginx-http-auth]
enable  = true
port    = http,https
logpath = %(nginx_error_log)s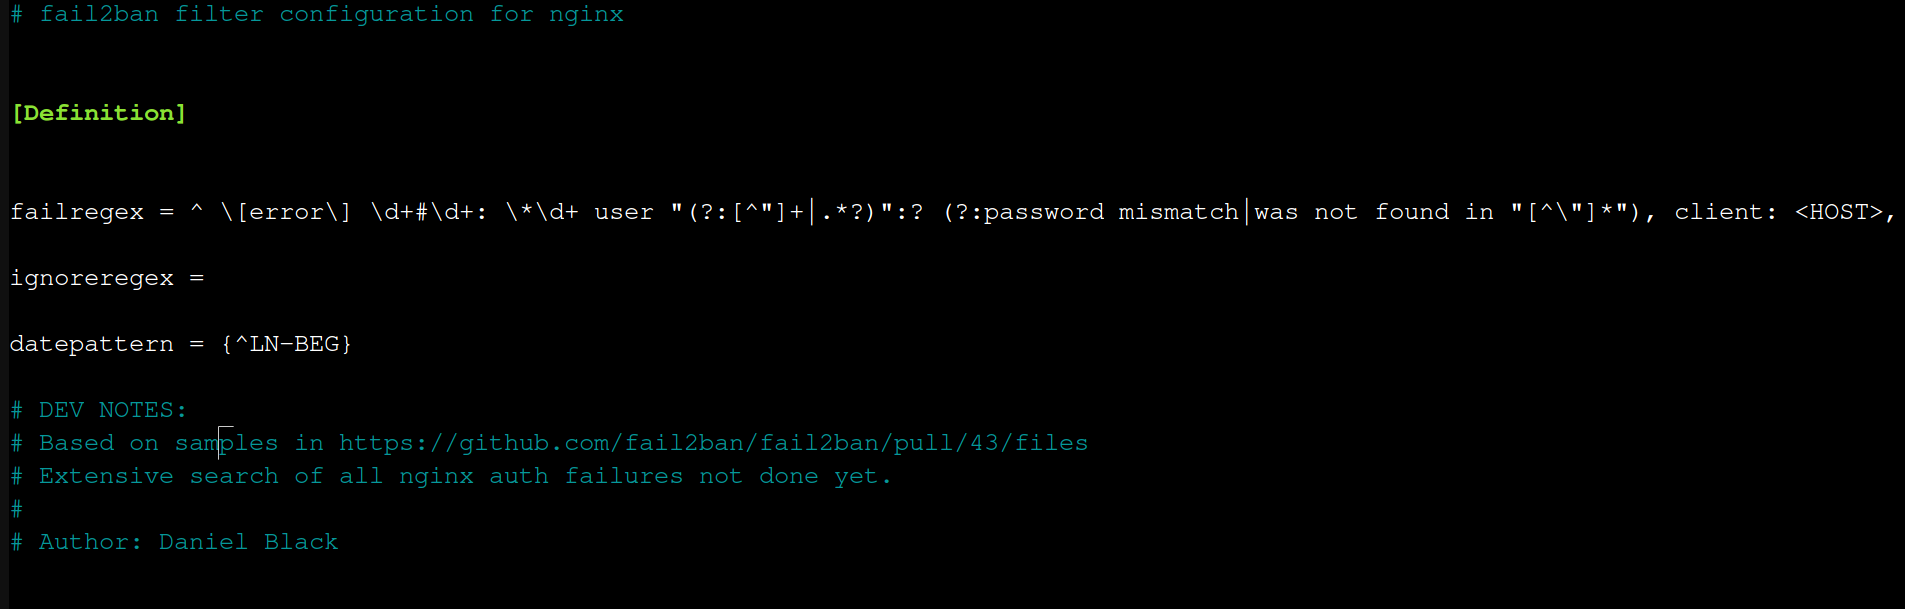
Proxmox Config
[proxmox]
enabled = true
port = https,http,8006
filter = proxmox
backend = systemd
maxretry = 3
findtime = 2d
bantime = 1h
Add to /etc/fail2ban/jail.local
[Definition]
failregex = pvedaemon\[.*authentication failure; rhost=<HOST> user=.* msg=.*
ignoreregex =
journalmatch = _SYSTEMD_UNIT=pvedaemon.service
/etc/fail2ban/filter.d/proxmox.conf
Other Services
In the /etc/fail2ban/filters.d folder you can see all the configuration filter files for each fai2ban Jail service available. You have to enable them to use or you can create your own.
Fail2ban can send email alerts
Yes, if some IP gets banned you can receive a mail notification of it.
However, you have to enable and define what email address you want to use to receive the notification. There are three key settings we have to edit in the jail.local file to get emails notification.
- destemail – mail address that will use to get a notification.
- sender – email address from which fail2ban will send the emails.
- action - declares when to send a mail
E.g. IP gets banned: send a mail action = %(action_)s or a mail with included log infoaction = %(action_mwl)s
See fail2ban homepage and man page for more details
Manage Fail2ban Service
After making all the changes, save your file and restart Fail2ban service using the following commands.
sudo systemctl restart fail2ban.service sudo systemctl enable fail2ban.service sudo systemctl status fail2ban.service With that done, you should now check your iptables rules for the newly added jail sections on each of the application modules you enabled.
sudo iptables -Lsudo fail2ban-client status
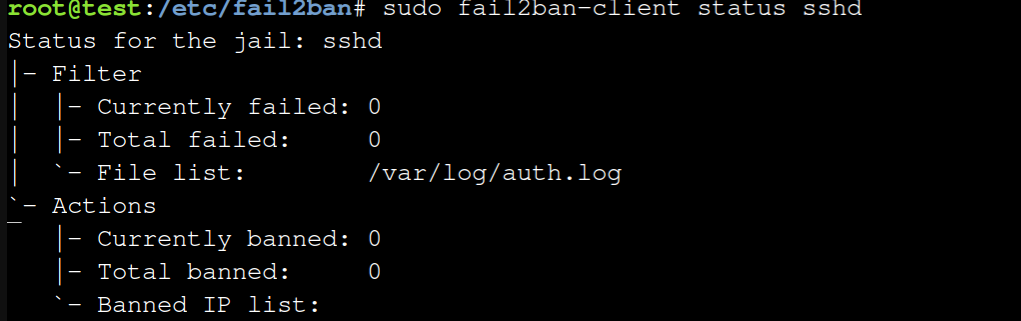
To check the status of one service: sudo fail2ban-client status sshd
Testing blocking and unblocking a PC
For this test a recommend to use an other PC and block it's access to your server.
Ban an IP
sudo fail2ban-client set <jail> banip <ip address>If you log in now, it should fail is Fail2ban is working correctly.
Unban an IP
sudo fail2ban-client set <jail> unbanip <ip address>If you log in now, it succeeds if Fail2ban is working correctly.
For example:
ban sudo fail2ban-client set sshd banip 192.0.2.100unban sudo fail2ban-client set sshd unbanip 192.0.2.100
Lock down OpenSSH
Login as root using a password is really dangerous. Use the sudo user for access from point 4. For intranet access restrict to only the management network or management user/users. For remote access restrict access to the VPN end point. to have access. Restrict login to keys only - no passwords allowed.
Create your key
Create your ssh-keygen -t ed25519 a elliptic curve key. The public key is the id-ed25519.pub and the private key is id-ed25519. Use a pass-pfhrace if possible.
Don't overwright a in-use key!
Now you can copy your public key to any server by ssh-copy-id -i ~/.ssh/id_ed25519.pub [email protected]. The server will ask you for your password.
If you like you can generate a set of keys, one per server or service.
Secure SSH
After you copied the key to your server, test it by logging in ssh [email protected] and you will not be asked for a password but if you have a pass-phrase it will ask for it.
Open a new session just in case somtehing goes sideways. It's a good practis to make a copy of the config file by sudo cp /etc/ssh/sshd_config /etc/ssh/sshd_config.orig.
Edit the SSH config by sudo nano /etc/ssh/sshd_config.
Scroll down to the line PermitRootLogin - set it to no
Next the really important line. Scroll down to the line PasswordAuthentication - uncomment and set it to no.

Restart the SSH service systemctl restart sshd

Close one of the windows and try to re-login, if everything is OK then we can close down both terminal windows. The other one was just in case of we can't log-in.
This is the basic things to do but you might like to make it even more strict.
Layered Security
Use more ways of hardening is better. Today it's more than securing open ports on the network ore just a firewall that do everything - no it's highly complex.Chose your set of things making it harder for some one to get to your servers and services. And keep them up to date. These 15 is not all you could do. Continu to evaluate what to do for a better security.
The 7 Layers Of Cybersecurity from Mindsight
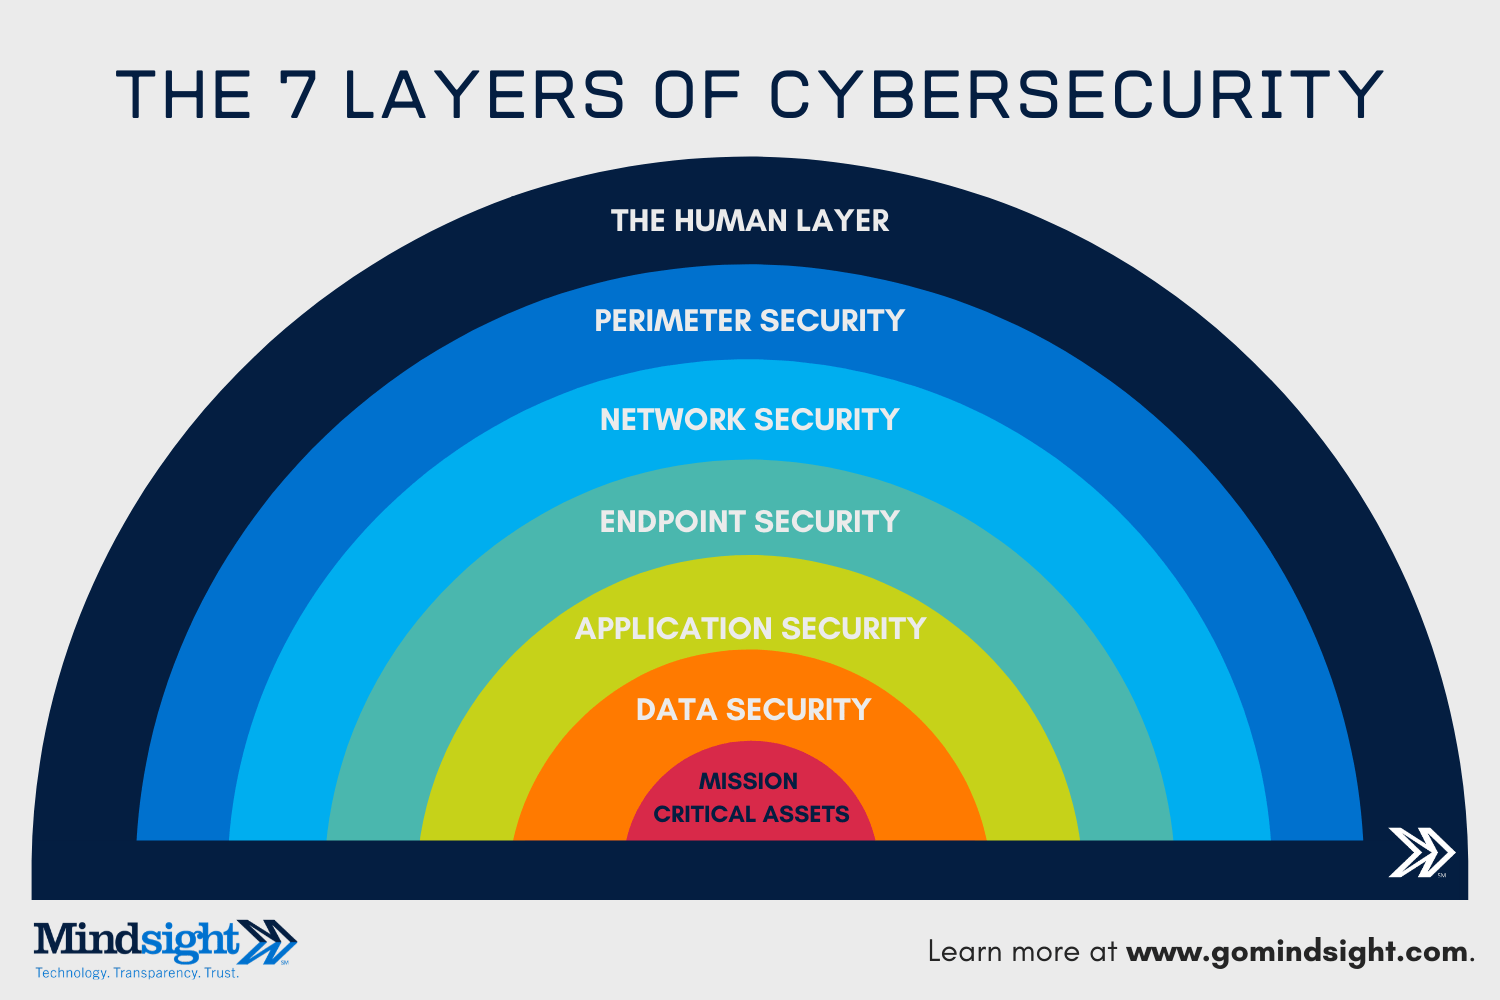
The 7 layers of cybersecurity should center on the mission critical assets you are seeking to protect.
1: Mission Critical Assets – This is the data you need to protect*
NOT ALL DATA IS CREATED EQUAL and does not require equal levels of protection. Identifying the kinds of data you have, categorizing that which is mission critical, and centering your security program around that is a smart first step towards a more secure organization.
2: Data Security – Data security controls protect the storage and transfer of data.
3: Application Security – Applications security controls protect access to an application, an application’s access to your mission critical assets, and the internal security of the application.
4: Endpoint Security – Endpoint security controls protect the connection between devices and the network.
5: Network Security – Network security controls protect an organization’s network and prevent unauthorized access of the network.
6: Perimeter Security – Perimeter security controls include both the physical and digital security methodologies that protect the business overall.
7: The Human Layer – Humans are the weakest link in any cybersecurity posture. Human security controls include phishing simulations and access management controls that protect mission critical assets from a wide variety of human threats, including cyber criminals, malicious insiders, and negligent users.
In the near future with the growing use of AI we will se data as a cheap commodity without any greater value. We will move from protecting data to protectiong knowlege of processes how to use data.
Backups, backups and backups
Use fully tested and multiple layered Backup strategies. Backups are the tool to securely get back up and running, when somethings goes sideways or after an attack.
Follow the 3-2-1 backup rule
Whether it is disruptions caused by accidental deletions and hardware failure or more severe accidents like natural disasters or malware attacks, maintaining access to data is critical.
The 3-2-1 rule, attributed to photographer Peter Krogh over 20 years ago,
follows these easy requirements:
- 3 Copies of Data – Maintain three copies of data — the original, and at least two copies.
- 2 Different Media – Use two different media types for storage. This can help reduce any impact that may be attributable to one specific storage media type. It’s your decision as to which storage medium will contain the original data and which will contain any of the additional copies.
- 1 Copy Offsite – Keep one copy offsite to prevent the possibility of data loss due to a site-specific failure.
A single copy of critical data may seem to be sufficient to recover from. However, at the heart of every robust data protection plan is the 3-2-1 backup rule. Today, this rule is a universally accepted strategy within the IT industry and beyond. The 3-2-1 backup approach is recommended by information security professionals and government agencies like the Cybersecurity and Infrastructure Security Agency (CISA) in the USA (in the Data Backup Options document by US-CERT).
Most enterprices go much farter than just the basic 3-2-1 rule, a type of 3-2-1-#-#-#rule. The 3-2-1 rule is over 20 years old but still the de-facto rule in IT.
Use monitoring tools
Zabbix is my choice of monitoring system, see my blog. Just knowing a server is up don't really tell you anything. You need to now if it's behaving normally or not.
- Monitor a multitude of things
- Use alerts 🚨
- Use email alerts 🔔.
Systems Security Auditing
Internal SSA is the start of the process. Use a 3d party System Security Auditing if you can afford it, it’s dam expensive. See my blog.
Business Continuity Strategy
Create a Business Continuity Strategy for bad and worst case scenarios. In many areas nature is not that easy on you and earthquakes are not nice, wildfires are also bad and getting more frequent every year as the global worming continues, flooding is also a major problem in many places and the rising sea levels is making it worse.
House fires happen and cars do drive through the walls from time to time and the electricity is interrupted due to treas falling from snow and wind or by human intervention in some form. Diggers is a major problem to data and electrical cables every where what ever we do it seams.
Keys and Tokens
Forget the old habit of using passwords and go for keys and tokens and include Two-factor authentication (2FA) or Multi-Factor Authentication (MFA) into your lock-down strategy. For Business Security 2FA is the absolute minimum level of security measures. Two-Factor Authentication (2FA) is a form of authentication that requires only two authentication factors. The first factor is your username and password and the second factor is another method that you choose.
The four different types of authentication are:
- Something you know: Password, PIN or security question.
- Something you have: Physical token or virtual token such as a One-Time Password (OTP) or Time-Based One-Time Password (TOTP).
- Something you are: Biometric data such as Face ID.
- Somewhere you are: Apps and services only accessible to users within a specific geographic location.
MFA systems require users to provide at least two different factors from two different categories. Typical use-cases for MFA includes online accounts, such as email, online banking, ATMs and cloud storage, as well as physical access to buildings and other secure areas.
Create tokens for your services best to use ED25519 with a passphrase. In some use cases keys it may be better not to use passphrases.
Use app-tokens when ever it's possible to make your services secure. Especially critical assets like Backup Servers need to be secured and monitored.
The LAN can be very Dangerous
Remember to secure your server from attacks from the LAN. You never know who is connecting to your network. It is a good practices to control the WLAN with extra cation and treat all IoT devices as insecure. One of the tricks to use is to setup VLANs to segragete users by duty and servers by function.
Layer 2 Attacks
- MAC Table Attacks - Includes MAC address flooding attacks.
- VLAN Attacks - Includes: VLAN hopping in which a hacker configures a host to act like a switch, taking advantage of the automatic trunking feature enabled by default on most switch ports. VLAN double-tagging attacks in which a hacker embeds a hidden 802.1q tag inside a frame already containing one to gain access to a VLAN that would otherwise be blocked.
It also includes attacks between devices on a common VLAN. - DHCP Attcks - Includes things like: DHCP starvation in which a hacker embeds a hidden 802.1q tag inside a frame already containing one to gain access to a VLAN that would otherwise be blocked. DHCP spoofing attacks in which a hacker attempts to consume all legitimate DHCP leases by sending DHCP discovery messages with fake MAC addresses.
- ARP Attacks - Includes ARP spoofing and ARP poisoning attacks. Gratuitous ARP vulnerability that allows hosts to send unsolicited replies to network hosts. Threat actors abuse this feature for ARP spoofing and poisoning attacks.
- Address Spoofing Attacks - Includes MAC address and IP address spoofing attacks.
- STP Attacks - Includes Spanning Tree Protocol manipulation attacks.
- Cisco Discovery Protocol (CDP) - A Cisco proprietary Layer 2 protocol that gathers information about neighboring Cisco devices, such as host name, IOS version, and IP addresses.
- Malware - An attack in which hosts are infected with malicious software that can cause a variety of problems.
Layer 2 Attack Mitigation
- Port Security - Prevents many types of attacks including MAC address flooding attacks and DHCP starvation attacks.
- DHCP Snooping - Prevents DHCP starvation and DHCP spoofing attacks.
- Dynamic ARP Inspection (DAI) - Prevents ARP spoofing and ARP poisoning attacks.
- IP Source Guard (IPSG) - Prevents MAC and IP address spoofing attacks
Layer 2 solutions will not be effective if the management protocols are not secured. For example, the management protocols Syslog, Simple Network Management Protocol (SNMP), Trivial File Transfer Protocol (TFTP), telnet, File Transfer Protocol (FTP) and most other common protocols are insecure. Always use secure variants of these protocols
The following are recommended
- SSH, Secure Copy Protocol (SCP), Secure FTP (SFTP), and Secure Socket Layer/Transport Layer Security (SSL/TLS).
- Consider using out-of-band management network to manage devices.
- Use a management VLAN where nothing but management traffic resides.
- Use ACLs to filter unwanted access.
Final words
Cyberattacks have become more sophisticated, extensive, frequent and more difficult to defend against. Many cybersecurity experts believe that these attacks will only continue to grow more complex and aggressive. The Russian invasion of Ukrain in 2008 and total war 2022 made it even more intense and wide spread.
Some of the most prevalent types of network security attacks you should be aware of include but not limiting to the following:
- Data Theft: Also called data exfiltration or data breach. Attackers frequently use stolen login credentials to read protected files or steal the data while it is in transit between two network devices. An attack in which an organization's data servers or hosts are compromised to steal confidential information.
- Insider Threat: As its name implies, insider threats come from employees within. These employees use their own access to infiltrate the network and obtain company information for their ovwn use, Industrial Espionage.
- Malware Attacks: A malware attack can cause a variety of problems. It occurs when a malicious code (malware) inserts undesired, unauthorized software onto a network device. Malware can easily spread from one device to another, making it very difficult to get rid of entirely.
- Password Attacks: Any type of attack that involves someone attempting to use a password illegitimately is considered to be a password attack. The hacker may obtain access either by guessing, stealing or cracking a password.
- Social Engineering: These attacks use deception and falsehoods to convince others to give up private information, such as an account password, or to violate security protocols. Social engineering attacks often target people who are not tech-savvy, but they may also target technical support staff with false requests for help.
Of course, these are only a few of the many ways that hackers may try to infiltrate network systems, and they will continue to develop new, creative ways to do so. Always pay attention to any unusual activity you happen to notice, and don’t hesitate to investigate the matter further.
References
Password managers [1]Dynamic software updating DSU [2] Fail2ban [3] OpenSSH [4] Zabbix Monitoring [5] Digital signature [6] Unattended Upgrades [7] Layerd Security Mindsight [8] and IBM [9] Planing Internet Security [10] CCNA 2 v7.0 Module 10 [11] Gartner Network Security [12]
Other parts of this series [13]
List of password managers on Wikipedia , Bitwarden Home Page Use a Password generator page About Password strength Wikipedia and this page ↩︎
Read more abouth Digital signature on this page and abouth ED25519 keys on this page ↩︎
Layerd Security by Mindsight. Read abouth it on their page ↩︎
The layered defense approach to security by IBM read this page ↩︎
CCNA 2 v7.0 Curriculum: Module 10 – LAN Security Concepts page Switch Security Configurations page WLAN Concepts page ↩︎
17 Network Security Consepts and Acronyms You Need to Knowpage ↩︎
Security Audit and Hardening post Hardening your Servers blog Hardening Servers 3 blog Proxmox Backup Server blog Moitoring your Serversblog ↩︎


