Setup SDN in Proxmox
SDN The Software-Defined Network enables the creation of virtual zones and networks (VNets) including a DHCP. This functionality simplifies advanced network configurations for home labbing. The benefits in a more responsive and adaptable network infra. #pve #sdn


The Software-Defined Network (SDN) feature in Proxmox VE enables the creation of virtual zones and networks (VNets), which enables users to effectively manage and control complex networking configurations and multi tenancy setups directly from the GUI at the datacenter level. A perfect match for any lab.
Use cases for SDN range from an isolated private network on each individual node to complex overlay networks across multiple Proxmox VE clusters on different locations. The benefits result in a more responsive and adaptable network infrastructure that can scale according to business needs.
See pert 2 for hands-on examples, link.
Notes on Install
Install from 8.1 USB should it do all - upgrade do not. To make SDN active on upgraded systems, you need to do, on all nodes in the cluster:
apt update && apt install libpve-network-perlNow you should have source /etc/network/interfaces.d/* in the /etc/network/interfaces configuration file.
Add the DHCP IPAM integration, install the dnsmasq package
apt install dnsmasq
# disable default instance
systemctl disable --now dnsmasq
Create a Zone
A zone will define a virtually separated network.
It can use different technologies for separation:
- Simple: Isolated Bridge, simple l3 routing bridge (NAT)
- This is the simplest plugin, it will create an isolated vnet bridge. This bridge is not linked to physical interfaces, VM traffic is only local to the node(s).
It can also be used for NAT or routed setup like a Lever 3 switch.
- This is the simplest plugin, it will create an isolated vnet bridge. This bridge is not linked to physical interfaces, VM traffic is only local to the node(s).
- VLAN: Virtual LAN are the classic method to subdivide a LAN
- This plugin will reuse an existing local Linux or OVS bridge, and manage VLAN on it. The benefit of using SDN module, is that you can create different zones with specific VNets VLAN tag, and restrict Virtual Machines to separated zones.
- QinQ: stacked VLAN (formerly known as IEEE 802.1ad)
- VXLAN: (layer2 vxlan) a tunnel on top of an existing network
- BGP-EVPN: bgp-evpn vxlan using layer3 border gateway protocol routing
You can restrict a zone to specific nodes.
It’s also possible to add permissions on a zone, to restrict a user to use only a specific zone and only the VNets in that zone
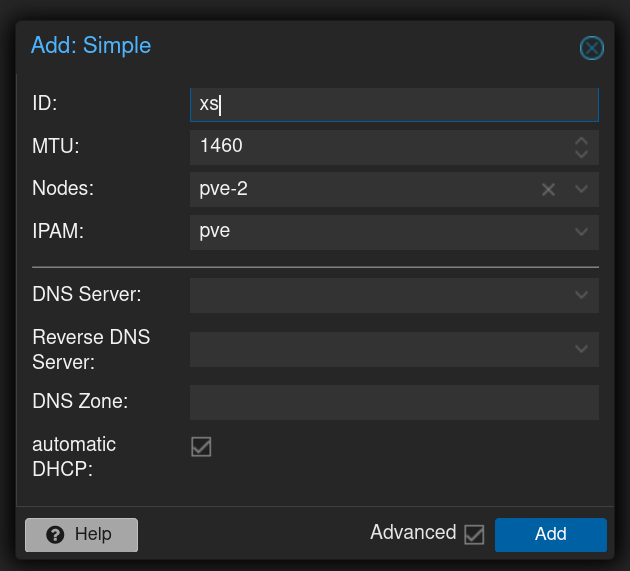
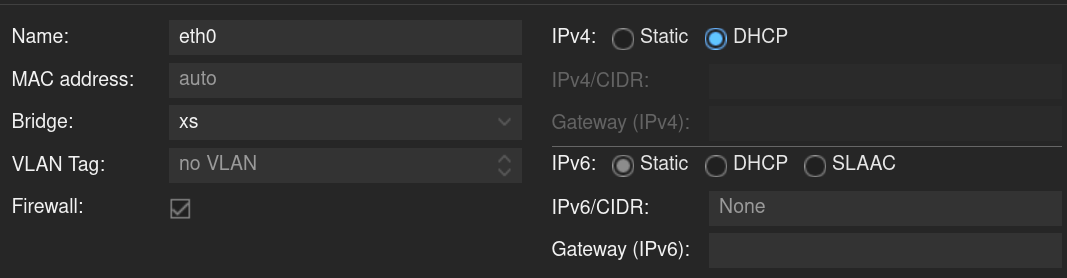
In Datacenter → SDN → Zones hit Add and choose Simple to create the network and in SDN do Apply to activate the new network. In the Network section, you now have localnetwork and the new Network you just created and applied. We also set automatic DHCP to on.
Add a VNet
A VNet is in its basic form just a Linux bridge that will be deployed locally on the node and used for Virtual Machine communication.
Create the Virtual Network (VNets) in VNets, hit Create to create a new VNet

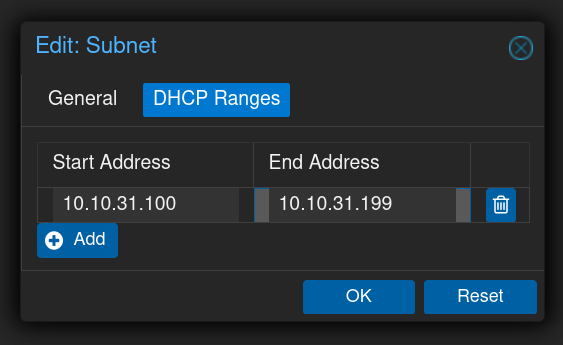
Add a Subnet
A subnetwork (subnet or subnet) allows you to define a specific IP network (IPv4 or IPv6). For each VNET, you can define one or more subnets.
Go to Subnets and add the Subnet by hitting Create and fill in the data.
Click SNAT on to reach outside the SDN Network and the rest of the world.

Activate the new Network
In SDN, do Apply to activate the new VNet and Subnet.
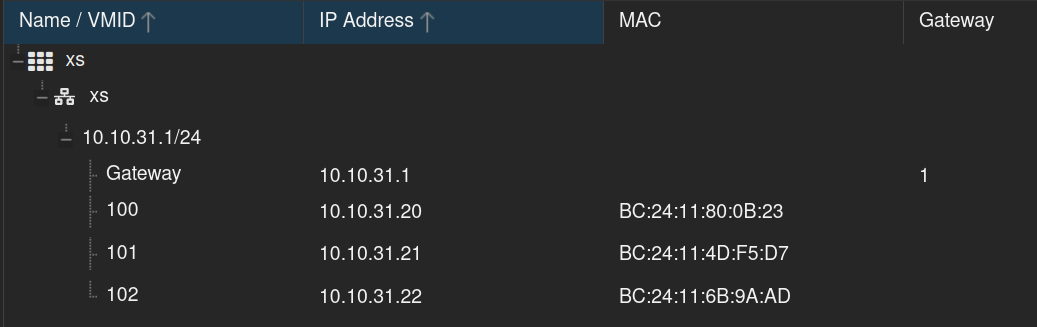
Status of SDN Network
SDN Architecture
SDN architectures decouple network control and forwarding functions, enabling the network control to become directly programmable and the underlying infrastructure to be abstracted from applications and network services.
References
SDN [1] Network Configuration [2] Wikipedia [3]


