Setting up K8s on Ubuntu 22.04
A Kubernetes cluster is a set of node machines for running containerized applications. If you’re running Kubernetes, you’re running a cluster. It's easy to make it HA with a Load Balanser. #k8s #kubernetes #ubuntu2204


Kubernetes is the next level to a Docker install - a whole cluster of containers.
A Kubernetes cluster is a set of node machines for running containerized applications. My K8s isn't big but it's growing. There is a learning curve for sure. Is it the best for a HomeLab - maybe not, K3s can be a more suited for small clusters.
Is K8s a replacement to Proxmox - No, definitively not. I use Proxmox as the Orchestration base. That said, Proxmox is not a replacement to K8s.
They both have their use cases an the HA you gain from one is different from the other. We need them both.
For me K8s is mostly testing and not (yet ?) a part of my infrastructure.
I use Ubuntu 22.04 LTS not because its easy but because it's hard. Ubuntu has started to do strange things lately but it's still my go to before switching fully to Debian and Alpine for my servers.
Kubernetes basic terms
A cluster is as a set of nodes. Kubernetes terms that help to understanding what a cluster does. Many things are familiar from Docker. This is an over simplification.
Kubernetes environments are becoming highly distributed. They can be deployed across multiple data-centers, in the public cloud, and at the edge. It's actually mind blowing what you can do and it's definitely a nightmare if you don't plan well and i detail. That said it's clear you need good training to start with K8s projects.
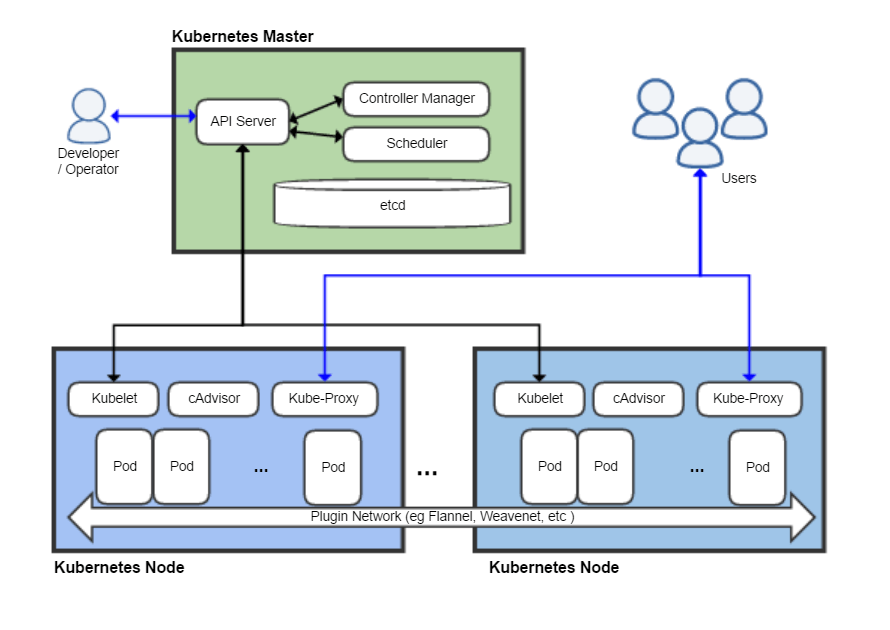
Control plane
The Kubernetes master node handles the Kubernetes control plane of the cluster.
This is where all task assignments originate, it's managing its workload and directing communication across the system.
etcd is a persistent, lightweight, distributed, key-value data store.
The consistency is crucial for correctly scheduling and operating services.
API server serves the Kubernetes API using JSON over HTTP, which provides both the internal and external interface to Kubernetes.
Scheduler is an extensible component that selects the node that an unscheduled pod runs, based on resource availability and other constraints. The scheduler tracks resource allocation on each node to ensure that workload is not scheduled in excess of available resources.
The controller manager is single a process that manages several core Kubernetes controllers, and part of the standard Kubernetes installation.
Nodes
A node, also known as a worker or a minion, is a machine where containers (workloads) are deployed. Every node in the cluster must run a container runtime, as well as the below-mentioned components, for communication with the primary network configuration of these containers. Nodes perform the requested tasks assigned by the control plane.
kubelet is responsible for the running state of each node, ensuring that all containers on the node are healthy. It takes care of starting, stopping, and maintaining application containers organized into pods as directed by the control plane.
kube-proxy is an implementation of a network proxy and a load balancer, and it supports the service abstraction along with other networking operations. It is responsible for routing traffic to the appropriate container based on IP and port number of the incoming request.
Namespaces
A virtual cluster. Namespaces allow Kubernetes to manage multiple clusters (for multiple teams or projects) within the same physical cluster.
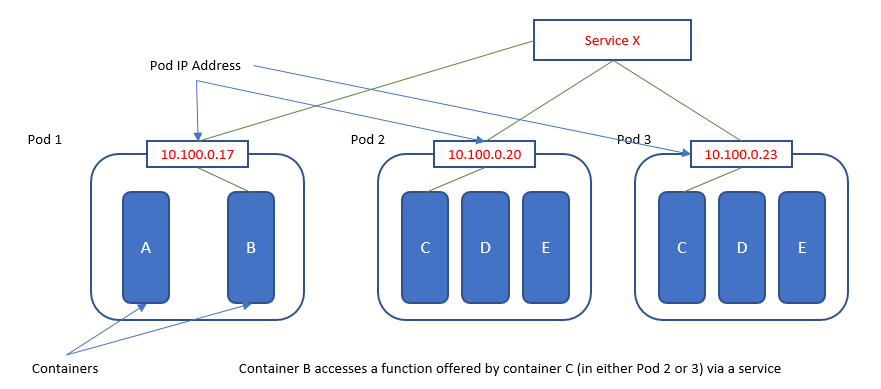
Pod: A set of 1 - n containers deployed to a single node. A pod is the smallest and simplest Kubernetes object.
Service: A way to expose an application running on a set of pods as a network service. This decouples work definitions from the pods. Like a Reverse Proxy for a Proxmox cluster.
Volume: A directory containing data, accessible to the containers in a pod. A Kubernetes volume has the same lifetime as the pod that encloses it. A volume outlives any containers that run within the pod, and data is preserved when a container restarts.
Setup your first cluster - the hard way
I will use my old favorite Ubuntu for this. I'm slowly switching to Debian but very slowly. The Template can also my setup by TemplateBuilder, see the associated post and see my scripts section at GitHub.
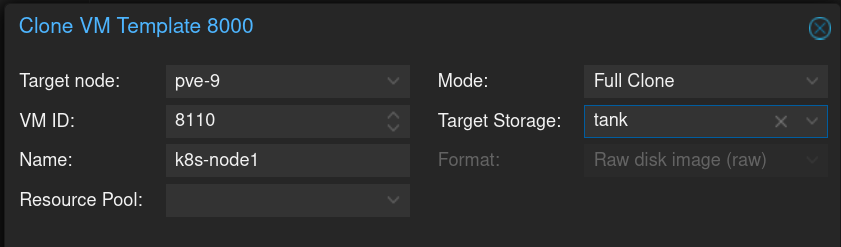
Set up a VM as a Tempalate
- VM ID: 8000 (it's a K8s template 😂)
- Name: k8s-template
- OS: set to: Do not use any media (we fix this later)
- Disk : delete the disk (yes, we fix this also later)
- Cores: 1 (we set this later)
- Memory: 1024 (we set this later)
- Network: use a VM subnet and a VLAN if you have them
(I prefer to leave the management interface free) - Add a Cloud-Init drive (from the HW tab)
We need to have a user to be able to login. Remember to set the SSH public Key too, it saves you from doing it later.
Set IP Config DHCP on, otherwise it has no connectivity.
(I use DHCP for all my servers, using static leases they get the static IP's)
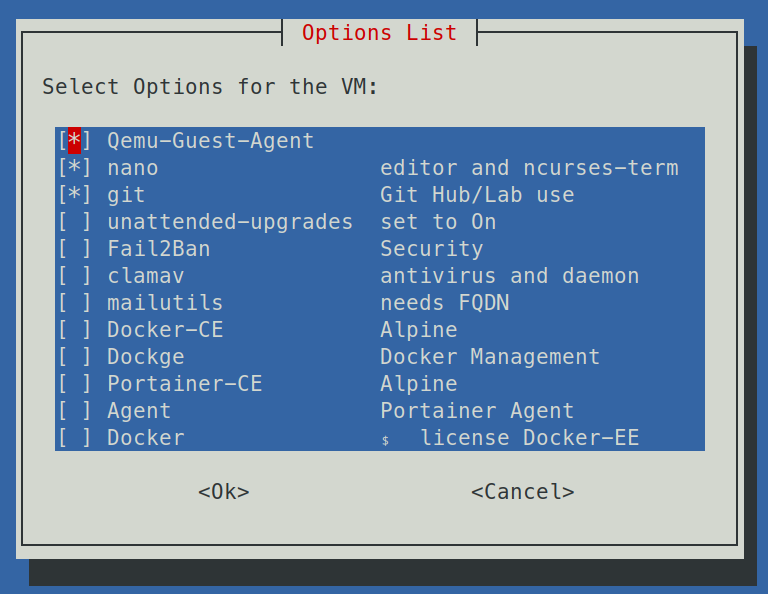
It's up to you what you like to have in the Template. Mandatory settings are Cloud-Init drive, user and password and IP Config has to be st set to DHCP.
I use DHCP for all my servers, using static leases they get the static IP's
Download a Ubuntu Cloud image and make it 16-32 GiB
wget -O ubuntu-22. 4-mini.qcow2 https://cloud-images.ubuntu.com/minimal/releases/jammy/release/ubuntu-22.04-minimal-cloudimg-amd64.imgDownload and save as ubuntu-22.04-mini.qcow2
qemu-img resize ubuntu-22.04-mini.qcow2 32GResize to 32 GiB
virt-customize --install qemu-guest-agent -a ubuntu-22.04-mini.qcow2Optional Install Qemu Guest Agent on the image
virt-customize --install nano -a ubuntu-22.04-mini.qcow2
virt-customize --install ncurses-term -a ubuntu-22.04-mini.qcow2
Install nano editor or what you prefer
Setup the Template
qm importdisk 8000 ubuntu-22.04-mini.qcow2 local-zfsThis fix the missing OS and Disk
qm set 8000 --serial0 socket --vga serial0To be able to have output
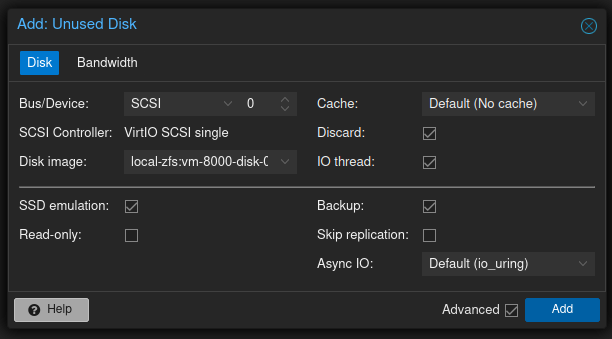
Go to GUI and setup the disk to be used. In Hardware you see a Unused Disk 0. Click it and then [Edit] and last [Add].
If the storage type is SSD, activate Discard and SSD emulation
Then goto Options Boot Order and edit
ide2 checked is not needed but, you might need it one day
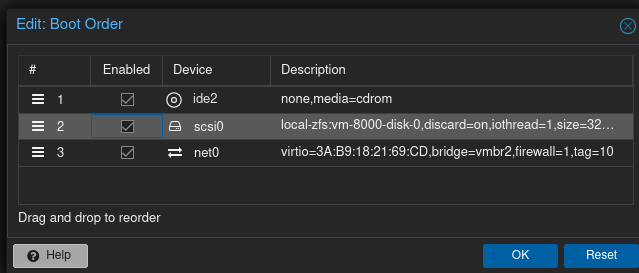
Start at boot is probably what you like for VM's created from this Template
Consider and check your VM and please redo it once more.
Then Fill in the Notes for future you to red what this Template is all about.
The mess it creates isn't wort to fix - just restart the process.

Create the Template
This is easy right click the VM and Convert to Template.
Now we setup the K8sCluster
We will need as a mare minimum on Controller and one minion

Startup the VM's
Now check that you can login and the the QGA is running. Note the MAC addresses and go to your Firewall or DHCP server and setup the correct IP's for them. After that you can apt update && apt upgrade -y and restart the servers with the right IP's
The controller needs 2 GiB RAM and 2 cores, the workers are fine as is but your use-case may need more resources. Workers don't need to be bloated, just use more of them if needed.
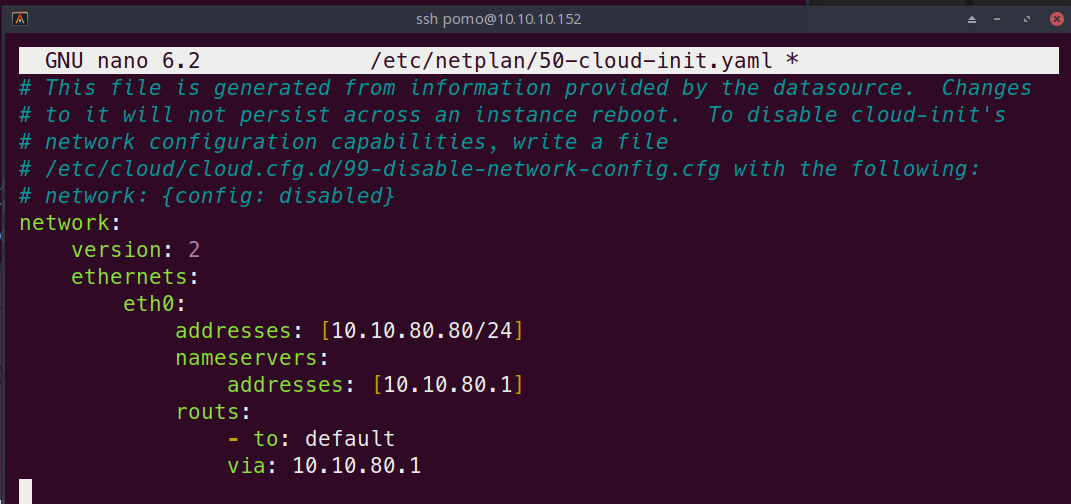
If you can't use static leases you can edit /etc/netplan/50-cloud-init.yaml (that's the filename my VM's had) and set dhcp to false and enter the IP.
I recommend SSH. login and edit anything on a VM (remember the Key).
Installing base programs
These goes onto both the controller and the workers
sudo apt install -y curl containerd software-properties-common
sudo mkdir /etc/containerd
containerd config default | sudo tee /etc/containerd/config.toml
sudo nano /etc/containerd/config.toml
Search for SystemdCgroup = false and change to SystemdCgroup = true
Check for swap, for K8s it must be off, free -h if only 0's all is OK.
If not edit the fstab and comment out swap.
Usually swap is a good and needed on servers but K8s is different
sudo nano /etc/sysctl.confSearch for an change the line #net.ipv4.ip_forward=1 to net.ipv4.ip_forward=1
sudo nano /etc/modules-load.d/k8s.confType this line br_netfilter and save.
Reboot the Servers
It is good practice to reboot so all your changes to take effect before continuing.
Installing Kubernetes
Next we need the GPG keys, repositories and some packages that are required by Kubernetes.
Note: Today Xenial is the latest Kubernetes repository. And that's good.
curl -s https://packages.cloud.google.com/apt/doc/apt-key.gpg | gpg --dearmor | sudo dd status=none of=/usr/share/keyrings/kubernetes-archive-keyring.gpg && echo "deb [signed-by=/usr/share/keyrings/kubernetes-archive-keyring.gpg] https://apt.kubernetes.io/ kubernetes-xenial main" | sudo tee /etc/apt/sources.list.d/kubernetes.listwe’ll need to add the appropriate GPG key
sudo apt update && sudo apt install kubeadm kubectl kubeletInstall the following Kubernetes packages
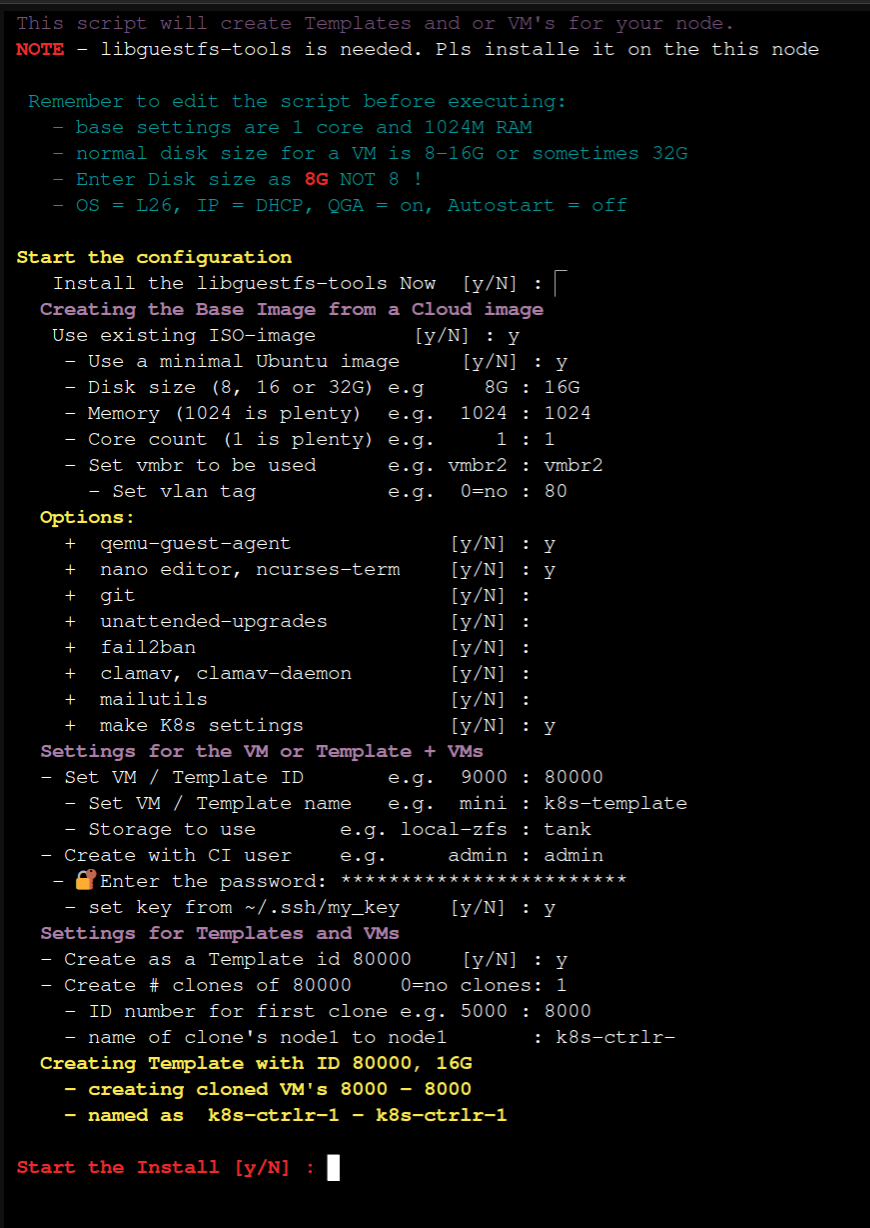
The fast track - create with a Template
You can do all this manual tweaking by a script myTemplateBuilder version 4.0 or the newer TemplateBuilder 5. The reason I took you on this long journey its more to explain what the script do and also give you an opportunity to do it manually.
Create the basic K8s cluster in 5 minutes - TemplateBuilder
wget https://raw.githubusercontent.com/nallej/MyJourney/main/scripts/myTemplateBuilder.shDownload unto your Proxmox node and create 1 template k8s-template and 1 node k8s-ctrlr
My recommended way is to first setup the template k8s-template and one clone the controller k8s-ctrlr. All the nodes can be created from the template.
The template is fully loaded with all the parts needed and configured for a basic cluster setup.
Change the controller RAM to 2048 and cores to 2. Copy the MAC address and enter it to your DHCP for a fixed IP. Alternative is to make it a fixed one.
The nodes are fine as is, make full clones and note the MAC and enter them to the DHCP to get the IP's consecutive, it's easier later.
Initialize the Cluster
Controller node
Now we are close to initialize our Kubernetes cluster. The name of the first controller as k8s-ctrlr-1 in this example. Reason is that it you choose to upgrade the cluster to a HA-Cluster you will have 3 or more.
First the Controller needs more memory than the workers. And you need tho get the Controller a fixed IP. I use to copy the MAC and create a fixed IP entry in mu DHCP.
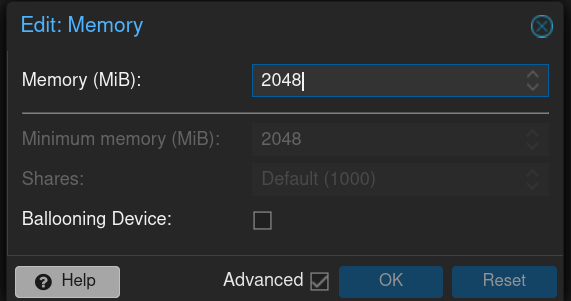
Set RAM to 2 GiB and give it 2 cores. More is better

Consider to use a vLAN for the cluster, its easier to control IP's. This isn't a must.
Reboot
You need to reboot for all the cloud-init stuff and your changes to take effect.
Initialize the Controller
As long you have everything complete so far, you can initialize the Kubernetes cluster now. You should change two parameters the endpoint IP 192.0.2.80 to your controllers IP and change the node-name if different to your controllers name.
sudo kubeadm init --control-plane-endpoint=192.0.2.80 --node-name k8s-ctrlr-1 --pod-network-cidr=10.244.0.0/16Start the controller and copy the join command
Copy the kubeadm join info from the screen, it will be used to join the workers.
kubeadm join <IP>:6443 --token <your token>
--discovery-token-ca-cert-hash sha256:<hash>
--control-plane
Remember to keep this info very private! This is the master key to the cluster!
Setup the user account to manage the cluster
Follow the output from the previous command. To start using your cluster, you need to run the following as a regular user:
mkdir -p $HOME/.kubesudo cp -i /etc/kubernetes/admin.conf $HOME/.kube/configsudo chown $(id -u):$(id -g) $HOME/.kube/configAlternatively, if you are the root user, you can run:
export KUBECONFIG=/etc/kubernetes/admin.confYou can now join any number of control-plane nodes by copying certificate authorities and service account keys on each node and then running the join command as root. Typically 3 for a HA K8s Cluster

Install an Flannel Overlay Network
You should now deploy a pod network to the cluster for the it to function.
Run "kubectl apply -f [podnetwork].yaml" with one of the options listed at:
https://kubernetes.io/docs/concepts/cluster-administration/addons/
The following command will install the Flannel overlay network.
kubectl apply -f https://raw.githubusercontent.com/flannel-io/flannel/master/Documentation/kube-flannel.ymlAdding 1-n Nodes
The join command, which you received from the output when you initialized the cluster, can be ran on your node instances to get them to joined to the cluster.
Worker nodes
The worker nodes are better to be slim. You can always to spin-up more workers.
Set RAM to 1 GiB and give it 1 cores. I have 2 Gig and 2 cores as a hard max
Make full clones and copy the MAC's from each to your DHCP to give them fixed IP's.
Reboot
You need to reboot for all the cloud-init stuff and your changes to take affect.
Joining the nodes
The following command will help you monitor which nodes have been added to the controller, it can take several minutes for them to show up.
kubectl get pods -o wideRun the Join Command we copied from the screen
kubeadm join <IP>:6443 --token <your token>
--discovery-token-ca-cert-hash sha256:<hash>
--control-plane
Remember to keep this info very private! This is the master key to the cluster!
If you get errors, the join command has expired, get a new one with this command:
kubeadm token create --print-join-commandCheck for success
kubectl get nodesTest the cluster
On the Controller create a yaml file for a web server. This is actually a very good use case for K8s. You can scale it up and down by the number of pods and even make it HA with some more Controllers and other things that we will not cover in this already lengthy post.
Xreate test.yml on the Controller and depoly it
apiVersion: v1
kind: Pod
metadata:
  name: nginx-test
  labels:
    app: nginx
spec:
  containers:
    - name: nginx
      image: nginx
      ports:
        - containerPort: 80
          name: "nginx-http"
test.yml
kubectl apply -f pod.ymlLook tor: pod/test created
kubectl get pods -o wide
To be able to access the web server we need a NodePort
Creating the NodePort Service
Setting up a NodePort service is one of the methods we can use to access containers from outside the internal pod network.
Create a file (kind=service-type=nodeport) service-nodeport.yml. Valid nodeports are 30000-23767.
apiVersion: v1
kind: Service
metadata:
  name: nginx-test
spec:
  type: NodePort
  ports:
    - name: http
      port: 80
      nodePort: 30000
      targetPort: nginx-http
  selector:
    app: nginx
Apply that file with:
kubectl apply -f service-nodeport.ymlTo check the status of the service:
kubectl get service
The web server is now reachable on any of the cluster nodes IP's on port 30000.
An other thing I tested is HomeAssistant
apiVersion: v1
kind: Service
metadata:
  name: homeassistant
spec:
  type: NodePort
  ports:
    - name: hass
      port: 8123
      nodePort: 30123
      targetPort: home-assistant
  selector:
    app: homeassistant
Next Steps
That's all for now, that was how to setup a K8s cluster using Ubuntu 22.04. If you want to have a package manager for Kubernetes try Helm.
Install Helm by running these 3 commands
curl -fsSL -o get_helm.sh https://raw.githubusercontent.com/helm/helm/main/scripts/get-helm-3chmod 700 get_helm.sh./get_helm.shUse Helm examples
helm list --namespace <namespace_name>helm list --all-namespaces or helm list -A
#helm search repo <repo name>
helm search bitnami
helm repo add bitnami https://charts.bitnami.com/bitnami
helm repo update
helm install bitnami/mysql --generate-namehelm upgrade --install <deployment name> <address>helm uninstall <deployment name> --namespace <namespace_name>Now add services a good source is GitHub.
And if you need a GUI like Kubernetes Dashboard link, Lens link. Octant (easy to install) link, or kubenav (iOS/Android), Rancher link or Portainer link
Examples - partial commands only
Please consult the home pages of these packages before you start to deploy. You need to get all the commands and info how to run them.
Install Portainer Agent
kubectl apply -f https://downloads.portainer.io/ce2-19/portainer-agent-k8s-nodeport.yamlInstall Kubernetes Dashboard
Using the Helm package Manager
helm repo add kubernetes-dashboard https://kubernetes.github.io/dashboard/Add kubernetes-dashboard repository
helm upgrade --install kubernetes-dashboard kubernetes-dashboard/kubernetes-dashboard --create-namespace --namespace kubernetes-dashboardexport POD_NAME=$(kubectl get pods -n kubernetes-dashboard -l "app.kubernetes.io/name=kubernetes-dashboard,app.kubernetes.io/instance=kubernetes-dashboard" -o jsonpath="{.items[0].metadata.name}")
echo https://127.0.0.1:8443/
kubectl -n kubernetes-dashboard port-forward $POD_NAME 8443:8443Delete
Delete Deployments: kubectl get deploy then kubectl delete deploy DEPLOMENT
kubectl delete pod <podname> -n <namespace> --grace-period=0 --force
Delete a pod in a name-space: kubectl delete pods <podname> -n <namespace>
Extra - Fixing the machine id
If you create a template from an ones started VM.
You need to fix that so not all consecutive clones have the same macine-id, it may end up that they all have the same IP (depends on the DHCP)
- Erase the machine id:
sudo truncate -s 0 /etc/machine-id - Remove the linked:
sudo rm /var/lib/dbus/machine-id - Create symbolic link:
sudo ln -s /etc/machine-id /var/lib/dbus/machine-id
Close down the VM and make it into a template
References
Kubernetes [1] Ubuntu Cloud images [2] Flannel [3] Helm [4]
Linux containers [5] Containers vs VMs [6] Container orchestration [7] NginX [8]


