Proxmox Template by a Script
How to automate creation of templates and VM's in Proxmox. This script builds templates to be the base for VM's in k8s or anything else in your cluster. You can easily choose from the menu what to do like auto install qemu-guest-agent. Or by editing and commenting or de-commenting lines.


This script builds templates to be the base for VM's in k8s or anything else on your cluster. You can easily choose from the menu what to do like auto install qemu-guest-agent, also by editing and commenting or de-commenting lines in the script.
Instructions for myTemplateBuilder.sh
You need to edit the script myTemplateBuilder.sh to suite your needs.This template will create a base template for you to customize.
Make choices before starting:
- Server or Minimal Server
- Template ID - 9000
- Network bridge to use - vmbr2
- Number of cores to use - 1 (The min. for VM's, can be changed later)
- Size of disk for the template - 16G (can be changed later)
- Size of RAM for the template - 1G (can be changed later)
- Where to store the interim template, local-lvm or your preferred storage
- Autostart the VM at boot - yes/no
- Use qemu-guest-agent - yes/no
- And any other you want to add due to your use case
Get the script
SSH into your Proxmox node and get the script.
Do NOT run it - it should to be edited!
wget https://raw.githubusercontent.com/nallej/MyJourney/main/myTemplateBuilder.shEdit the myTemplateBuilder.sh
- Use your choices when editing - be careful not to make typos
- Choose your Ubuntu Cloud Image Ubuntu Server Cloud Image or Ubuntu Minimal Server Cloud Image for this template.
The minimal image can be converted to a full image if you need the extra bits, by one command - unminimized. - Edit the
createBasefunction, add or delete add-ons - Edit the
createVMfunction, add or delet options
nano myTtemplateBuilder.shRun the myTemplateBuilder script
Make it executable and then run it
chmod +x myTemplateBuilder.sh./myTemplateMuilder.sh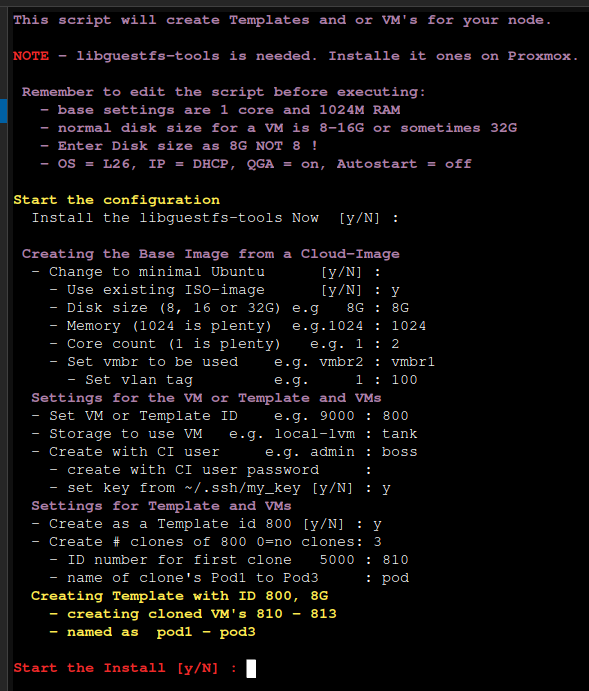
Edit the template base in the GUI
- Edit the Hardware tab if needed: size of RAM, Disk and number of Cores
- If using a SSD check Discard then Advanced and SSD Emulation
- Edit the Cloud-Init
- Add your user id, password and keys (Keys are highly recommended)
- Edit Options
WARNING - Do NOT Start your VM just NOW !
Now, configure and then create the template and clone as many VM's you need. If you want to expand your templates hard drive, you can, before creating a template or after you have cloned a new VM.
I prefer to expand the hard drive after I clone a new machine based on need - keeping the template lean as possible.
Create the template
Warning - You can't change the template ! You need to re-make it from scratch.
Make all changes before creating the template. The Cloud-Init can be changed.

Create your VM's
I prefer to create the VM's as full clones but you could save some space by creating them as linked clones. But please read the documentation on linked clones.
Now you can spin up VM's in quick and easy. The VM is loaded and ready for your apps straight out, with the quemu-guest-agent and your app.
You need to address the following:
- Make choices: VM Id, size of RAM, size of Disk and number of Cores
- Start at boot yes/no
- Install the qemu-guest-agent on the new VM
sudo apt update && sudo apt install qemu-guest-agentTroubleshooting
Making mistakes is human and the basis for learning and progress
Wrong machin-id
If you need to reset your machine-id
Then shut it down and do not boot it up. A new id will be generated the next time it boots. If it does not you can run:
sudo systemd-machine-id-setup
Network errors
Ubuntu Note: When launching the download image from KVM, you will need to specify the virtio network driver.
Or same machine-id as an other one, see above hove to fix. (The template has an machine-id, it was started before made into a template)
Log-in problems
If you can't log in to a new VM based on this template.
You are missing user id and/or password from the Cloud-Init. You need to delete the template totally and redo it from scratch.
Cloud-Images
You can download the Cloud-Images from: Ubuntu Cloud Image Ubuntu Server Cloud Image or Ubuntu Minimal Server Cloud Image for this template you could also use any other cloud-image.
References
Proxmox docs [1] Ubuntu Cloud Images [2]
Ubuntu Cloud Images download page. Cloud images introduction page ↩︎


