PXE - Disk free boots
Booting devices from the net by PXE is a good way to start diskless devices or provisioning new devices. A new tool is presented iVentoy. Or do it the traditional way with DNSMASQ or DHCP by TFTP. #pxe #iventou #netboot #proxydhcp


Boot or install your Servers and PC's by Preboot eXecution Environment (PXE) or pixie boot using the iVentoy running on some device in your network. Or use DNSMASQ or DHCP+TFTP to do it.
There is a Free Edition of iVentoy for 20 Clients and and a Pro Edition for $49 for commercial use, unlimited Clients and ARM64 Support. A .lic file can hold up to 50 machines. iVentoy is a spin off from the famous Ventoy project.
Boot chain
What is pixie boot? PXE (pronounced “pixie”) was introduced by Intel and Systemsoft in 1999. In short, it’s a capability most modern network cards and BIOSes have that enables the system to boot from LAN, just like it would boot from hard disk or CD-ROM. It's using DHCP (proxyDHCP) and TFTP server with DHCP options to supply the stuff a desktop/server needs to boot. Address (option 67) for the Next Server (the TFTP) server and the boot files for this server (GUID or MAC] or the default ones. When that is done the Boot Chain begins, Netvork Bootstrap Program or NBP -file. The NBP-file can be larger than the PXEs 630 and the naming is free. PXE (most often pronounced as /ˈpɪksiː/pixie, often called PXE Boot/pixie boot.)
A fine commercial tool is Serva (with a free version, 2 clients)
Where is it used - it's one of the typical enterprise tools where just plugin a blank disk in the server/desktop and the rest is automated and the best is that the disk is sometimes optional. It's a good friend of WoL.
The pixie boot need to be very secure, both the servers and the network.
This is the first post on the PXE. In a follow up post I share some of my current setups. We will discuss iPXE, proxyDHCP, menus and IP/MAC locked boots.
PXE with iVentoy

Install iVentoy
What do you need: a NIC, a DHCP capable of PXE and a TFTP Server
Download the package from Releases · ventoy/PXE. Extract it and move the new folder where you like it to be. They also have Windows versions.
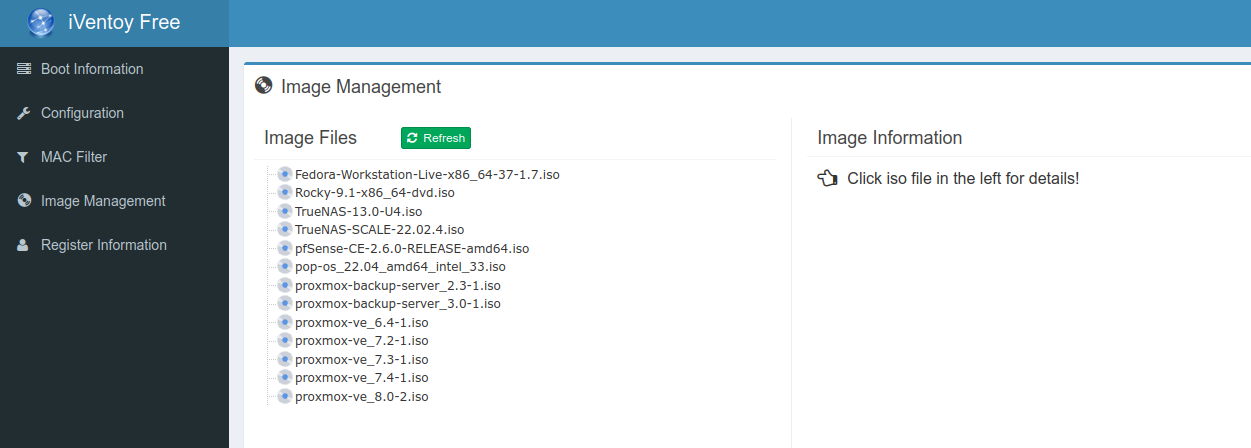
Read the code in iventoy.sh. If you are OK with running it now proceed to populate the ISO directory and then start it. It's for up to 20 devices. You can use Alpine as a base OS - it's the smallest.
Don't run scripts from the web if you don't understand what they do!
Start your PXE Server
Start the PXE Server sudo ./iventoy.sh start and you will have it on port 26000
Open your browser and visit http://127.0.0.1:26000 or http://192.0.2.99:26000 (192.0.2.x is an IP address only used for documentation porpoises)
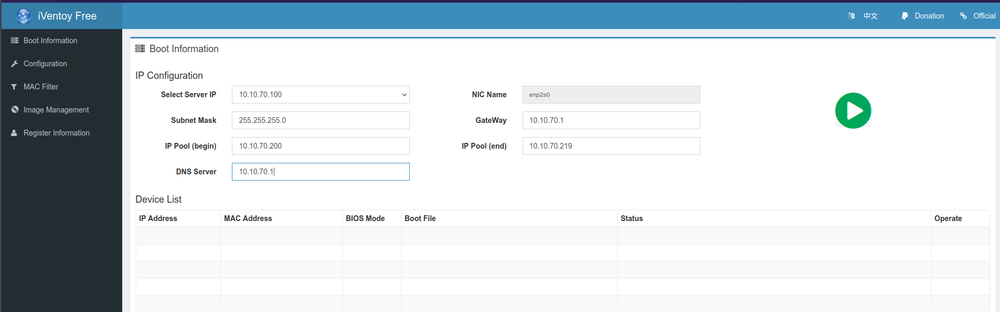
In the GUI set up the IP pool and hit the green button. Now it's live.
In the future just start the PXE Server by sudo ./iventoy.sh -R start
Other options:
sudo ./iventoy.sh stopto stop your PXE serversudo ./iventoy.sh statusto chek it's status
Configuration and setup
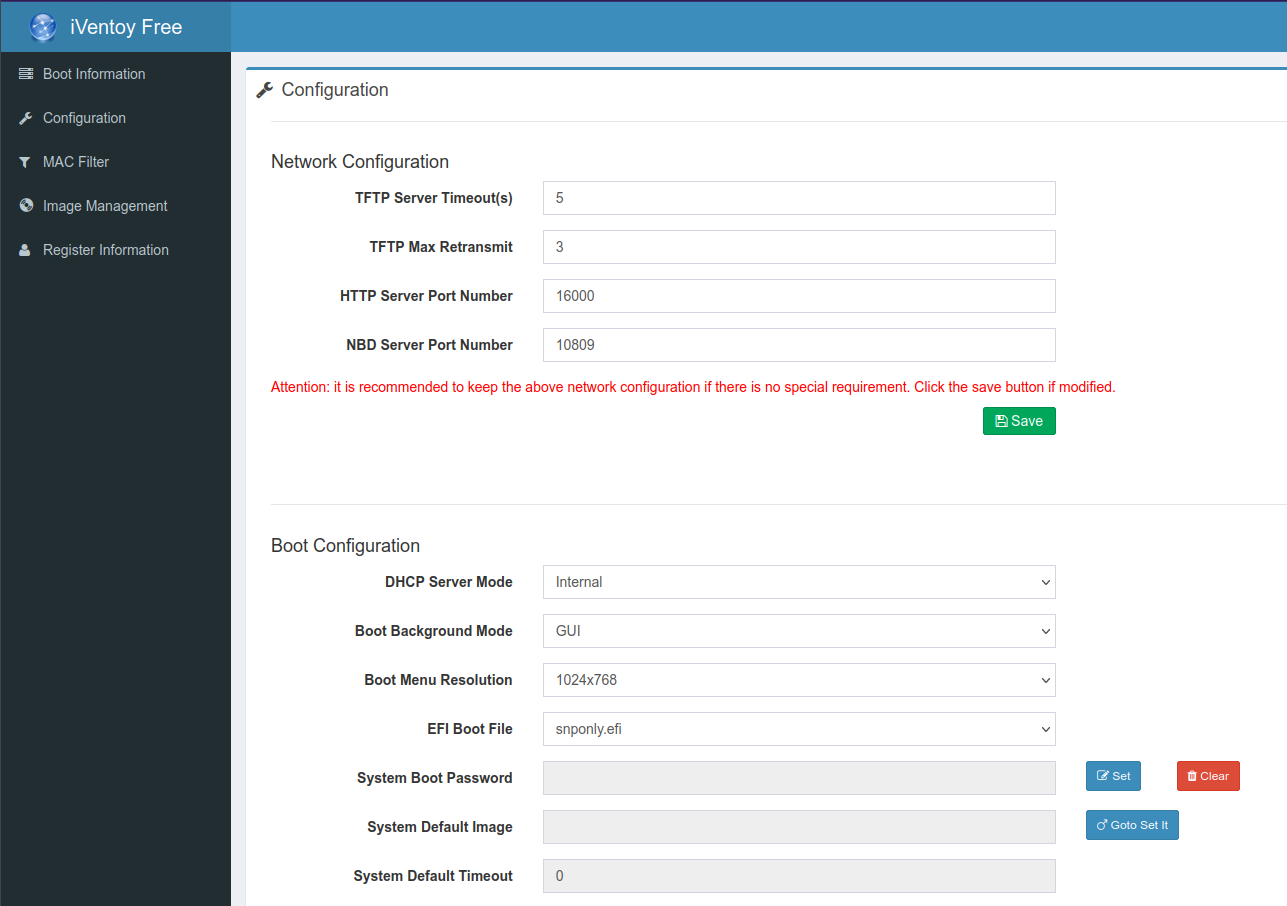
DHCP can by iVentoys internal, external on this net or and external on a other VLAN or LAN. See the documentaion: [Third party DHCP Server](https://www.iventoy.com/en/doc_ext_dhcp.html)
Running iVentoy
In the future just start the PXE Server by sudo ./iventoy.sh -R start.
Setup yor firewall
Port List for iVentoy
| Port | Protocol | Description |
|---|---|---|
| 60/67 | UDP | DHCP Server Port |
| 69 | UDP | TFTP Server Port |
| 26000 | TCP | iVentoi GUI HTTP |
| 16000 | TCP | iVentoy PXE Service HTTP Server Port |
| 10809 | TCP | NBD Server Port |
Note: 16000 and 10809 are the default values. They can be modified in the web page, if you set different port numbers, you should allow them in the firewall.
Setup your Server
In bios set PXE as default, 1st device to boot from. It will then handle extended DHCP packages. First it ask the DHCP for an IP and the DHCP answers whith an IP and an IP to the TFTP Server is where the boot stuff are.
Setup your DHCP
It needs to have the boot program for our servers.
Update iVentoy
Please use the new version as follows:
- Extract the new release
- Copy
data/config.datfile from the old version to thedatadirectory of the new version. - Cut/Move all the ISO files under
isodirectory from the old version to the new version.
This way all configurations in the old version will be kept.
DHCP Servers
ISC DHCP
Open source DHCP server, relay agent, and client software for all your IP address-assignment needs. A complete open source solution for implementing DHCP servers, relay agents, and clients.
Kea DHCP
Flexible, open source, dynamic IP address and static host reservation management for DHCPv4 and DHCPv6 servers. The Kea distribution does not currently include either a client or a relay. It might not be ready yet.
Use ISC DHCP and TFTP
You can set up these services on one small VM running :
- TFTP stands for Trivial File Transfer Protocol. It’s the old protocol transferring files to use with PXE. Not very secure or good.
- DHCP stand for Dynamic Host Configuration Protocol. The DHCP server has a pool of addresses from which it offers IP's when requested. The de facto standard is still the fully featured ISC DHCP Server but there is the new replacement to be Kea (still missing some parts).
- FTP Server tftpd-hpa or my old favorit vsftp
- PDHCP is the Proxy DHCP Server, it runs paralell to any DHCP
- NginX is a www server we can use to distribute files over http. TFTP isn'nt the best protocol or the safest.
- iPXE is the leading open source network boot firmware. It provides a full PXE implementation enhanced with additional features such as: boot from a web server via HTTP, boot from an iSCSI SAN, boot from a Fibre Channel SAN via FCoE, boot from an AoE SAN, boot from a wireless network, boot from a wide-area network, boot from an Infiniband network and control the boot process with a script.
Install of the servers
The following will be a skeleton setup on a Debian Server
Install and start the FTTP Server
sudo apt install tftpd-hpa pxelinuxsudo systemctl start tftpd-hpaSetup the DHCP Server
sudo apt install isc-dhcp-serverEdit the /etc/dhcp/dhcpd.conf file for PXE, and adapt it with the IP addresses and network information of your systems.It looks something like this,
Remember a semicolons at the end of each line
ddns-update-style none;
DHCPDARGS=eth1;
default-lease-time 86400;
max-lease-time 604800;
authoritative;

subnet 192.0.2.0 netmask 255.255.255.0 {
        range 192.0.2.80 192.0.0.99;
        filename "pxelinux.0";
        option subnet-mask 255.255.255.0;
}
# There is more to this file. This is enough for PXE.
Setup as you need. I'm used to have the PXE on a special closed network where the Boot Chain devices connects by a dedicated NIC. This way it's newer exposed to the web. This is not mandatory but if you can afford it it's recommended.
Now re-start the Server.
ISC DHCP is end-of-life from Oct. 2022.
sudo systemctl restart isc-dhcp-serverConfigure the PXE files to install Debian
You need to provide the boot file. To do so, download the needed netboot image for your environment from Debian. What processor architecture do you need.? You probably need the netboot.tar.gz for amd64 CPUs but they still have the old i386 and also armel, armhf, mips64el, mipsel, ppc64el and s390x.
Ubuntu netboot files can be find at this link and follow this guide.
Go to /srv/tftp and download the tarball file
https://deb.debian.org/debian/dists/bookworm/main/installer-amd64/current/images/netboot/netboot.tar.gzExtract the files in the /srv/tftp directory and set owner to tftp
sudo tar xf netboot.tar.gz
sudo chown tftp -R tftp ./*
You should have something like this

Set files permissions. Read permission to all users
sudo chmod -R a+r /srv/tftp/*Setup pfSense
pfSense/openSense are easy to setup to deal with PXE. Goto Services/DHCP Server/<Your VLAN> and open Network Booting. Open the UDP 69 port.
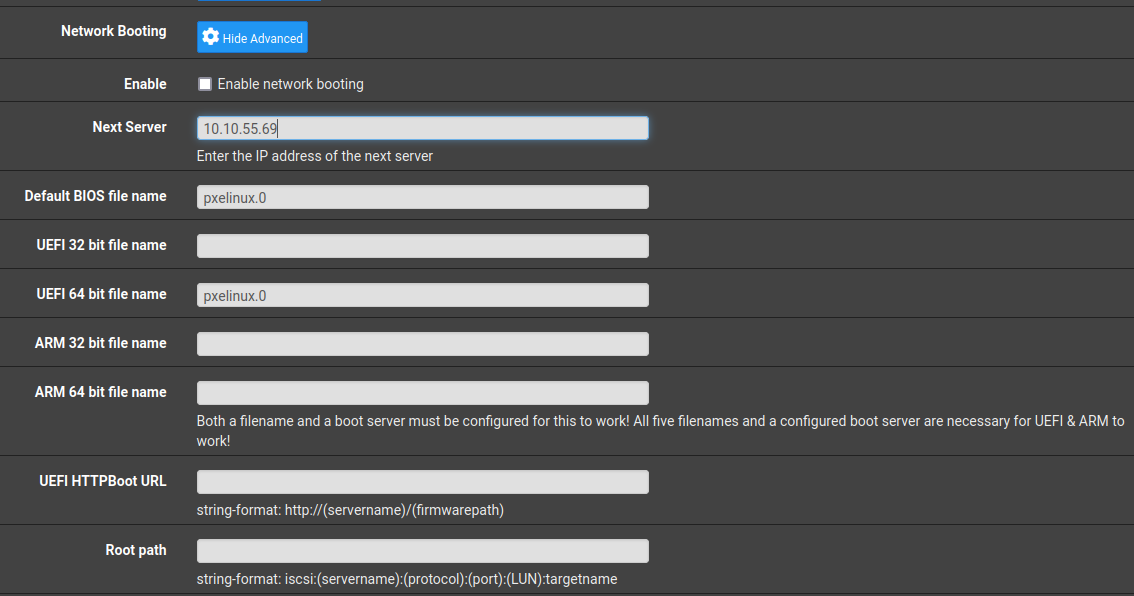
Both a filename and a boot server must be configured for this to work!
When ready set Enabled.
UEFI & ARM
All five filenames and a boot server are necessary for PXE to work!
PXE with DNSMASQ and TFTP
How we used DNSMASQ and TFTP
Install the DNSMASQ Server and plan your setup. Example from my old CentOS.
DNSMASQ uses tcp/udp port 53 to localhost and udp port 67 to world
This is a recreation of a part of our Management Console and only the core parts. The full PXE was quit complex with several menus and VLA's for things to install or use. It run on road kill hardware and wasn't pretty acuallu really ugly but it did what we needed. Last used 2010.
The statements you may/need to change (0.0.0.0 address is for self-reference)
- interface – NIC's that the server should listen on and provide services to
- bind-interfaces – Uncomment to bind only on this interface (see 1)
- domain – Your domain name - if you have one
- dhcp-boot – Replace the IP statement with your interface IP address
- dhcp-option=
- 3,0.0.0.0 – your network segment Gateway or 0.0.0.0
- dhcp-option=6,0.0.0.0 – your DNS Server/servers IP('s)
- dhcp-option=28,10.0.0.255 – optional network broadcast address
- dhcp-option=42,0.0.0.0 – your NTP servers – optionally - dhcp-range=192.0.100,192.0.2.199,12h –Dynamic range of IPs to make available to LAN PC and the lease time (fist test with 5 min)
- server=8.8.4.4 – Put your DNS forwarders IPs Addresses here
- pxe-prompt – Leave as default, hit F8 key for the menu within 60 sec.
- pxe=service – Use x86PC for 32-bit/64-bit architectures and enter a menu description prompt under string quotes. Other values types can be: PC98, IA64_EFI, Alpha, Arc_x86, Intel_Lean_Client, IA32_EFI, BC_EFI, Xscale_EFI and X86-64_EFI
- enable-tftp – Enables the build-in TFTP server
- tftp-root – Use /var/lib/tftpboot – the location for all netbooting files, sub dirs for individual machines based on IP or MAC
- dhcp-host=aa:bb:cc:dd:ee:ff,nas1,192.0.2.9 – assign static IP's to some clients
For other options in the configuration file see dnsmasq man page.
DNSMASQ is perfect for smaller networks but, needs a FTP server for file sharing.
Install SYSLINUX Bootloaders
yum install syslinux dnsmasqFirst make a backup and then edit /etc/dnsmasq.conf.
mv /etc/dnsmasq.conf /etc/dnsmasq.conf.backup && nano /etc/dnsmasq.confinterface=enp2s1,lo
#bind-interfaces
domain=example.com
# DHCP range-leases
dhcp-range= enp2s0,192.0.2.3,192.0.2.253,255.255.255.0,1h
# PXE
dhcp-boot=pxelinux.0,pxeserver,192.0.2.20
# Gateway
dhcp-option=3,192.0.2.1
# DNS
dhcp-option=6,192.0.2.1, 1.1.1.1
server=1.0.0.1
# Broadcast Address
dhcp-option=28,10.10.0.255
# NTP Server
dhcp-option=42,0.0.0.0
pxe-prompt="Press F8 for menu.", 60
pxe-service=x86PC, "Install CentOS 7 from network server 192.0.2.20", pxelinux
enable-tftp
tftp-root=/var/lib/tftpbootInstall TFTP-Server
yum install tftp-serverPopulate it with SYSLINUX Bootloaders
cp -r /usr/share/syslinux/* /var/lib/tftpbootPXE Server Configuration File
The PXE Server reads its configuration from a group of specific files (GUID files – first, MAC files – next and finally uses the Default file as the last recource). The Files are hosted in the folder pxelinux.cfg, which must be located in the directory specified in tftp-root statement from DNSMASQ main configuration file.
mkdir /var/lib/tftpboot/pxelinux.cfg && # touch /var/lib/tftpboot/pxelinux.cfg/defaultEdit the PXE Server config
All paths used in this file must be relative to the /var/lib/tftpboot directory. Edit nano /var/lib/tftpboot/pxelinux.cfg/default
default menu.c32
prompt 0
timeout 300
ONTIMEOUT local

menu title ########## PXE Boot Menu ##########

label 1
menu label ^1) Install CentOS 7 x64 with Local Repo
kernel centos7/vmlinuz
append initrd=centos7/initrd.img method=ftp://192.0.2.20/pub devfs=nomount

label 2
menu label ^2) Install CentOS 7 x64 with http://mirror.centos.org Repo
kernel centos7/vmlinuz
append initrd=centos7/initrd.img method=http://mirror.centos.org/centos/7/os/x86_64/ devfs=nomount ip=dhcp

label 3
menu label ^3) Install CentOS 7 x64 with Local Repo using VNC
kernel centos7/vmlinuz
append  initrd=centos7/initrd.img method=ftp://192.0.2.20/pub devfs=nomount inst.vnc inst.vncpassword=$tr0ngP$$w0rd

label 4
menu label ^4) Boot from local drive
We use FTP to transfer the data from our boot server to the target. We used VNC but newer with a password as week as $tr0ngP$$w0rd offcourse. To function a internet connection is required to download the CentOS part.
Add CentOS Boot Images
CentOS kernel and initrd files are required. To get those files you need the CentOS DVD and mount the image to /mnt system path. Or download it with wget from a local mirror. You need to check for your local mirror in the list.
wget http://ftp.funet.fi/pub/mirrors/centos.org/7.9.2009/isos/x86_64/
mount -o loop /path/to/centos-dvd.iso  /mnt
Create a centos7 directory and copy the bootable kernel and initrd images from the DVD mounted location to centos7 folder.
mkdir /var/lib/tftpboot/centos7
cp /mnt/images/pxeboot/vmlinuz  /var/lib/tftpboot/centos7
cp /mnt/images/pxeboot/initrd.img  /var/lib/tftpboot/centos7
Create Local Mirror Installation Source
I recommend a FTP server like Pure-FTPd or ProFTPd or the minimal vsftpd
yum install vsftpd
cp -r /mnt/*  /var/ftp/pub/
Copy the files to /var/ftp/pub and chmod -R 755 /var/ftp/pub
Start and enable DNSMASQ and vsftpd
# Start them
systemctl start dnsmasq
systemctl start vsftpd
# Status
systemctl status dnsmasq
systemctl status vsftpd
# Enable if Status ok
systemctl enable dnsmasq
systemctl enable vsftpd
Setup your Firewall
Find out all the ports that needs to be open for client machines to reach and boot from the PXE server, run netstat command and add Firewalld rules accordingly to dnsmasq and vsftpd listening ports.
netstat -tulpn
firewall-cmd --add-service=ftp --permanent       ## Port 21
firewall-cmd --add-service=dns --permanent       ## Port 53
firewall-cmd --add-service=dhcp --permanent      ## Port 67
firewall-cmd --add-port=69/udp --permanent       ## Port for TFTP
firewall-cmd --add-port=4011/udp --permanent     ## Port for ProxyDHCP
firewall-cmd --reload                            ## Apply the rules
Using it
Check that all server ar running. And test your first Server setup.
We used it to provision new servers by specifying the server to do pixie boot. This was part of the Management Console app we used 20 years ago. This example I used it the last time 2010 before I retired from IT and CentOS was independent and free before RedHat took them over in January 2014. See Wikipedia
The Label 2 - 4 was used to do special setups.
- Use the local version
- Download from the web
- Boot using VNC
- Boot from local Drive
Note
DNSMASQ on Ubuntu. Systemd resolverd uses the port 53.
You should free first.
Background of this final section: I was the author of an early ERP system that started its life in the 80's and evolved later into a Client-Server system using first RedHat, also some Ubuntu installs for a short while and finally CentOS servers. Development ended 2010. My old company also supplied general purpose Linux servers, services and support, mainly based on CentOS to our and our partners customers and.
I retired from IT in 2010 and from bussines in 2020.
Referenses
iVentoy [1] PXE [2] Debian PXE [3] Ubuntu Server Install using PXE [4] PXE on Arch [5] RedHAT PXE [6] The History of DHCP [7] Bind 9 [8] ICS DHCP [^dhcpd] Kea DHCP [9] TFTP [10] FTP Servers [11] iPXE [12] proxyDHCP [13] SimpleHTTPServer [14]
Automated Server Install using PXE ask Ubuntu Using iVentoy ↩︎
See RedHat DocsPXE Boot Configuration and Booting from the Network Using PXE and ↩︎
ISC Internet Sustems Consortiom The History of DHCP ↩︎
ISCs Bind 9, the de facto standard for DNS, see this page ↩︎
Read more aboutTFTP Wikipedia Advanced TFTP Server, Trivial file transfer protocol server., HPA’s TFTP server, Lightweight DNS, TFTP and DHCP server., ↩︎
Read more abouth FTP on Wikipedia. Ubuntu docs, ftpd, vsftp, PureFTPd, ProFTPD ↩︎
iPXE - open source boot firmware, can also use HTTP, iSCSI, AoE and FCoE home page, Wikipedia, GitHub ↩︎


