iPXE Boot Anything
PXE is the way to go of booting and installing stuff in a large environments, netboot.xyz is a smart system that handles legacy and UEFI as OS and tools alike. It's the one-stop app for installing or running live images in a lab.


I have used PXE boot for decades to boot up servers and workstations. It somehow feels like the normal operation, whereas it actually was the only way to startup servers with RAID controllers many years back.
But, it's also a very interesting way of testing stuff quickly - and that is what Home Labs are all about. Most nodes will be reinstalled every 1–3 months, and VM more frequent than that. Last spring before the summer break (move to our summer home for 3–6 months, my family has been doing this for 100 years) I installed iPXE server. Now after a lot of usage I can say it's here to stay and my old PXE server will be replaced.
iPXE uses a rolling release model, in which every commit is intended to be production-ready. You should always use the latest.
The app with all bells and whistles is netboot.xyz. That is what I did use for my iPXE install on Docker. It's the one-stop app for installing or running live images in a home lab.
One-stop app for installing and/or running live images
They have a fantastic set of documentation that I recommend you to read before installing and using this awesome tool. I had to redo some stuff that I missed in the spring - and understood the hard way 🤬.
- You don't need to compile your own iPXE, but you can.
- You can use HTTPS or switch to HTTP
for internal use or behind a reverse proxy - Boot methods: USB, ISO, iPXE, GRUB, QEMU, TFTP, VMware
Install on pfSense
The easiest way to install netboot.xyz is to set it up on your pfSense firewall. It might not always be possible or recommended doing so.
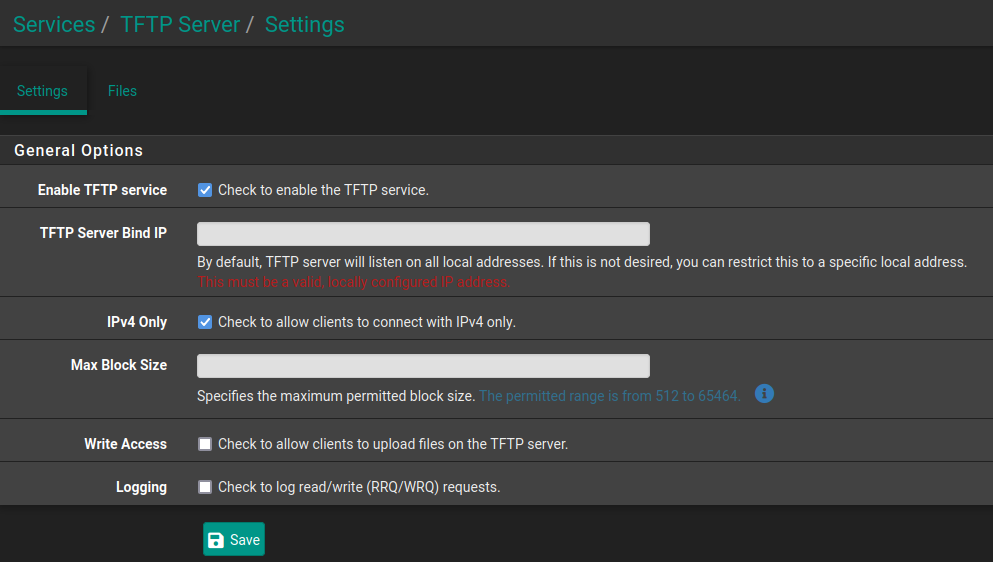
Install a TFTP Server
Install tftpd from the Package Manager and enable it.
Download the boot file
Download the DHCP bootloader file you need (UEFI or Legacy). Go to nextboot.xyz download section and download needed files.
Here you also find the Virtual floppy disk for DRAC/iLO etc.
Verify the download’s checksum - you know why!
Upload files to the TFTP Server
Go to: Services/TFTP/Files tab and clicking Upload
Configure the TFTP Server
Go to Services/DHCP Server and do the config
- TFTP
- TFTP Server: insert the TFTP server IP (your pfSense IP)
- Network Booting
- Enables network booting
- Next Server: (your pfSense IP)
- Default BIOS file name, UEFI 32 and UEFI 64 bit file names.
Enter the name of the file(s) you downloaded and verified.
e.g.netboot.xyz.lkrn,netboot.xyz.efi
You will be now able to boot to netboot.xyz and then select an OS or any of the Utilities you need to boot into.

Install with Docker
With docker, you may use any DHCP server and is therefore future proofed.
Set up a Docker VM
Depending on the use case, choose disk size 16 GiB - xxx GiB, depends mainly on number of locally stored ISO's and their sizes. Other resources can be on the low side.
Install Docker-CE
Just a plain docker install. We will use some persistent storage.
If you have a paid license, use the Docker version.
Copy the script from Docker.com
curl -fsSL https://get.docker.com -o get-docker.shTest the script with a dry-run
sudo sh ./get-docker.sh --dry-runShows the steps, but the option dry-run inhibits the installation.
Install Docker-CE
We'll install docker-ce docker-ce-cli containerd.io docker-compose-plugin docker-CE-rootless-extras docker-buildx-plugin and all dependable.
sudo sh ./get-docker.shThe installation will be performed by the script without any options.
Grant non-root users access to Docker
docker group grants root-level privileges to the user. For details on how this impacts security in your system, see Docker Daemon Attack Surface.To create the docker group and add your user:
- Create the
dockergroup.
sudo groupadd docker- Add your user to the
dockergroup.
sudo usermod -aG docker $USER
- Log out and log back in so that your group membership is re-evaluated.
Install Dockge
The Portainer replacement
Install Portainer-CE or/and Agent
You might need only the other, depending on your setup. If you have a paid license, use the Portainer-BE version.
Install Portainer Agent
If you already have a main Portainer install, you may like to use the Agent instead.
Create the storage
mkdir -p netboot_xyz/assets netboot_xyz/configInstall netboot.xyz
First you need to decide where the Images are Locally or in the Cloud (netbook.xyz GitHub). Then set up the container, configuration and start it.
After that, it's just to create VM's and make them boot from this server.
Set your Timezone
Use the data from the node or set yours in the setup. You may use a ENV or a direct setting, e.g. TZ=Asia/Shanghai. In enterprises, you often see TZ=Etc/UTC.
volumes:
- /etc/timezone:/etc/timezone:ro
- /etc/localtime:/etc/localtime:ro
TZ=Etc/UTC
Set Menu and the Ports
You need to select
- an unused port for netboot.xyz
- Menu version you like to use
Local Mirror
If you want to present the boot files from a local source, you can edit the boot.cfg file from the boot menus and change 1 to 2.
set live_endpoint https://github.com/netbootxyzset live_endpoint http://192.0.2.25:8080
NOTE you can't boot from environments you haven’t downloaded.
Portainer stack or docker-compose.yml
Start the yml-file with docker compose -d && docker compose logs -f
Check the addresses for Portainer deployment
# Install netboot.xyz Original
version: "2.1"
services:
  netbootxyz:
    image: ghcr.io/netbootxyz/netbootxyz
    container_name: netbootxyz
    environment:
      # - MENU_VERSION=2.0.47 # optional, if unset - use latest
    volumes:
      - ./config:/config # optional
      - ./assets:/assets # optional
    ports:
      - 3000:3000
      - 69:69/udp
      - 8080:80 # optional
    restart: unless-stopped
# Install netboot.xyz by Linuxserver
version: "2.1"
services:
  netbootxyz:
    image: lscr.io/linuxserver/netbootxyz:latest
    container_name: netbootxyz
    environment:
      - PUID=1000
      - PGID=1000
      - TZ=Etc/UTC
      #- MENU_VERSION=1.9.9 # optional, if unset - use latest
      - PORT_RANGE=30000:30010 # optional
      - SUBFOLDER=/ #optional
    volumes:
      - ./config:/config
      - ./assets:/assets #optional
    ports:
      - 3000:3000
      - 69:69/udp
      - 8080:80 # optional
    restart: unless-stopped
Parameters
Setting up your DHCP
You need to set the DHCP server to be able to use the netboot.xyz
ISC DHCP Server
Edit /etc/default/isc-dhcp-server and configure at least one of the INTERFACES variables with the name of the interface you want to run the DHCP server on
INTERFACESv4="eth0"You'll also need a /etc/dhcp/dhcpd.conf looking something like this:
option arch code 93 = unsigned integer 16;

subnet 192.0.2.0 netmask 255.255.255.0 {
  range 192.0.2.100 192.0.2.199;       # Change range for your network
  next-server 192.0.2.33;               # Change to IP of your DHCP server
  option subnet-mask 255.255.255.0;
  option routers 192.0.2.1;             # Change to the IP of your router
  option broadcast-address 192.0.2.255;
  option domain-name "example.com";     # This is optional
  option domain-name-servers 1.1.1.1;
  if exists user-class and ( option user-class = "iPXE" ) {
    filename "http://boot.netboot.xyz/menu.ipxe";
  } elsif option arch = encode-int ( 16, 16 ) {
    filename "http://boot.netboot.xyz/ipxe/netboot.xyz.efi";
    option vendor-class-identifier "HTTPClient";
  } elsif option arch = 00:07 {
    filename "netboot.xyz.efi";
  } else {
    filename "netboot.xyz.kpxe";
  }
}
Restart the DHCP Server
References
IPXE [1], PXE [2], netboot.xyz [3] is like PXE on steroids, Timezones [4]


