Proxmox IP2tag – tag by IP
This script automatically assigns tags containing IP addresses to virtual machines and containers running in a Proxmox environment. It is an alternative to lxc-iptags but is more extensive and flexible in many ways.

By default, the program runs in an infinite loop, continuously monitoring IP addresses and their associated tags. However, it can be launched with the --run-once option to perform a one-time synchronization and exit afterward. The script detects all IPv4 addresses (excluding 127.0.0.1) and assigns them as tags to virtual machines and LXC containers.
You may want to and can limit the range of detected IP addresses.
Key Features:
- Support for containers (LXCs) and virtual machines (VMs)
- Independent user-defined colors for active and inactive IP tags
- Control over tag placement (beginning or end)
- Automatic sorting of IP tags for running and stopped guests
- Custom actions for inactive IP tags (change color, remove, or none)
- Definition of IP addresses and network ranges to tag
- Ignore lists for IPs, network ranges, and VM/LXC IDs
- Configurable interval for checking and updating IP tags
- Run as a
systemd-service or standalone script - Built-in config validation on startup to prevent runtime errors
- Faster retrieval of selected settings compared to
pvesh,qm, andlxc
Installation
You shall always read the code and ONLY proceed if you understand and accept the doings of the code ❗
The following things will happen:
- The app file
prox-ip2tagis copied to a directory/usr/local/bin/ - The default configuration file
prox-ip2tag.confis also copied to/usr/local/bin/and as the local configuration to/usr/local/etc/prox-ip2tag.conf - The file
prox-ip2tag.serviceis copied to/etc/systemd/system/ jqwill/will not be installed- file privileges will be set to
- 700 for
/usr/local/bin/prox-ip2tag - 600 for
/usr/local/bin/prox-ip2tag.conf - 600 for
/usr/local/etc/prox-ip2tag.conf - 644 for
/etc/systemd/system/prox-ip2tag.service
- 700 for
Download the installation script to your PVE
Manual installation
❗ Remember to investigate any downloaded script and make sure you understand what it's doing to your system
Download the installation script
wget -P /usr/local/bin/ https://github.com/MorsStefan/proxmox-ip2tag/releases/latest/download/prox-ip2tagSet the variables
export INSTALL_SOURCE=github AUTO_START=yes SKIP_DEPENDENCIES=noRun the script
chmod 700 prox-ip2tag_install.sh && ./prox-ip2tag_install.sh You always need to understand the security issues before issuing anything like this.
The app will be initialized, and you will see some IP tags
Enable and run service
systemctl daemon-reload systemctl enable --now prox-ip2tag.service
Check status
systemctl status prox-ip2tag.service
Manual upgrade
Download the latest stable release, extract it, and run the prox-ip2tag_install.sh installer — the same script used for online installation.
If you prefer full control over every file, follow these steps:
Stopping service before installation or upgrade
systemctl stop prox-ip2tag.service &>/dev/nullDownload the files
curl -sSL https://github.com/MorsStefan/proxmox-ip2tag/releases/latest/download/prox-ip2tag -o /usr/local/bin/prox-ip2tag
curl -sSL https://github.com/MorsStefan/proxmox-ip2tag/releases/latest/download/prox-ip2tag.conf -o /usr/local/etc/prox-ip2tag.conf
curl -sSL https://github.com/MorsStefan/proxmox-ip2tag/releases/latest/download/prox-ip2tag.service -o /etc/systemd/system/prox-ip2tag.service
Enable and run the prox-ip2tag service
systemctl daemon-reload
systemctl enable --now prox-ip2tag.service
Check status of pro-ip2tag service
systemctl status prox-ip2tag.serviceConfiguration
List of Option with explanations
The configuration file with all available options is located at: /usr/local/etc/prox-ip2tag.conf
| Option | Default | Description of Setting |
|---|---|---|
| GUEST_TYPE | 3 | Defines which guest types to process: 1 = LXCs, 2 = VMs, 3 = both. |
| NETWORK_RANGES | (0.0.0.0/0) | IP addresses and network ranges in CIDR format in which IP must be located in order to be automatically added or removed as IP tag. |
| NETWORK_RANGES_IGNORED | (127.0.0.1) | Do not auto add or remove IP tags for VMs and LXCs from this range, and do not change their color. |
| IGNORED_VMIDS | () | Ignore these LXCs and VMs. |
| INACTIVE_IP_TAGS_ACTION | change_color | What to do with IP tags when VM/LXC is stopped: [ remove | change_color | none ]. |
| CHANGE_IP_TAGS_COLORS | 1 | Allow changing Proxmox default tags colors: [ 0 | 1 ]. (Note 1) |
| UPDATE_IP_TAGS_INTERVAL | 60 | Time in seconds between IP tags updates. Must be > 0. Minimum 60 is recommended. |
| IP_TAGS_POS | first | Controls the placement of newly added IP tags: [ first | last ]. (Note 2) |
| FORCE_IP_TAGS_POS | 1 | Enforces a fixed position for IP tags according to the value of the |
| TAG_COLOR | ffffff | Foreground color for active IPs (hex). |
| TAG_BGCOLOR | 4c4c4c | Background color for active IPs (hex). |
| TAG_INACTIVE_COLOR | ffffff | Foreground color for inactive IPs (hex). |
| TAG_INACTIVE_BGCOLOR | aaaaaa | Background color for inactive IPs (hex). |
| VM_LXC_CONFIG_SOURCE | cfg_files | Method for reading tags and selected config options: [ cfg_files | qm_pct ]. (Note 3) |
| VM_LXC_LIST_METHOD | custom | Method for creating list of running VMs and LXCs: [ custom | qm_pct ]. |
| CLUSTER_CONFIG_SOURCE | cfg_files | Method for reading cluster config options: [ cfg_files | pvesh ]. (Note 3) |
| DISPLAY_TIMESTAMP | 0 | Prefixes each output line with a timestamp - useful for terminal logging. |
| VERBOSE | 3 | Verbosity level of log messages: [ 0 | 1 | 2 | 3 | 4 | 5 | 6 ]. |
Notes
- When
CHANGE_IP_TAGS_COLORS=0, it overwritesINACTIVE_IP_TAGS_ACTION=change_colorandINACTIVE_IP_TAGS_ACTION=change_none. - Require cluster setting:
Datacenter->Options->Tag Style Override->Ordering='Configuration' - The
cfg_filesoption is very fast because it reads local configuration files; otherwise, the default Proxmox tools are used.
Enabling full visibility for IP tags
To make IP tags fully visible in the Proxmox interface, adjust the tag display settings:
- Open the Proxmox web interface.
- Navigate to:
Datacenter -> Options. - Find the
Tag Style Overrideoption and clickEdit. - Set
Tree shape = Full. - Set
Ordering = Configuration. - Save the changes.
Usage
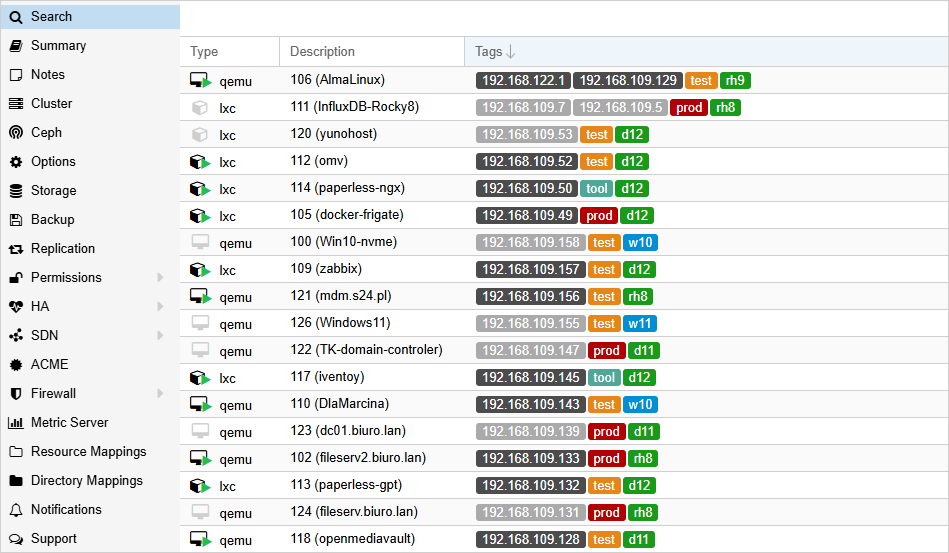
By default, the program runs in an infinite loop, continuously monitoring IP addresses and their associated tags.
However, it can be launched with the --run-once option to perform a one-time synchronization and exit afterward.
IP Discovery
By default, the script detects all IPv4 addresses (excluding 127.0.0.1) and assigns them as tags to virtual machines and LXC containers.
To limit the range of detected IP addresses, you can define custom networks using the NETWORK_RANGES parameter. For example, to include only common local networks and a single IP address:
NETWORK_RANGES=( 192.168.0.0/16 10.0.0.0/8 194.181.15.20 )
IP addresses that should be ignored
IP addresses that should be ignored must be added to the NETWORK_RANGES_IGNORED variable. This list can also include existing IP tags that you don't want to modify. If, for example, docker is installed in a LXC, and we do not want its internal container (docker) addresses are added as tags:
NETWORK_RANGES_IGNORED=( 127.0.0.1 172.17.0.0/16 172.18.0.0/16 )
This also works the other way around, if these addresses were already assigned as IP tags to a LXC/VM, they will not be automatically removed when added to the NETWORK_RANGES_IGNORED.
They will be ignored, just as the variable name suggests.
Note that NETWORK_RANGES_IGNORED has higher priority than NETWORK_RANGES!
Tags order
The order in which IP tags are displayed depends on both the script's configuration and the cluster's global settings.
To ensure correct IP tag sorting and position enforcement, the parameter:Datacenter -> Options -> Tag Style Override -> Ordering should be set to Configuration.
Please note that IP tags are not automatically sorted in the following cases:
- The VM/LXC is listed in the
IGNORED_VMIDS - The IP address is listed in the
NETWORK_RANGES_IGNORED - The guest agent is not installed in the virtual machine (VM)
- Datacenter
Tag Style Override -> Orderingis not set toConfiguration FORCE_IP_TAGS_POSis set to0in/usr/local/etc/prox-ip2tag.conf
Tags colors
By default, when a virtual machine associated with an IP tag is shut down, the color of the IP tag is updated to indicate its inactive state.
If the same IP address is assigned to more than one machine — with one running and the other stopped — the tag color will be determined by the running machine. This behavior results from the fact that tag color changes are applied globally and cannot differ per machine.
Tag color changes are not visible immediately. Press
F5 to refresh the view. This is not a bug, but a limitation/feature of the Proxmox interface.Initial Setup Guide
This is not a required step, but it allows for a quick and trouble-free script setup.
- Stop the service:
systemctl stop prox-ip2tag - In the file
/usr/local/etc/prox-ip2tag.conf, setVERBOSE=4andUPDATE_IP_TAGS_INTERVAL=5 - Set two options in the Proxmox configuration:
Datacenter -> Options -> Tag Style Override -> Ordering=Configuration=
Datacenter -> Options -> Tag Style Override -> Tree ShapeFull - Run in terminal:
/usr/local/bin/prox-ip2tagand observe the output
This way, all running virtual machines and containers will receive IP tags. They will be placed at the beginning of the tag list, making them easier to view and sort - especially in the Datacenter -> Search view.
If available memory is limited on the server, you can start virtual machines one by one, and shut them down after they get IP tags. Once all machines have tags assigned, you can stop the script (Ctrl + C).
You can now make configuration changes and check the effect by running the script manually again.
With the above settings, changes should be visible within 60 seconds after launch.
Once the result is satisfactory, you may reduce the VERBOSE level, increase UPDATE_IP_TAGS_INTERVAL, and run the script as a systemd service.
Uninstall
Stop and disable the prox-ip2tag.service
systemctl stop prox-ip2tag.service
systemctl disable prox-ip2tag.service
Remove the prox-ip2tag
rm -fv /etc/systemd/system/prox-ip2tag.service
rm -fv /usr/local/bin/prox-ip2tag
rm -fv /usr/local/etc/prox-ip2tag.conf
Automatic installation and upgrade - Experts ONLY
You shall always read the code and ONLY proceed if you understand and accept the doings of the code ❗
To install or upgrade to the latest stable release, run as root:
INSTALL_SOURCE=github bash -c "$(curl -sSL https://github.com/MorsStefan/proxmox-ip2tag/releases/latest/download/prox-ip2tag_install.sh)"You always need to understand the security issues before issuing anything like this.
The script will download all necessary files and perform the installation automatically. If the original configuration file exists, it will remain untouched – a new config will be saved as: /usr/local/etc/prox-ip2tag.conf_new
You can control the behavior of the installer using environment variables:
| Variable | Default | Description |
|---|---|---|
| INSTALL_SOURCE | (not set) | If set to github, downloads the installer files from GitHub Releases. If not set, the installer uses local files from the current working directory. |
| AUTO_START | yes | If yes, the prox-ip2tag systemd service will be enabled and started after installation. If no, the service will not be started automatically. |
| SKIP_DEPENDENCIES | no | If no, the installer will attempt to install the jq package automatically. If yes, dependency installation will be skipped. |
References
Proxmox ip2tag [1]


