Jump Servers
The Jump Box, Host or Server or a Bastion Host or Server. By create a highly secured, The Jump Box with web access and use it to jump to servers on a internal and dedicated network we only have 1 server exposed to the web not 5. #2FA #TUI #TOTP


Old tools from the 1990s is the Jump Server and the Bastion Host. The rational is to do the securing of the server on one and make it less on the ones behind the Jump Box. By create a highly secured server with web access and use it to jump to servers on an internal and dedicated network we only have 1 server exposed to the web not 5. The key is to harden the Jump Box to the max.
Their is much debate on this approach today and it's benefits and problems, but that is for other forums to discuss.
What is a Jump Server
Although jump servers are phasing out, they can still offer valuable capabilities for smaller businesses needing a basic security and access management solution.
For years, jump servers (also known as jump box servers) have been used to safely bypass firewalls and allow cross-network navigation for remote devices. While not as widely used today, jump servers still provide practical applications for businesses wishing to grant remote network access to customers and employees — allowing for quick integration and interaction.
- SSH Academy
Setup
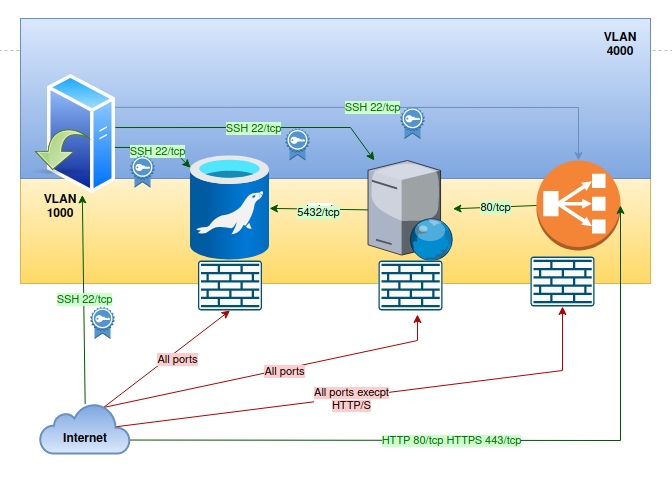
Scenario: We have 5 servers we like to access for management tasks from the net at any time. We also setup a Terminal User Interface (TUI) sg1
- Create a VLAN for jumps, vlan 4000
- ⚠️ Absolutely no access to the web!
- Create vlan 4000 on each server
- test
- Add the user (I call him luke like as in Luke Skywalker)
adduser luke(creates an user with a home folder and shell /bin/bash)- same as
useradd -m luke -s /bin/bashand thenpasswd luke
- same as
- give the user a strong password
- Create a Jump Server, a minimal server it will only administer jumps
- add a web interface NIC
- add a NIC for vlan 4000
adduser luke(creates an user with a home folder and shell /bin/bash)- give the user a strong password
- create a ed25519 key for the user
- ssh-keygen -t ed25519 -C "Luke Skywalker"
- create a file: servers and edit and add all the server ips
- copy the public key to all 5 servers
- test connectivity using keys
- create the login and menu script
- install oathtool and libpam-google-authenticator
- ⚠️ install and test - ☠️ potential to make the VM in-accessible ☠️
- keep tho ssh windows open during setup until end of testing
- On all 6 servers do the following
- setup fail2ban and other security measures to harden them
- harden the SSH
- setup the firewall for extra protection
- make the Jump Server accessible from the web
Security
⚠️ You need to harden the Jump Box to the max!
It's better not to just use password but to secure with keys and 2FA to.
- Use ed25519 keys not RSA keys
Compared to the RSA keys– ed25519 brings a number of improvements:- it’s faster: to generate and to verify
- it’s more secure
- collision resilience – this means that it’s more resilient against hash-function collision attacks
- keys are smaller
- Use a dedicated network for the jumps
- Use Two Factor Authentication (2FA)
- Harden the Jump Box to the max!
Firewall
Using a tunnel or a VPN is the preferred way of communicating with any device over the web. Using SSH is some times the way you need to go.
- The main Firewall shall be setup to pass all SSH traffic to the Bastion.
- The Proxmox Firewall need to be activated and configured.
- The Server Firewalls only pass ingress SSH traffic from the dedicated network and only from the Jump Box all other traffic is dropped.
- The Server Firewall will only egress to the Jump Box as SSH
Create the Jump Server
A minimal server will do the job of a Jump Server. We need to have SSH installed.
Add a new User
adduser lukeuser luke will have a home folder and use shell /bin/bash (depends on your config)
Change to the new User
su - lukeAdd the Key Pair
ssh-keygen -t ed25519 -C "Luke Skywalker"I don't use a pass phrase
Copy the Public Key to ALL Servers
ssh-copy-id [email protected]Repeat for all of them
Test that the user can login on all the servers
Edit the SSH settings
Change back to the root by typing exit or ctrl + d
Edit nano /etc/ssh/sshd_config and do the following
Disable root login by searching for an entry #PermitRootLogin... and change it to PermitRootLogin no and the add at the end of the file.
Set X11Forwarding yes to X11Forwarding no X11 is notoriously insecure by design.
PermitRootLogin no
AllowAgentForwarding no

Match User luke
        X11Forwarding no
        PermitTTY yes
        PermitTunnel no
        GatewauPorts no
        ForceCommand /home/luke/scripts/sg1
Restart ssh with the new settings systemctl restart sshd
Consider hardening the Shell Access even more.
Add YOUR Public Key to the Jump Servers user "luke"
ssh-copy-id [email protected]Add the TUI
Create the file and make it executable touch sg1 && chmod +x sg1
Edit the file nano sg1
#!/bin/bash

OPT=$(whiptail --menu "Select Target:" 16 24 8 \
    1 "Server 1" \
    2 "Server 2" \
    3 "Server 3" \
    4 "Server 4" \
    5 "Server 5" \
    6 "Exit" \
    3>&1 1>&2 2>&3 3>&-); clear
case $OPT in
     1) ssh [email protected] ; exit ;;
     2) ssh [email protected] ; exit ;;
     3) ssh [email protected] ; exit ;;
     4) ssh [email protected] ; exit ;;
     5) ssh [email protected] ; exit ;;
     *) exit ;;
esac
Add 2FA to the TUI - pro tip
First we need to add some tools and do the setup for them.
Install OATH Toolkit
Keep in mind that this usage is not recommended on multi-user systems, command-line parameters of running processes can be seen by other users.
sudo apt-get update && sudo apt-get -y install oathtoolInstall Google Authenticator
sudo apt-get update && sudo apt-get -y install libpam-google-authenticatorSetup the Google Authenticator
Then run the google-authenticator command to create a new secret key in your home directory make your terminal full screen (for the QR Code) and type google-authenticator
When asked Do you want authentication tokens to be time-based? Answer y.
Then you will see a QR code that you can scan using a TOTP app on your phone.
Next you are presented with 4 questions, you can answer yes to all if you like. But read the text and the documentation so you know what is going to happen.
Do you want me to update your "/home/<user>/.google_authenticator" fileDo you want to disallow multiple uses of the same auth token? ...By default, a new token is generated every 30 seconds ...If the computer that you are logging into isn't hardened ...
TUI sg2
Copy the old TUI cp sg1 sg2 and then edit the new file nano sg2
#!/bin/bash

CODE=$(whiptail --title "Two Factor Authentication" \
     --passwordbox "Enter code:" 8 32 \
     3>&1 1>&2 2>&3 3>&-); clear
USEC=$(sed -n 1p $HOME/.google_authenticator)
TOTP=$(oathtool --totp -b $USEC)

if [[ $CODE -ne $TOTP ]]; then whiptail --title "Error Detected" --msgbox "Wrong Code!" --ok-button "exit" 5 24; clear; exit 1

  else

    OPT=$(Whiptail --menu "Select Target:" 16 24 8 \
        1 "Docker srv 1" \
        2 "Docker srv 2" \
        3 "DNS main" \
        4 "K8s master" \
        5 "NAS" \
        6 "Exit" \
        3>&1 1>&2 2>&3 3>&-); clear
    case $OPT in
         1) ssh [email protected] ; exit ;;
         2) ssh [email protected] ; exit ;;
         3) ssh [email protected] ; exit ;;
         4) ssh [email protected] ; exit ;;
         5) ssh [email protected] ; exit ;;
         *) exit ;;
    esac
fi
Edit nano /etc/ssh/sshd_config and change to stargate2.
Restart ssh with the new settings systemctl restart sshd
Background
Their is much debate on this approach today and it's benefits and problems, but that is for other forums to discuss. In the 1990s when co-location facilities became more common there was a need to provide access between dissimilar security zones. The jump server concept emerged to meet this need. The jump server would span the two networks and typically be used in conjunction with a proxy service such as SOCKS to provide access from an administrative desktop to the managed device. As SSH-based tunneling became common, jump servers became the de facto method of access.
A bastion host is a special-purpose computer on a network specifically designed and configured to withstand attacks, so named by analogy to the bastion, a military fortification. The computer generally hosts a single application or process, for example, a proxy server or load balancer, and all other services are removed or limited to reduce the threat to the computer. It is hardened in this manner primarily due to its location and purpose, which is either on the outside of a firewall or inside of a demilitarized zone (DMZ) and usually involves access from untrusted networks or computers. These computers are also equipped with special networking interfaces to withstand high-bandwidth attacks through the internet.
- From Wikipedia, the free encyclopedia
References
oathtool [1] libpam-google-authenticator [2] Jump Box [3] Bastion Host [4] Web SSH [5]


