How to sync files on all devises
Do you require a certain set of files with you, regardless of the device you're using, be it a different PC or even your mobile device? You don't have to fumble with USB sticks or cloud storage or NextCloud. File/directory synchronization is done automatically by Syncthing including version control.


I use many devices, and that used to be a problem with files on one, but not on the one I worked on. USB memories and Cloud storage was my go-to solution for a long time. Well, hasn't been for many years now — Syncthing is my savior.
I have replaced Dropbox, Box, OneDrive, and Nextcloud with Syncthing.
Synching runs on all my development workstations and laptops, as on one of the NAS servers in my network. This way I also have an extra backup. I also have version control for anything needing it.
Syncthing is easy to install and easy to set up, and the rest is automated.
Syncthing is a continuous file synchronization program. It synchronizes files between two or more computers. Syncthing goals: Data is protected from data loss. Secure yourself against cybercriminals. It is easy to use. Automated. Universally available. Empowering individuals with easy to use file synchronization. The Syncthing goals are listed, in order of importance, in the Goals document. Initial release: December 15, 2013; 10 years ago.
Easy to use
- Powerful. Synchronize as many folders as you require with different people or just between your own devices. You choose how.
- Portable. Configure and monitor Syncthing via a responsive and powerful interface accessible via your browser. Works on macOS, Windows, Linux, FreeBSD, Solaris, OpenBSD, and many others. Run it on your desktop computers and synchronize them with your server for backup.
- Simple. Syncthing doesn’t need IP addresses or advanced configuration: it just works, over LAN and over the Internet. Every machine is identified by an ID. Give your ID to your friends, share a folder and watch: UPnP will do if you don’t want to port forward, or you don’t know how.
- Version control is easy to configure to suite different needs.
- Mapping between different languages on desktops is ease to do
Installation
The package manager for your distro usually has an older version, for Ubuntu it's 0.9.4.4, the same with Flathub. Installing with Nala you get 1.18.0.
If you know how to and want to do extra work, download the latest version 1.27.4 from here, extract it, and install it with dpkg -i.
Configuration
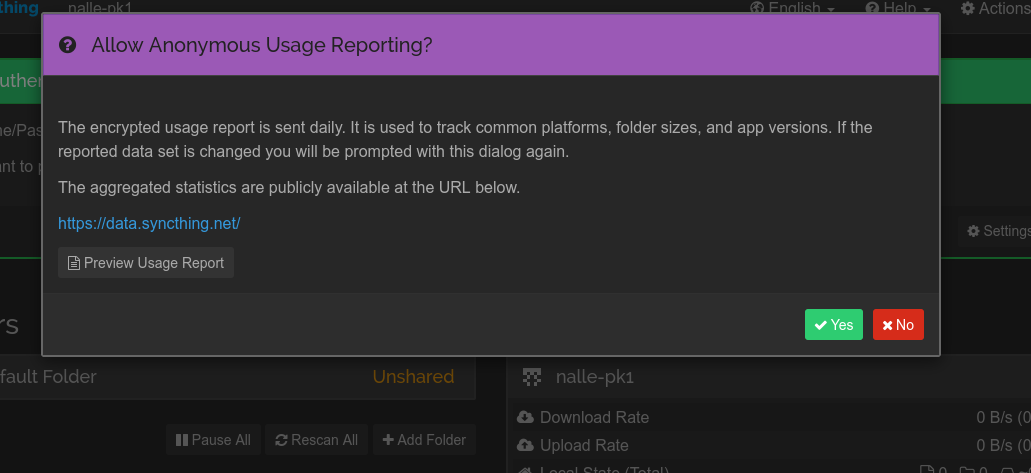
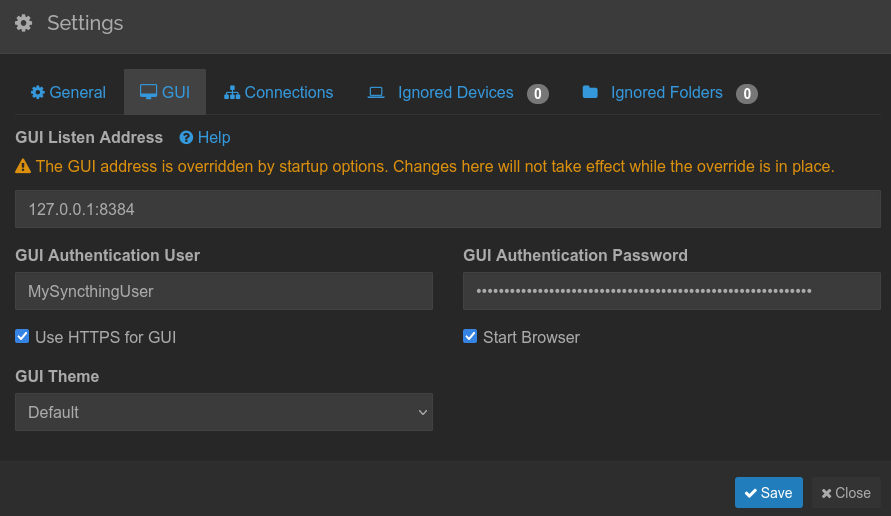
After the installation, you will see a directory called Sync in your home folder. Just set up the user credentials and turn on HTTPS if that's all you require.
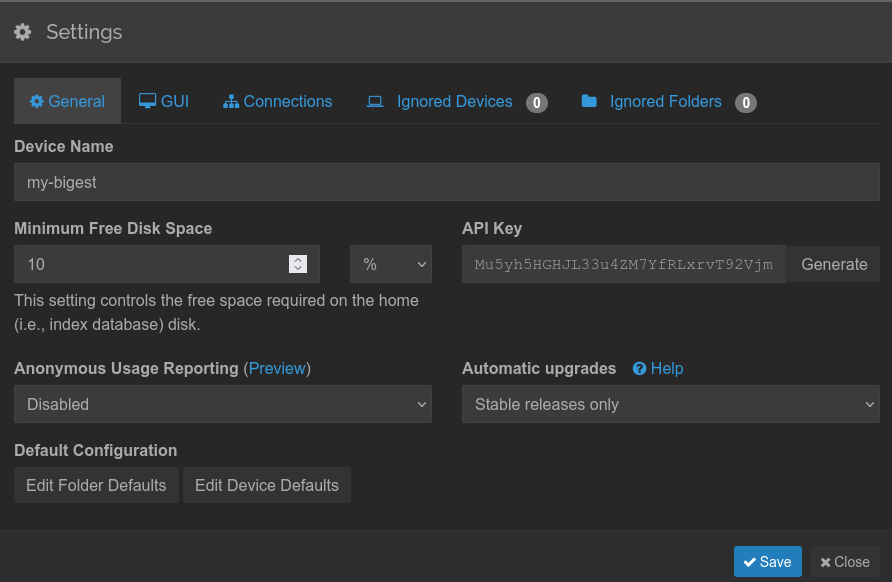
Create your credentials and select the theme. The GUI port is, 8384. Listening is on port, 22000.
Connections tab, here you can limit egress and ingress bandwidth to Syncthing.
Ignored Device and Folders tabs are for ignoring folders and files.
Add the storage for the synchronized files
Add a virtual disk (sdb) and create a partition on it. Make a filesystem mkfs.ext4 /dev/sdb1 and mount it with sudo mount -t auto -v /dev/sdb1 /sync/.
Find the UUID ls -l /dev/disk/by-uuid and edit /etc/fstab, add the line /dev/disk/by-uuid/<UUID> /sync ext4 defaults 0 2. The fs_passno of 2 means check filesystem after the root filesystem is checked, for no check use 0.
The root filesystem should be specified with a fs_passno of 1. Other filesystems should have a fs_passno of 2. Filesystems within a drive will be checked sequentially, but filesystems on different drives will be checked at the same time to utilize parallelism available in the hardware. Defaults to zero (don’t check the filesystem) if not present.
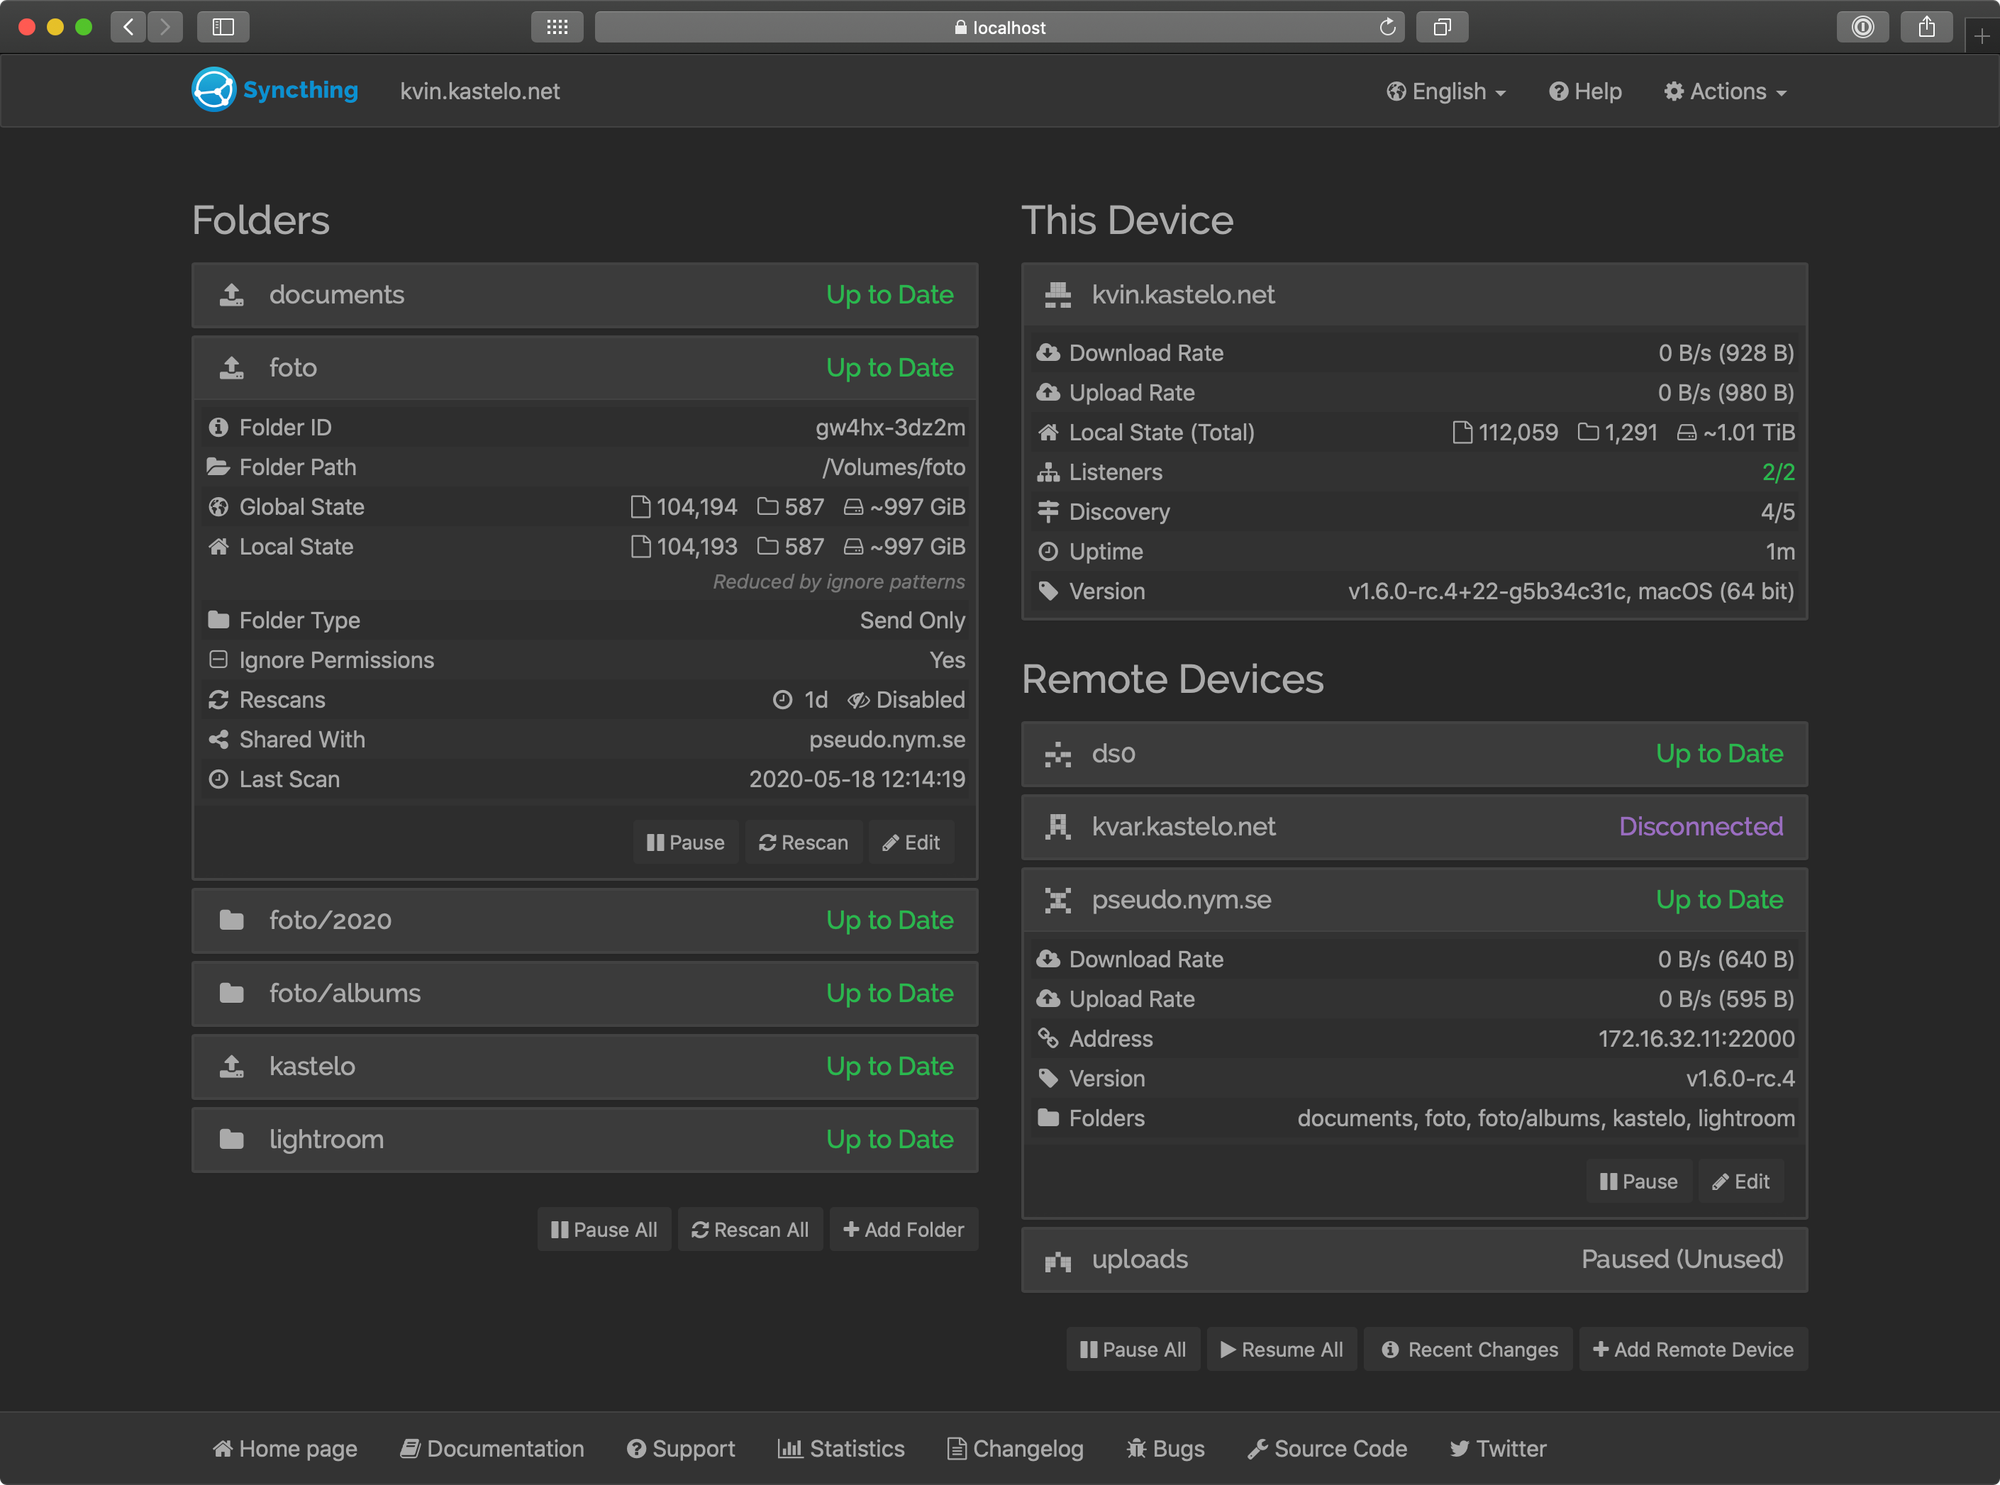
Start using Syncthing
Add your devices by hitting [+Add Remote Device] and choosing it from the list.
Start synchronizing a folder by hitting the folder bar and then hit edit, select with whom to share this folder. Add your File Versioning (guide) strategy and Ignore Patterns (guide).
Installed from a .deb file
Run Syncthing as a demon
This is an example file /etc/systemd/system/syncthing.service of how to run it as a service on a server. Check the extracted files for examples and READ.me files.
Copy the extracted executable file to your path, file syncthing to folder /usr/bin.
Running Syncthing as a system service — systemd
Create the user for running syncthing.
- From git location, copy the
[email protected]file into the load path of the system instance. - use
systemctl enable [email protected] --now
[Unit]
Description=Syncthing - Open Source Continuous File Synchronization for %I
Documentation=man:syncthing(1)
After=network.target
StartLimitIntervalSec=60
StartLimitBurst=4

[Service]
User=%i
ExecStart=/usr/bin/syncthing serve --no-browser --no-restart --logflags=0
Restart=on-failure
RestartSec=1
SuccessExitStatus=3 4
RestartForceExitStatus=3 4

# Hardening
ProtectSystem=full
PrivateTmp=true
SystemCallArchitectures=native
MemoryDenyWriteExecute=true
NoNewPrivileges=true

# Elevated permissions to sync ownership (disabled by default),
# see https://docs.syncthing.net/advanced/folder-sync-ownership
#AmbientCapabilities=CAP_CHOWN CAP_FOWNER

[Install]
WantedBy=multi-user.target
Running Syncthing as a user service — systemd
From git location, copy the syncthing.service file into the load path of the user instance. Use without root privileges, use this folder under your home directory ~/.config/systemd/user/.
[Unit]
Description=Syncthing - Open Source Continuous File Synchronization
Documentation=man:syncthing(1)
StartLimitIntervalSec=60
StartLimitBurst=4

[Service]
ExecStart=/usr/bin/syncthing serve --no-browser --no-restart --logflags=0
Restart=on-failure
RestartSec=1
SuccessExitStatus=3 4
RestartForceExitStatus=3 4

# Hardening
SystemCallArchitectures=native
MemoryDenyWriteExecute=true
NoNewPrivileges=true

# Elevated permissions to sync ownership (disabled by default),
# see https://docs.syncthing.net/advanced/folder-sync-ownership
#AmbientCapabilities=CAP_CHOWN CAP_FOWNER

[Install]
WantedBy=default.target
Enable and start the Syncthing as a user service systemctl --user enable syncthing --now.
If your home directory is encrypted with eCryptfs on Debian/Ubuntu, then you will need to make the change described in Ubuntu bug 1734290. Otherwise, the user service will not start, because by default, systemd checks for user services before your home directory has been decrypted.
See the documentation on how to run using systemd, link.
Advanced Settings
These are abstracts from the Syncthing documentation, for more info use this link.
Networks
allowedNetworks is an advanced device setting that affects connection handling. The default is for this setting to be empty, indicating that there is no restriction on the allowed networks for a device.
By setting this to a comma separated list of networks, connections to the given device will be limited to those networks. The networks refer to the address of the remote device, not the network that the local device is presently on.
Given a value of 192.0.2.0/16
Local Firewall
If your PC has a local firewall, you will need to open the following ports for incoming and outgoing traffic:
- Port 22000/TCP: TCP based sync protocol traffic
- Port 22000/UDP: QUIC based sync protocol traffic
- Port 21027/UDP: for discovery broadcasts on IPv4 and multicasts on IPv6
If you configured a custom port in the Sync Protocol Listen Address setting, you have to adapt the firewall rules accordingly.
Remote Web GUI
To be able to access the web GUI from other computers, you need to change the GUI Listen Address setting from the default 127.0.0.1:8384 to 0.0.0.0:8384. You also need to open the port in your local firewall, if you have one.
Tunneling via SSH
If you have SSH access to the machine running Syncthing but would rather not open the web GUI port to the outside world, you can access it through an SSH tunnel instead. You can start a tunnel with a command like the following:
ssh -L 9999:localhost:8384 machineThis will bind to your local port 9999 and forward all connections from there to port 8384 on the target machine. This still works even if Syncthing is bound to listen on localhost only.
Via a Proxy
Syncthing can use a SOCKS5 proxy for outbound connections.
Personal notes on usage
In my pool of machines, I have machines using English and other languages than English. In that case, I set the correct name for the system's folders according to that language when accepting the folder to share e.g., Documents, Music, Pictures.
My workflow on GIT is to use on two desktops to be Git-enabled and others just to get the newest files by Syncthing.
Version control is different for files used for book writing compared to GIT and other coding related files. Also, spreadsheets and other office type documents have different needs. Using a set of folders and not just the Documents folder gives me that flexibility.
References
Syncthing [1]
Syncthing homepage, GitHub, Getting Started documentation, wikipedia ↩︎


