Cloud Images & Cloud-init
One of the supporting pillars of virtualization is the use of Cloud-Init and Cloud Images. Setting up VMs is easy and fast. The process is easy to automate and adapt to CI/CD.


Setting up any VM, using cloud images and cloud-init, is a pretty easy task. Especially with the newish Import Disk feature of the PVE 9 GUI.
Cloud Images and Cloud-Init
Cloud images are ready-made disk images for Cloud and VM use. Cloud-init is an industry-standard, open source, tool for rapid deployment of cloud servers. It's designed to automate the process of getting systems up and running.
Private clouds
Private Clouds are built using standard or minimal images for the following environments: Hyper-V, KVM, OpenStack, Vagrant, VMware.
As Proxmox and TrueNAS uses KVM, we need suitable images for them too.
A VM made using a cloud image, can be very different from an installation of a VM made using the standard ISO. All depending on the distribution.
Some distributions (e.g. Ubuntu) are distinguishing between cloud and server images. Their documentation is mostly sparse or non-existent.
My favorite images are the Debian official ones. Debian makes a decent attempt to document the differences, and they are very stable.
For a smaller system, I often use Alpine, as it's really lightweight.
Download a Cloud Image
You need to have Import activated on a local or remote storage.
If not, go to Datacnter and add Import to an existing pool.
The default setting (in the GUI) for a new VM in Proxmox is QCow2.
QCow2 or RAW
The QCow2 format is more sophisticated than the raw format, but both the QCow2 and raw disk formats have pros and cons. You can choose QCow2 if you need more features, but if I/O performance is your main priority, choose a raw disk format. If you have to choose a raw disk format, remember to use a Proxmox storage type that supports snapshots.
- QCow2, you need mapping between logical and physical blocks.
This makes it slightly slower compared to a raw disk. - RAW disk, pre-allocates the entire space to the disk file, so you get a bigger disk file.
Since there is no additional mapping overhead, you get slightly better performance.
Storage Types
The choice of a storage type will determine the format of the hard disk image.
- Block Devices (LVM, ZFS, Ceph)
- Require the raw disk image format
- RAW disk image – is a bit-to-bit image of a hard disk, similar to what you would get when executing the
dd-command on a block device on Linux.
This format doesn't support thin provisioning or snapshots by itself, requiring cooperation from the storage layer for these tasks.
It may, or may not, be up to 10% faster than the QEMU image format QCow2.
- File based (Ext4, XFS, NFS, CIFS)
- Let you choose either RAW or QCow2
- QCow2 (the QEMU image format), is a copy-on-write format.
It allows snapshots and thin provisioning of the disk image. - The default for a new VM in Proxmox is QCOW2.
write cache, but it may increase the risk of data loss. Today, the performance of QCow2 probably don't need it.
Download
Go to your storage where import is activated local (or dpool in my case) and
hit Import→Download from URL.
- in the
URL-field, drop the full path to the image to be downloaded – raw or qcow2 - Select
Verifiy certificatesand select theHash algorithmfrom the drop-down menu and drop the checksum toChecksum - hit
Download.
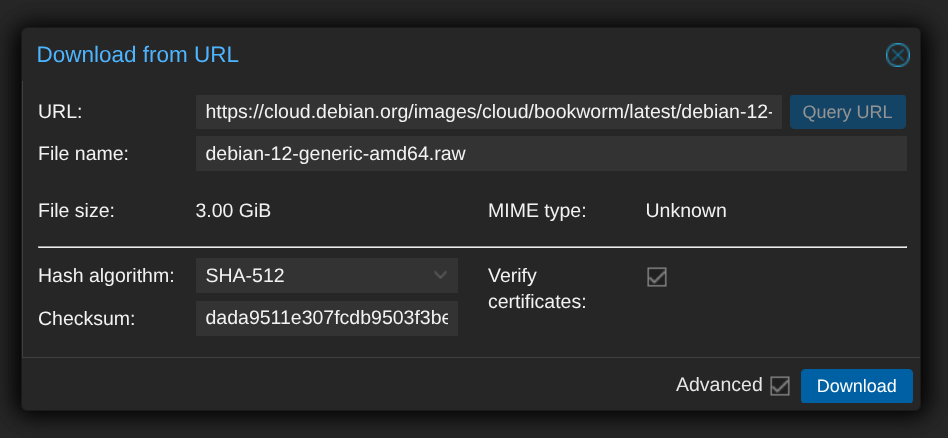
Image examples
You will find, on most distros, QCow2, OVA and VMDK -files, some also have RAW.
Alpine
https://dl-cdn.alpinelinux.org/alpine/v3.22/releases/cloud/generic_alpine-3.22.2-x86_64-bios-cloudinit-r0.qcow2Debian
QCow2
https://cloud.debian.org/images/cloud/trixie/latest/debian-13-generic-amd64.qcow2SHA512
1882f2d0debfb52254db1b0fc850d222fa68470a644a914d181f744ac1511a6caa1835368362db6dee88504a13c726b3ee9de0e43648353f62e90e075f497026RAW
https://cloud.debian.org/images/cloud/trixie/latest/debian-13-nocloud-amd64.rawSHA512
aa70dd57f8d5f961aa3cd3236d4a9164038597027476ca246b8cb883b012490eb07c183b4476371dc4ff439c345f61ed4726b045793de17a9139adc2cd29b017Fedora
https://download.fedoraproject.org/pub/fedora/linux/releases/43/Cloud/x86_64/images/Fedora-Cloud-Base-Generic-43-1.6.x86_64.qcow2Ubuntu - Using the WGET -command
You need to convert to qcow2 or raw file format, depending on your use case.
wget -O noble-server-cloudimg-amd64.qcow2 https://cloud-images.ubuntu.com/noble/current/noble-server-cloudimg-amd64.imgUbuntu uses the .img file extension. But, actually, they are .qcow2 images.
qemu-img convert -f qcow2 -O raw noble-server-cloudimg-amd64.qcow2 noble-server-cloudimg-amd64.rawAnd add it to a VM: qm disk import 101 noble-server-cloudimg-amd64.raw vmpool
Convert and modify
Use the CLI to add any packages or settings needed for your VM. You can also specify a script to be executed at startup. See my old blog TemplateBuilder 5.1
qemu-img convert -f qcow2 -O raw <file-name.qcow2> <file-name.raw>The filenames are long and complicated, you might like to shorten them, but think twice.
Add it to your VM qm set 100 --scsi1 <DiskStorage>:vm-100-disk-1,size=8G
Example: Importing a TurnKey VMDK file
Importing a TurnKey VMDK file into Proxmox and use it in a VM
Create a new VM, no disk
qm create 1000 --name test --memory 1024 --sockets 1 --cores 1 --net0 virtio,bridge=vmbr0Import the downloaded VMDK disk as QCow2
qm disk import 1000 /mnt/test.vmdk local --format qcow2This command converts and import the VMDK disk.
If you want to do the conversion as a separate step you can, see below
qemu-img convert -f raw /mnt/usb/test.vmdk -O qcow2 /var/lib/vz/images/109/vm-1000-disk-0.qcow2Import the downloaded OVA disk as QCow2
If you have a virtual appliance in the OVA format (Open Virtualization Appliance).
First, you need to extract it, using the tar -command.
tar xvf <ova_file_path>
qm importovf <unused_vm_id> <ovf_file_path> <storage> --format qcow2Attach the disk and configure the boot order
qm set 1000 --scsi0 local:1000/vm-1000-disk-0.qcow2,discard=on --boot order='scsi0;net0'
Start your VM
qm start 1000Modify
Run the qm set command, with your needed changes. See the manual.
qm set --localtime
qm set --keyboard <your country code>
Create a VM
We will create a VM using a Cloud-Init and a Cloud Image disk image. When launching the download image from KVM, you will need to specify the virtio network driver.
Depending on the Cloud Image, you need to set different settings like: BIOS, Machine type, EFI disk, TPM state. See the origin documentation.
Setup
Click Create VM in the Proxmox GUI and setup as
- General tab → Give your VM a Name (e.g.,
ubuntu-noble-cloudinit). - OS tab → Select Do not use any media.
- System tab → Enable QEMU Agent.
- Disks tab → Remove all disks (we’ll import our own).
- CPU tab → Set at least 1–2 cores (depending on use case).
- Memory tab → allocate a minimum of 1024–2048 MB RAM
- Network tab → Set your Bridge (usually
vmbr0)
Finish the VM creation wizard – don’t start it yet.
Import the Hard Disk
Select your new VM from the left sidebar.
- Hardware tab
- Hit
Add→CloudInit Drive– to attach the cloud-init configuration drive.- Set the
Bus/DeviceandStoragedepending on your system
- Set the
- Hit
Addand selectSerial Port– to use axtemrm.js-console,
because it supports copy/paste and colors without changes (usually)
- Hit
- Hit
Add→Import Hard Disk- Import From:
localor your ISO storage - Select Image:
noble-server-cloudimg-amd64.raw - Target Storage: choose your VM storage (default is
local-zfs).
- Import From:
Once imported, select the new disk and hit the Disk Action button and select Resize to increase its size (e.g., 5) to have an 8 G disk.
Click Resize Disk to apply.
Configure Cloud-Init Settings
In the Hardware tab, select Cloudinit drive and enter your desired credentials and settings
- User: your username (e.g.,
ubuntu) - Password: your password (long and complicated)
- SSH public key if you use SSH. (Optional but highly recommended)
- IP Config: use DHCP with/without IP reservation or set a static IP
Hit the Regenerate Image button to apply the changes.
Options tab
Set Boot Order and Start the VM. Go to Options→Select Boot Order→Edit.
- Check your imported disk
SCSI0as the primary boot device, then click OK.
Summary tab
Write a description of the VM, and it's purpose, future you will thank you.
Console tab
Go to the Console tab and click Start to boot up your new cloud-init based VM.
Verify the Installation
Once the VM starts:
- Log in with your configured username/password.
- Check network settings with
ip rorip aandhostname -I. - Verify SSH access using your provided key (if configured).
- Set your locale
sudo dpkg-reconfigure locales(for a non US)
You now have a fully functional, cloud-init VM on Proxmox VE 9, created entirely through the web GUI and import disk feature.
Other
Enable Trim Support
As the number of virtual machines grows, you soon need an automated way to trim the unused blocks. This is where the trim option (fstrim or discard) enters the game.
Trim Support requires a SSD or a storage type that supports thin provisioning (e.g., thin-lvm and ZFS). For the trim operation to work effectively, you need to enable the Discard option on the VM disk.You need to have trim enabled in the guest OS, so that it can send the information about unused blocks to the underlying storage.
Proxmox allows you to enable SSD emulation, meaning you do not necessarily need an SSD storage, but it's highly recommended anyway.
Most modern operating systems (Linux and Windows) have trim enabled by default.
Shrink a QCow2 disk manually
Manual compression works when there are just a few disk images.
If, after using a QCow2 disk for some time, the file size becomes bigger than the actual data stored in it. This happens because the guest OS marks the files as deleted, but the unused blocks aren't automatically emptied. In this situation, you might need to manually shrink the QCOW2 disk.
Before doing anything,
- Shut down the VM
- Make a backup of the original virtual disk file.
To locate a virtual disk file, use thepvesmCLI tool (Proxmox VE Storage Manager).
Locate and back up a QCow2 disk
View the Proxmox storage status
pvesm statusList your storage
pvsm list localList the path
pvesm path local:1000/vm-1000-disk-1.qcow2Copy the original
First, make a work file, copy the original QCow2-disk as <file name>.qcow2.old.
cp /var/lib/vz/images/1000/vm-1000-disk-1.qcow2 /var/lib/vz/images/1000/vm-1000-disk-1.qcow2.oldThen, make backup file, copy the original QCow2-disk as <file name>.qcow2.orig.
cp /var/lib/vz/images/1000/vm-1000-disk-1.qcow2 /var/lib/vz/images/1000/vm-1000-disk-1.qcow2.origTo shrink the QCow2 file
To shrink the QCow2 file, you can use the qemu-img convert command, two ways:
- shrink without compression
- shrink with compression
Without is faster, but with compression takes longer but results in a much smaller file.
Go to /var/lib/vz/images/
Shrink without compression
qemu-img convert -O qcow2 vm-1000-disk-1.qcow2.old vm-1000-disk-1.qcow2
Shrink without compression
qemu-img convert -O qcow2 -c vm-1000-disk-1.qcow2.old vm-1000-disk-1.qcow2
Check a virtual disks information
To see more information about a virtual disk, use the qemu-img info command
You can see that the virtual disk size is 32 GiB, whereas the actual QCow2 file size is 10.5 GiB. When the compression is done, re-start your VM.
Check for success and if yes, you can delete the backup files to reclaim the free space.
References
Cloud-Init [1] Download a Cloud-Init image [2] TurnKey Linux [3]


