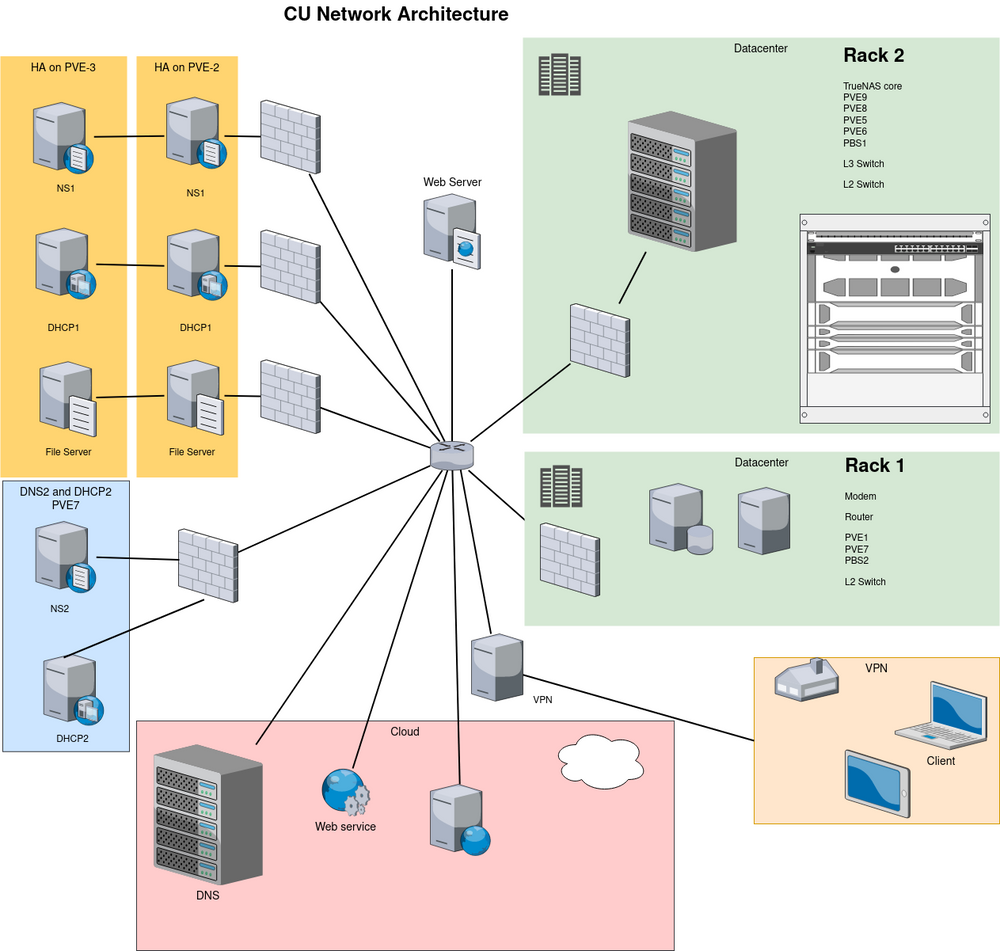
A redundant DNS - Pi-Stack
Without DNS nothing works. On any corporate network you will find several DNS server, several NTP servers and a lot of Firewalls. – Shouldn't the lab also have multiples of the core services, just in case.


Setting up redundant DNS is a sensible thing to do - and that's not all
The history behind Pi-stack
I had a situation where my DNS server just stopped working - what a mess. After some time nothing worked and people asked questions. I just had to acct fast.
I made a PI-hole setup - it was better than expected and I decided to expand add Unbound for global Secure DNS and buffering the known addresses on our local LAN's, PI.alert intrusion detection and a PiVPN.
As an alternative you may like DNS using Bind 9
Pi-stack - Mission Statement
The purpose is to provide a redundant system that is light weight and it shall include a validating, recursive, caching DNS resolver; an intrusion alert system and a sinkhole for adds:
- a Secure DNS using DNSSEC (Unbind + Pi-hole)
- a sinkhole for adds (Pi-hole)
- Sync the two Pi-hole servers (Gravity Sync)
- an intrusion detection system (Pi.alert)
- send e-mails when an event triggering an alarm occur
- We shall have redundancy. Two or more DNS (Unbind + Pi-hole)
- Install a VPN (PiVPN)
Add-on's :
- Local DNS records and CNAME's (Pi-hole, by configuration)
- DHCP servers (Pi-hole, by configuration)
- Replication in Proxmox for HA
We can go the Docker or the VM or the CT route to do this. The Docker is easy and follows the normal procedure but you need to have a Docker system set up on a CT/VM first. And I have done in an other post. The VM/CT route can be very automated or very hands-on - it's your choice.
We do it as easy as possible by using some nice scripts.
The Specifications and our check list
We will use imaginary settings in this article: IP: 192.0.2.2 and 192.0.2.3, User: Bob Builder, Password: Pa$$w0rd
- Hostname: pistack990 (example of VM 990) and pistack991 (VM 991)
- Password: Pa$$w0rd (better to have a secure one and not this)
- Template: Ubuntu-22.04-live-server-amd64 install as minimized
- Disk 8 G (for larger system and/or extensive logs 16 G)
- 1 cpu core (for larger systems 2 cores)
- Memory 1 G RAM (for very large systems 2 G)
- We need to have a static IP for the VM's.
- PiStack as DHCP yes/no - can be activated later
- Set-up e-mail alarms yes/no (needs tweaking in the settings)
- email address: [email protected]
- SMTP server: mail.example.com
- SMTP password: ask your admin
- Do you want to use your Dynamic DNS yes/no - depending on your use case
- Username: bobthebuilder
- Password, long and complicated: Pa$$w0rd (this is a really week password)
- Install PiVPN yes/no
- Redundancy yes/no
Best practices is to run Pi-stack in a VM
You can set it up on Raspberry Pi or any Linux machine virtual or real-rust. It's technically possible to set it up in a container, but not recommended if you are to use the PiVPN (technically you could do it but its unsafe).
Why use a VM
- Cluster based system can migrate VM's for High Availability
- CT's have smaller footprint but we do not like privileged containers
- CT's default uses is root (you could add an admin user and block root login)
Privileged Containers
Security in containers is achieved by using mandatory access control AppArmorrestrictions, seccomp filters and Linux kernel namespaces. The LXC team considers this kind of container as unsafe, and they will not consider new container escape exploits to be security issues worthy of a CVE and quick fix. That’s why privileged containers should only be used in trusted environments.
Create the virtual machine VM990
Configure the virtual machine according to the design
Start the VM and log in as bobbuilder using SSH.
(ssh [email protected] and accept the key)
sudo apt update && sudo apt upgradesudo apt install curl whiptail nano git rsync -yThe user created at install of the Ubuntu 22 belongs to the sudo group.
Security measures on a VM
SECURITY WARNING
Block ssh login for root as a minimum,
consider to only permit login by keys and only from specific IP's.
Secure logging in to SSH nano /etc/ssh/sshd_config. It's up to you and your use case what you block and what you allow.

Installation
Install as standalone or redundant
Installation in 3 easy steps
The full installation of a stand alone Pi-stack is done in only 3 steps
Install a redundant system - 7 steps
Installing a redundant Pi-stack is done in only 7 steps.
The first 3 are the same as for the a stand alone Pi-stack:
Step 4 = step 1 - step 5 = step 2 - step 6 = step 3 (optional). Step 7 is new.
- Install the first Pi-hole and Pi-alert
- Install Unbound
- Install PiVPN
- On a new VM install of Pi-stack or Pi-hole
- Install Unbound on both
- Install PiVPN (optional)
- Install Gravity-sync on both (if you need synchronization)

Step 1 - Install Pi-hole and Pi.alert
Network-wide ad blocking via your own Linux hardware
Pi-hole® is a DNS sinkhole that protects your devices from unwanted content, without installing any client-side software.
Pi.alert is WIFI / LAN intruder detector. Scan the devices connected to your WIFI / LAN and alert you the connection of unknown devices. It also warns the disconnection of "always connected" devices.
Now we install Pi-hole and Pi.alert with one script
- Choose install and install everything, but follow the design on DHCP
- Use Python 3 (its installed by default in version Ubuntu 22.04)
- I prefer to log all devices, at the first scan (Pi.alert) as new
- Set-up or do not set-up e-mail alerts now. It is the nature of Pi.alert to send alarm e-mails when a devise is entering the net or one that is supposed to be on is off-line
- If you have an Dynamic DNS you can set it up here
- I prefer to log all devices at initial start-up (Pi.alert)
- Chose any DNS provider from the list, we will correct this later.
- Add the Steven Black's Unified Host List (it's usually all you need)
- Install the Admin Web Interface and the web server
- You probably like to have query logging
- Show everything is my option.
The configuration can be edited later if mistakes was made or situations change nano /root/pialert/config/pialert.conf
See more about Pi-hole on GitHub See more about Pi.alert on GitHub
The one step install for Pi-hole and Pi.alert
The fork we use has more features and less errors than older ones. It's from GitHub.com/leiweibau LINK many thanks and give him a star.
curl -sSL https://github.com/leiweibau/Pi.Alert/raw/main/install/pialert_install.sh | bashNow the install begin and at the end you will be presented with the admin password. WARNING this is the only time it's shown!
The configuration can be edited later if mistakes was made or situations change nano /root/pialert/config/pialert.conf
Next you configure the Pi-hole and the Pi.alert to your liking
- 192.0.2.2/admin for pi-hole
- 192.0.2.2/pialert for pi.alert
- Change the password!
Note
In case you use Pi-hole with the DHCP server enabled on the same device, Pi.Alert will get the information from the servers database. If not then you have to enter the host names manually.
E-mail issues
If your mail server uses another port than 587 you need to edit it in the Pi.alert config nano /root-or-user/pialert/config/pialert.conf
Using other install scrips may end with an ERROR
There is an error in the installation script that may or may not end up with a ERROR message in the log that it can't find the files ieee-iab.txt and ieee-oui.txt. You will see that Pi.alert is unable to discover vendors from MAC, all are Unknown. The easy way to fix it is as follows:
The issue is that it do not create the vendor files in the correct directory
- /usr/share/arp-scan/ieee-oui.txt is missing but there is a ieee-oui.txt.bak
- /usr/share/arp-scan/ieee-iab.txt is missing but there is a ieee-iab.txt.bak
- the files are present in the /usr/share/arp-scan/i2_backup -directory
Quick fix
cd /usr/share/arp-scan
cp ieee-oui.txt.bak ieee-oui.txt
cp ieee-iab.txt.bak ieee-iab.txt
Step 2 - Install Unbound
Unbound is a validating, recursive, caching DNS resolver. It is designed to be fast and lean and incorporates modern features based on open standards.
We want to use Secure DNS in stead of the plain text DNS on port 53. We will also have buffering dns-records locally for better speed. Unbound on GitHub
Ubuntu has a version in the repository ready for download. It will not start yet, we need to add some code after the install.
sudo apt install unboundUnbound will give a fail to start error. This is because we haven't configured it yet. No worry we fix it next.
Add root domains (you need to update them periodically)
wget https://www.internic.net/domain/named.root -qO- | sudo tee /var/lib/unbound/root.hintsConfigure unbound link to origin
- Listen only for queries from the local Pi-hole (on port 5335)
- Listen for both UDP and TCP requests
- Verify DNSSEC signatures, discarding BOGUS domains
- Apply a few security and privacy tricks
Create the pi-hole.conf configuration file:
sudo nano /etc/unbound/unbound.conf.d/pi-hole.confAdd the code to the file and save (link to origin):
server:
    # If no logfile is specified, syslog is used
    # logfile: "/var/log/unbound/unbound.log"
    verbosity: 0

    interface: 127.0.0.1
    port: 5335
    do-ip4: yes
    do-udp: yes
    do-tcp: yes

    # May be set to yes if you have IPv6 connectivity
    do-ip6: no

    # You want to leave this to no unless you have *native* IPv6. With 6to4 and
    # Terredo tunnels your web browser should favor IPv4 for the same reasons
    prefer-ip6: no

    # Use this only when you downloaded the list of primary root servers!
    # If you use the default dns-root-data package, unbound will find it automatically
    #root-hints: "/var/lib/unbound/root.hints"

    # Trust glue only if it is within the server's authority
    harden-glue: yes

    # Require DNSSEC data for trust-anchored zones, if such data is absent, the zone becomes BOGUS
    harden-dnssec-stripped: yes

    # Don't use Capitalization randomization as it known to cause DNSSEC issues sometimes
    # see https://discourse.pi-hole.net/t/unbound-stubby-or-dnscrypt-proxy/9378 for further details
    use-caps-for-id: no

    # Reduce EDNS reassembly buffer size.
    # IP fragmentation is unreliable on the Internet today, and can cause
    # transmission failures when large DNS messages are sent via UDP. Even
    # when fragmentation does work, it may not be secure; it is theoretically
    # possible to spoof parts of a fragmented DNS message, without easy
    # detection at the receiving end. Recently, there was an excellent study
    # >>> Defragmenting DNS - Determining the optimal maximum UDP response size for DNS <<<
    # by Axel Koolhaas, and Tjeerd Slokker (https://indico.dns-oarc.net/event/36/contributions/776/)
    # in collaboration with NLnet Labs explored DNS using real world data from the
    # the RIPE Atlas probes and the researchers suggested different values for
    # IPv4 and IPv6 and in different scenarios. They advise that servers should
    # be configured to limit DNS messages sent over UDP to a size that will not
    # trigger fragmentation on typical network links. DNS servers can switch
    # from UDP to TCP when a DNS response is too big to fit in this limited
    # buffer size. This value has also been suggested in DNS Flag Day 2020.
    edns-buffer-size: 1232

    # Perform prefetching of close to expired message cache entries
    # This only applies to domains that have been frequently queried
    prefetch: yes

    # One thread should be sufficient, can be increased on beefy machines. In reality for most users running on small networks or on a single machine, it should be unnecessary to seek performance enhancement by increasing num-threads above 1.
    num-threads: 1

    # Ensure kernel buffer is large enough to not lose messages in traffic spikes
    so-rcvbuf: 1m

    # Ensure privacy of local IP ranges
    private-address: 192.168.0.0/16
    private-address: 169.254.0.0/16
    private-address: 172.16.0.0/12
    private-address: 10.0.0.0/8
    private-address: fd00::/8
    private-address: fe80::/10
Add the file and enter the code below and save:
sudo nano /etc/dnsmasq.d/99-edns.confedns-packet-max=1232Start your local recursive server
sudo service unbound restartCheck status of unbound
sudo service unbound statusTest for pi-hole
dig pi-hole.net @127.0.0.1 -p 5335This should give NOERROR
Testing unbound
dig sigfail.verteiltesysteme.net @127.0.0.1 -p 5335This should give a status report with SERVFAIL and no IP address
dig sigok.verteiltesysteme.net @127.0.0.1 -p 5335This should give NOERROR and an IP address.
Configure Pi-hole to use Unbound
Set Pi-hole to use Unbound and Sequre DNS globally on your net
Uncheck any DNS chosen during install and set Custom 1 (IPv4) as tagged and 127.0.0.1#5335 and check use DNSSEC if you like.

Now you are ready to add any block-list's (if really needed more).
Note on Google add links
If you like to have some person to able to click on google add-links use a group and add the clients there and add these two Regex whitelist rules to that group and enabled them:
Domain management
(.|^)atdmt.com$(.|^)googleadservices.com$
REMEMBER
You should fully configure and test the Pi-Stack before going any further. We will sync the next Pi-hole to to this one.
Editing DHCP static leases file
sudo nano /etc/dnsmasq.d/04-pihole-static-dhcp.confAfter editing re-start the DHCP service
sudo service pihole-FTL reloadFormat of the file is dhcp-host=MAC,IP,hostname:
dhcp-host=12:34:56:78:a1:d0,192.168.1.2,pi-stack.example.comEditing the local DNS file
sudo nano /etc/pihole/custom.listFormat of the file is IP hostname:
192.0.2.2 pi.alertStep 3 - Add a VPN service to you system
You will need to access the cluster even on the road. For this we can use a VPN to create a tunnel into the site. It's easy to use and apps for phones and pads are f really available. The PiVPN home page.
You can find more information here


The script will first update your APT repositories, upgrade packages, and install WireGuard (default) or OpenVPN, which will take some time.
You need a static Public IP or you must use a Dynamic DNS!
If not you are unable to connect after some time. This is usually due to that your Public IP has changed. There is a multitude of Dynamic DNS providers - some free some not.
Note that if you install PiVPN after Pi-hole, your existing Pi-hole installation will be detected and the script will ask if you want to use it as the DNS for the VPN, so you won't need to go through all these steps.
SECURITY WARNING
Using scripts from the web and piping them to bash is a known security risk. If in doubt read the script and make up your mind.
sudo curl -L https://install.pivpn.io | bashYou will need your admin user now or create a new user for the VPN.
You can use your domain or your Public IP as entry pointUse WireGuard or OpenVPN. Default OpenVPN port is 1194 and Wiregard is 51820 you should probably choose another port due to security.
- Answer yes to Unattended updates yes/no
- Reboot your vm
Now the PiVPN is ready for action
Now we need to add the VPN user(s), in the terminal:
- pivpn -a (add a user)
- pivpn -qr (generate the QR-code and scan it with your phone)
Prepare the client phone and/or pad
Go to the app store for your app and install it.Ther is also apps for PC's and you can scp the profile from the PiVPN.
Configure your router for PiVPN
This can be dangerous, you are opening a port to the internet and that is always dangerous - now you have been warn.
You need to go to the router or firewall and make the UDP port you did choose during the install to be routed to this VM/CT.
SECURITY WARNING
It's recommended to activate the VPN only when you are off-site. A open port is always a threat and we need to keep the threat surface as small as possible at all times. It's dangerous out there!
All PiVPN Terminal Commands
| cmd | Note | Explanation |
|---|---|---|
| -a | add | Create a client conf profile |
| -c | clients | List any connected clients to the server |
| -d | debug | Start a debugging session if having trouble |
| -l | list | List all clients |
| -qr | QR-code | Show the QR-code of a client for use with the mobile app |
| -r | remove | Remove a client |
| -off | off | Disable a client |
| -on | on | Enable a client |
| -h | help | Show this help dialog |
| -u | uninstall | Uninstall pivpn from your system! |
| -up | update | Updates PiVPN Scripts |
| -bk | backup | Backup VPN configs and user profile |
If you need to change settings, just re-execute the installation script.

Setup for redundancy
What is better than a Pi-hole blocking trackers, advertisements, and other malicious domains on your network? That's right, two Pi-hole blocking all that junk on your network!We shall now set-up a second set of Pi.hole with Unbound to be the fall-back unit in case of emergency. Use exactly the same setting as the Pi-stack.
The last released version of Gravity Sync (4.0.7) should continue to work with Pi-hole 5.x, but not with Pi-hole 6+ due to architecture changes.
You can use Nebula-sync as a replasement.
Create a new VM, VM991
Use the specifications in the checklist
Step 4a - Install a Pi-hole
curl -sSL https://install.pi-hole.net | bashStep 4b - Install Pi-hole and Pi-alert o
See Step 1 - Install Pi-hole and Pi-alert
Step 5 - Install Unbound
See Step 3 - Install Unbound
Step 6 - Install PiVPN (optional)
See Step 3 - Install PiVPN
Install a second set of PiVPN and Pi-alert for redundancy
It's OK but if you activate email on both, you will get a lot of e-mails.
See the section on Pi-stack.

Step 7 - Synchronize the DNS and DHCP servers
If you do a update the the block-lists, whitelists, local DNS or static DHCP settings on one server - that will be automatically copied to the other server.
Sync the Pi-hole DNS servers - Gravity Sync
We are now going to sync the DNS databases, block- and white-lists, Local DNS records, Static DHCP assignements if used and CNAME's. Link to vmstan github and link to system requirements
Gravity Sync requires two Pi-hole 5.x instances running on two separate hosts. These Pi-hole instances should be already be deployed and verified to be functional, prior to the installation of Gravity Sync.
Gravity Sync replicates the core of Pi-hole's ad/telemetry blocking settings, which includes:
- Ad-list settings with status and comments.
- Domain/RegEx whitelists and blacklist along with status and comments.
- Clients and group assignments, along with status and descriptions.
Gravity Sync also replicates local network DNS/DHCP settings, which includes:
- Local DNS Records.
- Local CNAME Records.
- Static DHCP Assignments.
Limitations
Gravity Sync will not:
- Modify or sync the individual Pi-hole's upstream DNS revolvers.
- Merge query logs, statistics, long-term data, caches, or other resolution information.
- Sync individual Pi-hole DHCP scoping information or leases.
Backup the Pi-stack - in case of ...
Go to Pi-stack and Settings > Teleporter > Backup
Install Gravity Sync by script - on both Pi-Stack and Pi-hole
If you do not have an existing configuration file, the installer will prompt to create one. Each Gravity Sync install requires it's own unique configuration.
The installer will automatically run the config command after the software install is complete. If you’re using a non-standard SSH port, you need to stop the config by pressing [CTRL] +[C] and then re-launch the config utility with this command ( if your SSH port is 22022):
gravity-sync config 22022It will ask you for the IP of the Pi-hole and the user account to use for sync purposes. We use the admin account we created.
The first time a SSH connection is being made from VM 990 to VM 991 or VM 991 to VM 990, you'll be asked this question - type yes. Are you sure you want to continue connecting (yes/no/[fingerprint])?
Configuration of Gravity Sync
If you do not have an existing configuration file, the installer will prompt to create one. It can also be run later by executing gravity-sync config. Each Gravity Sync install requires it's own unique configuration.
The configuration utility will guide you through the process of:
- Specifying the IP address of the remote Pi-hole instance.
- Specifying the SSH username to connect to your remote Pi-hole host.
- Creating a unique key and pairing it to your remote Pi-hole.
- Providing details about how your two systems are configured.
The configuration will be saved as gravity-sync.conf in /etc/gravity-sync. If you need to make adjustments to your settings in the future, you can edit this file or run the configuration tool to generate a new one.
After you're pleased with your configuration of both Gravity Sync instances, proceed to the Test run or else the Execution phase.
Custom SSH Ports
Gravity Sync is configured by default to use the standard SSH port (22) but if you need to change this, such as if you're traversing a NAT/firewall for a multi-site deployment, you can use a non-standard port. To do so, simply specify the target SSH port number in the config command. With a remote SSH port 1234: gravity-sync config 1234
Execution phase
- SSH into the Pi-stack and run the
gravity-sync config. - SSH into the Pi-hole and run the
gravity-sync config. - The configuration utility will guide you through the process.
Test run
Run a comparison between remote and local databases, which will be non-disruptive, and see if everything has been configured correctly.
- On Pi-stack - execute in the terminal :
sudo gravity-sync compare - On Pi-hole - execute in the terminal:
sudo gravity-sync compare
Assuming Gravity Sync runs successfully, it will indicate if there are changes pending between the two databases.
Initial sync
You must now pick the Pi-hole instance that currently has the "authoritative" list of settings and run the following command to send all of those settings to its peer for the first time.
- On Pi-stack - execute in the terminal:
sudo gravity-sync push
If you do not follow this step, especially if one of your Pi-hole instances is a fresh install, you run the risk of overwriting your current configuration with a default setup or something else less desirable.
- On Pi-hole, you can do a pull update by:
sudo gravity-sync pull
Initialize auto sync
Automation tasks within systemd are configured by default to run at semi-randomized times on each node. The net effect of replication should happen in under 5 minutes.
Replications will also automatically attempt for the first time 2 minutes after either system is rebooted/powered on.
- Check the situation on the remote and do a
sudo gravity-sync pull - If all is OK then execute: gravity-sync auto
sudo gravity-sync auto
You can adjust the sync frequency by passing a speed option to the function to minimize network load .
- auto
sudo gravity-sync auto quad15 min intervall (recommended) - auto
sudo gravity-sync auto half30 min intervall - auto
sudo gravity-sync auto hour1 hour intervall
After enabling auto sync, check that it is running properly by:
sudo systemctl status gravity-syncSecuring SSH
With Gravity Sync installed and configured – unless you’re using password based authentication to connect to your system – it's recommended to disable password authentication in SSH.
If you’re using passwords, you should seriously consider changing to using key based authentication.
To disable passwords, into into the SSH config file l and modify this setting then save and exit PasswordAuthentication no.
It's also recommended to block root login to SSH PermitRootLogin no.
Updating Gravity Sync
Start with running this command to see if there are updates available:
gravity-sync version
Run this command to do a update:
gravity-sync update
Using the Pi-stack
Set your networked devices to use this DNS and DHCP
Start using your new DNS system
- Configure your router to have DHCP clients use Pi-hole as their DNS server. Then all devices connecting to your network will have content blocked without any further intervention.
- It's recommended to use one Pi.alert per network.
- It's recommended to use one DHCP per network, I use my pfSense.
- Change the DNS in your router to 192.168.1.2, 192.168.1.3 (use the IP's for your DNS servers)
- It's recommended to use one PiVPN per cluster. Having more PiVPN's on the cluster means opening more ports.
How to keep Free and Open Software free and open?
Subscribe, like, share, discuss, clap, star, follow, watch, and anything that can help with social media algorithms. Also buy a license, donate, buy merchandise, use Patreon. Remember that most free software is produced by professional (need salary) using platforms and machines that cost money.

Final words
The Pi-stack components are built with the hard work of a great number of professionals, voluntairs and published on github. Pleace visit them on github and give them a star and a good review if you enjoy the effort they have made for the good of the community.
A special big thank you to the creators of Pi-hole [1] and to the creators of Pi-alert [2] and the PiVPN [3] and Unbound [4] and [5] Gravity-sync. Free and open-source [6].
Pi-hole by pihole. Pi-hole® and FTLDNS (forks of dnsmasq) are open source. Their GitHub page. More info on the home page. Documentation is found at this link ↩︎
Free and open-source needs community support!
There are many reoccurring costs involved with maintaining free, open-source, and privacy respecting software. Expenses which volunteer developers pitch in to cover out-of-pocket.
These are just some fine example of apps developed when people feel about their software, as well as the importance of keeping them maintained.Your support is absolutely vital to keep them innovating and maintaining! ↩︎


