Using VLAN's on Proxmox
How to setup VLAN's on a Proxmox system. Vlans gives security, speed and a cleaner network. VLAN's has been the standard in corporate networking for years and can be found almost everywhere you look. Also the management i/f #MGMT #VLAN


How to setup Virtual Local Area Networks (VLAN) on a Proxmox system. VLAN's gives security, speed and a cleaner network. My network uses several VLAN's to segregate private and business stuff: Home, Management, Servers, Guest, IoT crap ...
VLAN's has been the standard in corporate networking for years and can be found almost everywhere you look. Some are simple just segregating departments or machines, some are very complex and spanning the hole planet.
A nice introduction to Linux networking can be found here.
- VLAN's can be port based or tag based, 802.1Q
802.1Q VLAN is the way to classify the VLANs based on IEEE802.1Q protocol. The VLANs are distinguished by VLAN ID (VID). All untagged packets reaching the port are tagged according to PVID. The frames in the VLAN can only be forwarded in this VLAN. - Quality of Service (QoS) can be port based or tag based, 802.1P
QoS function is used to optimize the network performance. It provides you with network service experience of a better quality. The switch implements priority modes based on port, 802.1P and/or DSCP.
The easy way is to use Linux VLAN based systems in Proxmox, see thr wiki.
For the Spanning Tree Protocol (STP and RSTP) it's recommended to go with OVS. OVS is a complex world and needs a lot of networking skills and know-how, but you can create fantastic multi layer and redundant systems for really large enterprises.
In Proxmox Linux VLAN is installed by default but OVS is not.
Setup VLANs
Start by setting up your router (pfSense or what ever you have) then configure the vlans to your level 2 or level 3 switch, set up link aggregation if needed and configure routing and QoS.
Remember to also setup your DHCP and DNS servers.
Setup the VLANs in GUI
Some apps need a bridged interface to function, like CoroSync. For the Management see my setup later in this post.
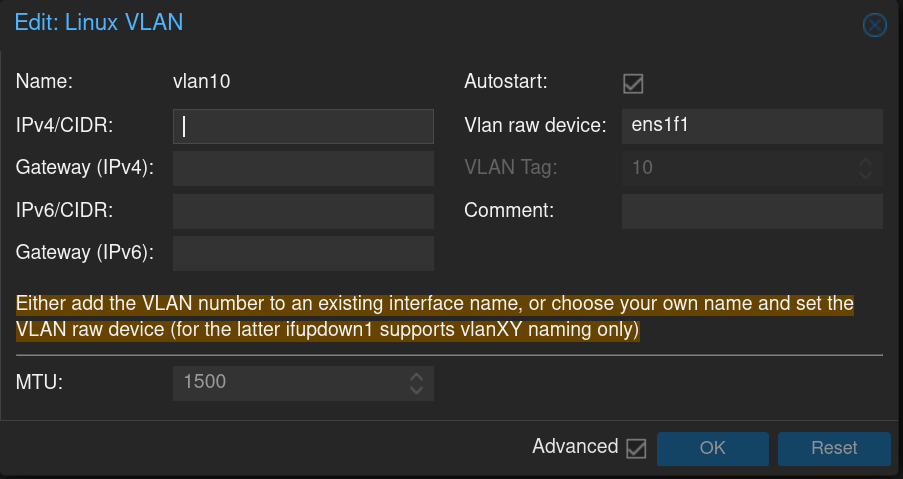
Setup all needed VLAN's, example vlan 10 on the second port of the first NIC
Setup the Bridges
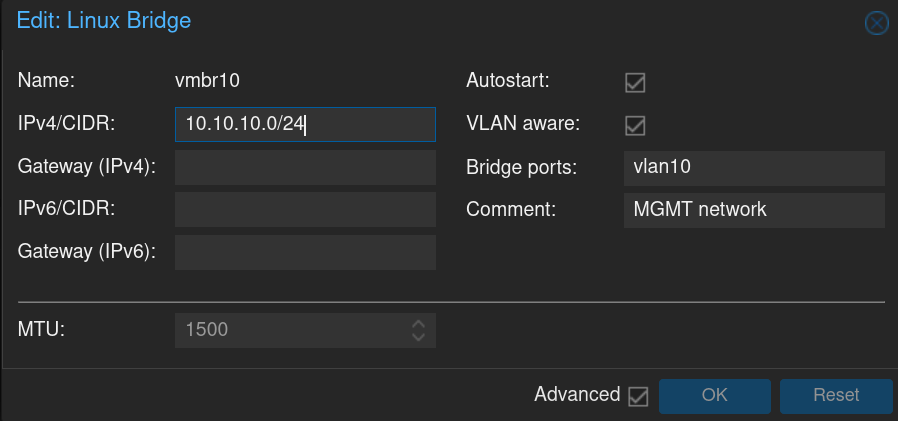
Set up all needed bridges, example vmbr10
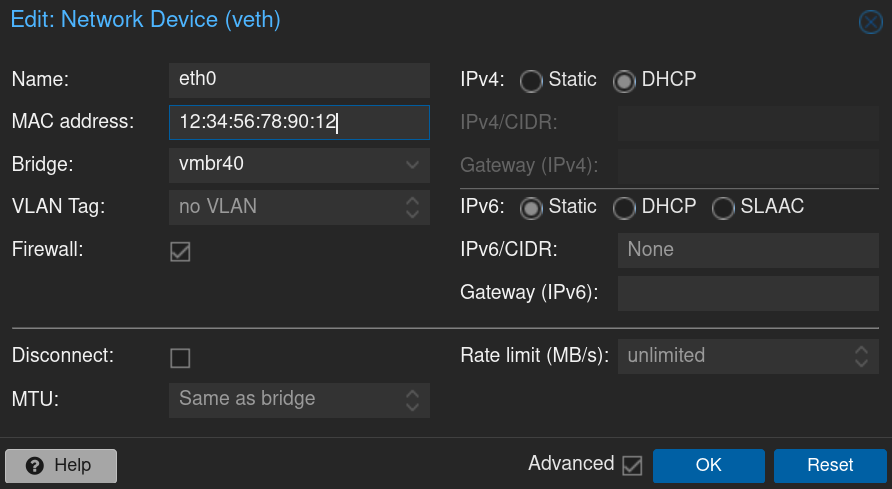
Start using your VLAN ready interfaces in VM's
Test the VM/CT's networks after rebooting with ping, nslookup , ip -a or ip a | grep inet | awk '{print $2}' | cut -f2 -d:. On an Ubuntu system use systemctl status systemd-networkd to see what networks are up and running.
The Management Interface on a VLAN
Makes your install more secure by locking the Management Interface in a VLAN. To setup the MGMT i/f edit nano /etc/network/interfaces
#this sub set is for the management i/f

auto eno1
iface eno1 inet manual

iface eno1.100 inet manual

auto vmbr0v100
iface vmbr0v100 inet static
        address 10.10.100.49/24
        gateway 10.10.100.1
        bridge_ports eno1.100
        brirge-stp off
#MGMT interface
Setup your Level 2 or 3 switches. Your PC port as untagged 100 and the server port serving eno1 as tagged 100. Set the QoS to low this trafic is secundary.
It is possible to run other VLAN's on vmbr0 if you set it as VLAN, just add the VLAN tag in the VM/CT's Network Device setup. I have all ( PVE, CT and VM managemeent interfaces ) on the same VLAN and data trafic on other VLAN's.
auto vmbr0
iface vmbr0 inet manual
        bridge-ports eno1
        bridge-stp off
        bridge-fd 0
        bridge-vlan-aware yes
        bridge-vids 2-4092
If you use GUI go to the tab System/Hosts and check or edit it, if you changed IP and the DNS tab too.
For CoroSync I want to have a separet VLAN 900 and QoS set to highest, for the switches to prioratize this trafik in all locations.
Restart the network by ifreload -a Test by ping and nslookup or some other tool.
QoS port based or PCP values 0-7
Switches uses different ways for this but I use this way of grouping trafic:
Low is 0-1, normal 2-3, medium 4-5 and high is 6-7.
With PCIe pass-throukg or OVS you can use 802.1P tagging instead of port based.
| 1. Lowest Priority (MGMT interface, background data) |
| 2. Normal Priority (business-critical data, email, internet, etc) |
| 3. Medium Priority (web servers, etc) |
| 4. Highest Priority (CoroSync, interactive voice, video, and delay sensitive data) |
Using port based Q0S: the setting affects all trafic on the port.
The examples created using the new Proxmox Dark theme
Disabling IPv6 on the Node
Proxmox VE works correctly in all environments, irrespective of whether IPv6 is deployed or not. We recommend leaving all settings at the provided defaults.
Should you still need to disable support for IPv6 on your node, do so by creating an appropriate sysctl.conf (5) snippet file and setting the proper sysctls, for example adding /etc/sysctl.d/disable-ipv6.conf with content:net.ipv6.conf.all.disable_ipv6 = 1 net.ipv6.conf.default.disable_ipv6 = 1
This method is preferred to disabling the loading of the IPv6 module on the kernel commandline.
Link to the Documentation
What is OVS
Open vSwitch is a production quality, multi layer virtual switch licensed under the open source Apache 2.0 license. It is designed to enable massive network automation through programmatic extension, while still supporting standard management interfaces and protocols (e.g. NetFlow, sFlow, IPFIX, RSPAN, CLI, LACP, 802.1ag). In addition, it is designed to support distribution across multiple physical servers similar to VMware's vNetwork distributed vswitch or Cisco's Nexus 1000V. Read more at this link. Link to features.
OVS can be installed from the shell by apt update && apt install openvswitch-switch -yy.


