Terraforming Proxmox & VPS
I will outline the process necessary to set up and utilize Terraform, from HashiCorp, within Proxmox, and also how I spin up VPS instances. And a quick word about what is Ansible's role.


Terraform is an infrastructure-as-code (IaC) software tool created by HashiCorp. Users define and provide data center infrastructure using a declarative configuration language known as HashiCorp Configuration Language (HCL), or optionally JSON. Terraform has been around for a number of years, and in my tool chest for quite a few. It's probably the best known IaC platform around.
Setting up infrastructure on a small home cluster or a bigger one can be handled by doing everything by hand, relevant with a minimum cluster or for lager clusters by running scripts. As most of my ICT days are before 2014, Terraform hit the market that year, I traditionally used scripts. But, large corporate sized clusters and datacenters is the right place for things like Terraform. Very few of us ever see a large server or a server farm, they are in large datacenters, in house or outsourced.
In some organizations, there are strict hieratical boundaries of what you can and cannot do. In one, they have white, green and brown lab coats. As a consultant, I have the benefit of having 3 coats if I ever go there. 😆
What's the benefits?
Scripts and IaC tools has one thing in common, repeatability. You can set up hundreds of the same all day long. A benefit from this is that we can set up a cluster after a total write-off disaster in a very short time. You get a set of new servers in a new location and run the latest scripts followed by importing the backups and by the end of the day we have a new datacenter.
What's the downside?
Scripts and IaC tools can also repeat a bad mistake over and over. Therefor, the work before implementation will take some time. The development time is considerable, but a long time is spent in testing and documentation.
What's the benefit in a Home Lab?
The only clear and undisputed benefit is the benefit of learning. Another benefit may be disaster recovery of infrastructure alongside a functional backup.
What's the downside in a Home Lab?
Setting up the basics is hard work and will take time to make it all safe and sound. Also, just the scale of code is prone to mistakes. The Providers change syntax, as do Proxmox and all the other, from time to time. To use tools like Terraform and Ansible, you need to be well-organized and disciplined.

From Theory to Practice
Install Terraform
Terraform can be installed on most common OS's, and for my purposes, I installed it on my MacBook Pro using Homebrew:
brew tap hashicorp/tap
brew install hashicorp/tap/terraform
wget -O- https://apt.releases.hashicorp.com/gpg | sudo gpg --dearmor -o /usr/share/keyrings/hashicorp-archive-keyring.gpg
echo "deb [signed-by=/usr/share/keyrings/hashicorp-archive-keyring.gpg] https://apt.releases.hashicorp.com $(lsb_release -cs) main" | sudo tee /etc/apt/sources.list.d/hashicorp.list
sudo apt update && sudo apt install terraformAdditional installation instructions for other OSes can be found here.
Create a set of Directories
First, we create a new directory terraformwhich will contain all of our Terraform configuration. You can name the directory as you like.
I do use git and all files are kept on my private GitLab.
Naming in the directory terraform is then
- customer/ –
my, for my clusters- architecture/ –
ubuntu,proxmox,vps,aws - status/ –
dev,test,prod
- architecture/ –
The main.tf is present in all – dev, test, prod.
But they point to different clusters and machines.
mkdir -p terraform/my/Creating a .gitignore file
- Use some sort of git/source control for your Terraform code,
- and to create a
.gitignore file. Example of a .gitignore file
# Local .terraform directories
**/.terraform/*

# .tfstate files
*.tfstate
*.tfstate.*

# Crash log files
crash.log
crash.*.log

# Exclude all .tfvars files, which are likely to contain sensitive data, such as
# password, private keys, and other secrets. These should not be part of version
# control as they are data points which are potentially sensitive and subject
# to change depending on the environment.
*.tfvars
*.tfvars.json

# Ignore override files as they are usually used to override resources locally and so
# are not checked in
override.tf
override.tf.json
*_override.tf
*_override.tf.json

# Ignore transient lock info files created by terraform apply
.terraform.tfstate.lock.info

# Include override files you do wish to add to version control using negated pattern
# !example_override.tf

# Include tfplan files to ignore the plan output of command: terraform plan -out=tfplan
# example: *tfplan*

# Ignore CLI configuration files
.terraformrc
terraform.rc
Running Terraform
You might like to run from your laptop like me, but many times there is a management VM on the main cluster from where the Terraform will be run and create the infrastructure needed for the apps to run from.
And the same applies to Ansible, to keep the apps up to date.
The stages of using Terraform code
Planning
You need to design your setup, what CT/VM you want to have and what they should look like.
Creating your code
Write the plan into code using your tool of choice
Implementation
Implementation is a 3 stage thing
- Initialize Terraform
First, run the commandterraform init. This will initialize a new working directory for use with Terraform. - Plan for the Terraforming
Now, let's run aterraform plan -out plancommand. This will give us output indicating what will be created, modified, or destroyed by Terraform. - Applying the Terraform Plan
Then, run the commandterraform apply plan. This will use the savedplanfile and apply it. Or justterraform apply.
Use case Proxmox
It's have been a great way to familiarize myself with Terraform by doing it in the comfort of my dev-lab.
There is no 0fficial provider for Proxmox, but plenty of Community providers, we will be using Telmate Proxmox provider. I have tested and still use:
Then, on a VM or your laptop (or Proxmox) install:
- Install Terraform
- Install a Proxmox provider, see the registry
- Create some directories
- You also need, to create an API token.
- If you are using
git, create a.gitignorefile.
Create the code storage
First, we create a new directory which will contain our Terraform configuration. You can name the files/directories any way you like.
mkdir -p terraform/my/proxmox/prod/
cd terraform/my/proxmox/prod/
touch main.tf vars.tf terraform.tfvars

mkdir -p terraform/my/proxmox/test/
cd terraform/my/proxmox/test/
touch main.tf vars.tf terraform.tfvars

mkdir -p terraform/my/proxmox/dev/
cd terraform/my/proxmox/dev/
touch main.tf vars.tf terraform.tfvars
Edit the main.tf according to your needs. The documentation about the Terraform provider is on GitHub or in the Terraform documentation.
Prepare Proxmox for Terraform
Before we can start spinning things up with Terraform, we must first configure Proxmox to allow communication with Terraform.
Start by SSH in to your Proxmox node and create the terraform-role. The privs appended to the end of this command, limit the scope of what this new terraform-role can and cannot do. Alternatively, you do these steps in the GUI.
Role
We create our own role in the Datacenter → Permissions → Roles section
pveum role add terraform-role -privs "Datastore.AllocateSpace Datastore.Audit Pool.Allocate Sys.Audit Sys.Console Sys.Modify VM.Allocate VM.Audit VM.Clone VM.Config.CDROM VM.Config.Cloudinit VM.Config.CPU VM.Config.Disk VM.Config.HWType VM.Config.Memory VM.Config.Network VM.Config.Options VM.Migrate VM.Monitor VM.PowerMgmt SDN.Use"User
Next, create our user in the Datacenter → Permissions → Users section.
Create the terraform user, and add it to the Terraform-role and create an authentication token. We will use a Token, and we do not use a password at all.
pveum user add terraformp@pvepveum aclmod / -user terraform@pve -role terraform-rolepveum user token add terraform@pve terraform-token --privsep=0pveum user add terraform@pve
pveum aclmod / -user terraform@pve -role terraform-role
pveum user token add terraform@pve terraform-token --privsep=0You will be presented with your token. Please copy the token key value now, you will not be able to retrieve it again in the future. But, you can create a new one.
┌──────────────┬──────────────────────────────────────┐
│ key          │ value                                │
╞══════════════╪══════════════════════════════════════╡
│ full-tokenid │ terraform@pve!terraform-token        │
├──────────────┼──────────────────────────────────────┤
│ info         │ {"privsep":"0"}                      │
├──────────────┼──────────────────────────────────────┤
│ value        │ 40444db9-24dc-1234-aa11-1a911f1918ad │
└──────────────┴──────────────────────────────────────┘
0829c4e7-7255-4186-b35e-5f2b8284e1e1
The Template
Cloud-Init is the de facto multi-distribution package that handles early initialization of a virtual machine instance. Using Cloud-Init, configuration of network devices and ssh keys on the hypervisor side is possible. When the VM starts for the first time, the Cloud-Init software inside the VM will apply those settings. For the following example, we will use the cloud image provided by Ubuntu at https://cloud-images.ubuntu.com.
Create your Cloud-Init template by hand or by a script: ubuntu-2204-template
wget https://github.com/nallej/MyJourney/raw/main/myTemplateBuilder.shCreate the Cloud Image VM TEMPLATE
# download the image to use as the base - it might take some time
wget https://cloud-images.ubuntu.com/jammy/current/jammy-server-cloudimg-amd64.img

# create a new VM
qm create 9000 --memory 1024 --net0 virtio,bridge=vmbr0 --description "# Template: Ubuntu 22.04.3 Jammy" --name "ubuntu-CI-TEMPLATE"

# import that disk to something like local-zfs or tank storage and attaching it as a SCSI drive
qm disk import 9000 jammy-server-cloudimg-amd64.img tank
qm set 9000 --scsihw virtio-scsi-pci --scsi0 tank:vm-9000-disk-0,discard=on,iothread=1

# add a Cloud-Init CD-ROM drive
qm set 9000 --ide2 local-zfs:cloudinit
# set DHCP
qm set 9000 --ipconfig0 ip=dhcp
#user and credentials for CI
#qm set 9000 --ciuser=username
#qm set 9000 --cipassword=password
###copy your public key to the node ssh-copy-id -i ~/.ssh/id_ed25519 [email protected]
##qm set 9000 --sshkey ~/.ssh/public.pub

# set the boot order
qm set 9000 --boot c --bootdisk scsi0 #order=scsi0

# add a terminal
qm set 9000 --serial0 socket --vga serial0

# resize the 2.2 GiB disk
qm resize 9000 scsi0 8G

#create the template
qm template 9000
Finalize the template build by adding what you need to it.
❗ Remember: do not grant too many privileges and keep the role lean.
⚠️ Do not use passwords – use a Token
Create the CI-template
Create SSH Key on the Host Machine
To access the VM from your host machine without entering the password each time, you need to create an SSH key and save the public key in the cloud-init tab.
ssh-keygen -t ed-25529 -f terrakeyTo copy to an existing VM/CT ssh-copy-id -i ~/.ssh/terrakey user@host For more about ssh-keygen, see https://www.ssh.com/academy/ssh/keygen
Creating a Virtual Machine
- Begin by creating a VM with a high
VM IDnumber and a unique name. - OS:
ChooseDo not use any media, we will attach the Cloud-Init Drive later. Maintain thetypeandversionas default. - System: ☑ tick the box
Qemu Agent, leave all other settings as default - Disks: Remove any existing attached disks.
- CPU: Keep settings as default.
- Memory: Keep as default.
- Network: Select a bridge, keep other settings as default.
- Confirm: Verify that all settings are aligned correctly.
❗Do not check the box:Start after created. - Add the Cloud-Init Drive to the new VM
- Open the
Hardwaretab of the created VM - Add a
CloudInitDrive, select the storage.- Configure Cloud-Init settings such as User, SSH public key, IP Config etc.
– Use an admin user (not root) with an SSH key and set IP to DHCP.
- Configure Cloud-Init settings such as User, SSH public key, IP Config etc.
- SSH into the node (or use the SHELL), run the following
1. wget https://cloud-images.ubuntu.com/minimal/releases/jammy/release/ubuntu-22.04-minimal-cloudimg-amd64.img

2. qm set 9000 --serial0 socket --vga serial0

3. mv ubuntu-22.04-minimal-cloudimg-amd64.img miniU2204.qcow2

4. qemu-img resize miniU2204.qcow2 8G

5. qm importdisk 9000 miniU2204.qcow2 tank
In the Options tab, set the boot order. Recheck the Hardware tab.
Now, convert the VM to a Template. Test for success by cloning it to a VM.
Edit the Terraform files
There are many ways of doing the files, this is one of those.
– Proxmox API viewer and the
– Provider documentation on GitHub, or the Terraform registry.
terraform.tfvars
token_secret = "0829c4e7-7255-4186-b35e-5f2b8284e1e1"
token_id = "terraform@pve!terraform-token"
vars.tf
# Your public SSH key
variable "ssh_key" {
  default = "your_public_ssh_key_here"
}

# On which Proxmox host do you like to spin up a VM
variable "proxmox_host" {
    default = "proxmox_host_name"
}

# Which template you want to use
variable "template_name" {
    default = "ubuntu-2204-TEMPLATE"
}

# Which NIC you want to use
variable "nic_name" {
    default = "vmbr<number>"
}

# What VLAN you want to use, if any
variable "vlan_num" {
    default = "vlan_number"
}

# URL or FQDN of the host you would like the API to communicate with.
# It's safe to use the URL/FQDN of your variable 'proxmox_host', but they can be different
variable "api_url" {
    default = "https://<proxmox_node_ip_or_FQDN>:8006/api2/json"
}


# Blank var for use by terraform.tfvars
variable "token_secret" {
}

# Blank var for use by terraform.tfvars
variable "token_id" {
}
main.tf - VM
terraform {
  #required_version = ">= 2.0.0"
  required_providers {
    proxmox = {
      # Latest stable version is 2.9.14
      # Newest version is 3.0.1-rc4
      source  = "telmate/proxmox"
      version = "3.0.1-rc4"
      #version = ">= 2.9.0"
    }
  }
}

provider "proxmox" {
  # References the vars.tf file
  pm_api_url          = var.api_url
  pm_api_token_id     = var.token_id
  pm_api_token_secret = var.token_secret
  pm_tls_insecure     = true
}

# Creates a 'proxmox_vm_qemu' entity named 'any name you like'
resource "proxmox_vm_qemu" "test_vm" {
  #name       = "test-vm-01"
  name        = "test-vm${count.index + 1}" # count.index starts at 0
  count       = 1                           # How many instances will be created
  target_node = var.proxmox_host
  desc        = "ClaudInit Test with Ubuntu"

  # References the vars.tf file to plug in the correct template name
  # https://pve.proxmox.com/wiki/VM_Templates_and_Clones
  # Creates a full clone, rather than a linked clone
  clone       = var.template_name
  full_clone  = "true"

  # QEMU agent on/off
  agent       = 0

  os_type     = "cloud-init"
  qemu_os     = "l26"
  numa        = true
  vcpus        = 0
  hotplug     = "network,disk,usb"
  cores       = 2
  sockets     = 1
  cpu         = "host"
  memory      = 2048

  scsihw      = "virtio-scsi-single"
  bootdisk    = "scsi0"
  cloudinit_cdrom_storage = "local-zfs"


  disk {
    slot      = scsi0
    size      = "16G"
    type      = "disk"
    # Name of storage, local to the node, you are spinning up the VM on
    storage   = "tank"
    # Enables SSD emulation
    emulatessd  = true
    # Enables thin-provisioning
    discard    = true
    iothread   = true
  }

  network {
    model    = "virtio"
    bridge   = var.nic_name
    tag      = var.vlan_num # This tag can be left off if you are not taking advantage of VLANs
    firewall = false
  }

  lifecycle {
    ignore_changes = [
      network,
    ]
  }

  ipconfig0 = "ip=dhcp"
  #ipconfig0 = "ip=192.168.100.9${count.index + 1}/24,gw=192.168.100.1"

  #provisioner "local-exec" {
    # Provisioner commands can be run here.
    # We will use provisioner functionality to kick off ansible playbooks in the future
    #command = "touch /home/nalle/terraform/my/proxmox/dev/ansible.playbook.yaml"
  #}
}
main.tf – LXC
terraform {
  required_providers {
    proxmox = {
      source = "telmate/proxmox"
      # Latest stable version is 2.9.14
      # Newest version is 3.0.1-rc4
      version = "3.0.1-rc4"
    }
  }
}

provider "proxmox" {
  # References the vars.tf file
  pm_api_url          = var.api_url
  pm_api_token_id     = var.token_id
  pm_api_token_secret = var.token_secret
  pm_tls_insecure     = true
}

resource "proxmox_lxc" "LXC" {
  target_node   = var.proxmox_host
  hostname      = "Ubuntu-01"
  ostemplate    = local:vztmpl/ubuntu-22.04-standard_22.04-1_amd64.tar.zst
  password      = "terraform"
  unprivileged  = true
  cores         = 1
  memory        = 512
  swap          = 512
  start         = true

  rootfs {
    storage = "tank"
    size    = "4G"
  }

  network {
    name   = "eth0"
    bridge = "vmbr0"
    ip     = "dhcp"
  }
}
I show them as separate, but in real life they are part of the same main.tf
Using Terraform
Now that you have configured all the files needed, to spin up a VM within Proxmox, let's start utilizing Terraform to do it.
Initialize Terraform
Next, run the command terraform init. This will initialize a new working directory for use with Terraform. More can be read about this command here.

Planning
Now that we have an initialized project, let's run a terraform plan command. This will give us output indicating what will be created, modified, or destroyed by Terraform.
It is generally a good idea to specify an -out file to save this generated plan to, rather than relying on a speculative plan.
terraform plan -out plan
Once run, you should receive output that looks similar to the following:
Place image here
Applying the Terraform Plan
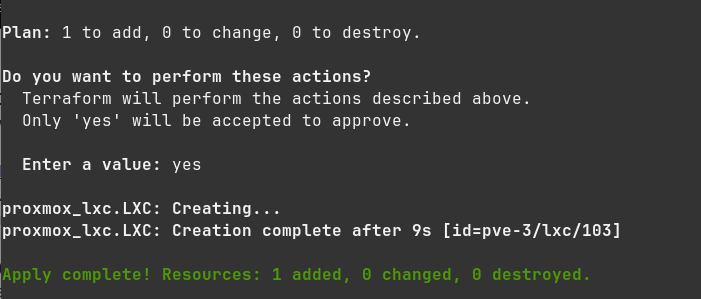
After all of your hard work, you are now ready to apply your plan and spin up a VM within your Proxmox server!
Doing so is as simple as running the command terraform apply plan. This will use our saved plan file and apply it.
Assuming things run successfully, you should see the following output:
Apply complete! Resources: 1 added, 0 changed, 0 destroyed.
Use case VPS
Setting up a VPS on Hetzner
First, you need to have an account at Hetzner. Hetzner operates server farms in Germany, Finland, USA and Singapore.
Then, on a VM or your laptop, install:
- Terraform
- The Hetzner Cloud provider, hcloud
You also need, to create a Hetzner Cloud API token.
Create the Code
A set of Terraform related files defining the infra as code.
First, we create a new directory which will contain our Terraform configuration. We will call it terraform and create two new files called main.tf and vars.tf. You can name the files as you like.
mkdir -p terraform/my/hetzner/vps1/
cd terraform/my/hetzner/vps1/
touch main.tf vars.tf secret.auto.tfvars server.tf user_data.yml
Consider a better name than hetcnercloud.tf
Edit the main.tf according to your needs. The documentation about the Terraform provider is in the Terraform documentation.
main.tf
terraform {
  required_providers {
    hcloud = {
      source = "hetznercloud/hcloud"
      version = "~> 1.45"
    }
  }
}

# Set the variable value in *.tfvars file
# or using the -var="hcloud_token=..." CLI option

variable "hcloud_token" {
  sensitive = true
}

# Configure the Hetzner Cloud Provider
provider "hcloud" {
  token = var.hcloud_token
}
server.tf
# Create a new server running debian
resource "hcloud_server" "node1" {
  name        = "hh2"
  image       = "ubuntu-22.04"
  server_type = "cx22"
  location    = "hel1"
  public_net {
    ipv4_enabled = true
    ipv6_enabled = true
  }
}
secrets.auto.tfvars
hcloud = "your Hetzner token goes here"user_data.yml
#cloud-config
system_info:
  default_user:
    name: <username>
    primary_group: <group>
    groups: users,sudo
    shell: "/bin/bash"
    ssh_authorized_keys:
      - "ssh-ed25519 public key"
    lock_passwd: true
    sudo: "ALL=(ALL) NOPASSWD:ALL"

users:
  - default

disable_root: true
ssh_pwauth: false

write_files:
  - path: /etc/ssh/sshd_config.d/zz-cloud-init.conf
    content:
      Port 54321
      AllowAgentForwarding yes
      AllowTcpForwarding yes
      PermitTunnel yes
      TCPKeepAlive yes
Ansible
Can you use Ansible, yes? IMHO, Terraform is for creating the infrastructure and Ansible to keep things (apps) running, or that is how I do it. There is an Ansible provider for Terraform to use. That way, Terraform can write Ansible files corresponding to what was created or updated by Terraform.
Example
# This example creates an inventory named `My new inventory`
# and adds a host `tf_host` and a group `tf_group` to it.
#
terraform {
  required_providers {
    aap = {
      source = "ansible/aap"
    }
  }
}

provider "aap" {
  host                 = "https://localhost:8043"
  username             = "ansible"
  password             = "test123!"
  insecure_skip_verify = true
}

resource "aap_inventory" "my_inventory" {
  name        = "My new inventory"
  description = "A new inventory for testing"
  variables = jsonencode(
    {
      "foo" : "bar"
    }
  )
}

resource "aap_group" "my_group" {
  inventory_id = aap_inventory.my_inventory.id
  name         = "tf_group"
  variables = jsonencode(
    {
      "foo" : "bar"
    }
  )
}

resource "aap_host" "my_host" {
  inventory_id = aap_inventory.my_inventory.id
  name         = "tf_host"
  variables = jsonencode(
    {
      "foo" : "bar"
    }
  )
  groups = [aap_group.my_group.id]
}

resource "aap_job" "my_job" {
  job_template_id = 7
  inventory_id    = aap_inventory.my_inventory.id
}References
Hashicorp [1] [2] [3] Terraform [4] [5] [6] [7] [8] [9] Ansible [10] Optimizing [11] [12] Cloud-Images [13] [14]
HashiCorp, Inc. is an American software company with a freemium business model based in San Francisco, California. HashiCorp provides tools and products that enable developers, operators and security professionals to provision, secure, run and connect cloud-computing infrastructure. It was founded in 2012 by Mitchell Hashimoto and Armon Dadgar. The company name HashiCorp is a portmanteau of co-founder last name Hashimoto and Corporation. homepage, Wikipedia ↩︎
IBM to Acquire HashiCorp, Inc. Creating a Comprehensive End-to-End Hybrid Cloud Platform
$6.4 billion acquisition adds suite of leading hybrid and multi-cloud lifecycle management products to help clients grappling with today's AI-driven application growth and complexity HashiCorp's capabilities to drive significant synergies across multiple strategic growth areas for IBM, including Red Hat, watsonx, data security, IT automation and Consulting As a part of IBM, HashiCorp is expected to accelerate innovation and enhance its go-to-market, growth and monetization initiatives Transaction expected to be accretive to Adjusted EBITDA within the first full year, post close, and free cash flow in year two IBM newsroom ↩︎What IBM’s Deal For HashiCorp Means For The Cloud Infra Battle Forbs ↩︎
Terraform Documentation, ↩︎
– Proxmox Telemate or bpg provider. Check the GitHum pages too. ↩︎
Blockbridxe technote Optimizing Proxmox: iothreads, aio, & io_uring ↩︎


