
Technitium on Docker
Anyone using computers knows how important the DNS is. For a homelab we need more, things like blocking bad sites. Without a working DNS you are lost and nothing will work. Technitium is a DNS Server for Privacy and Security including site blocking and syncronication. We set it up using Docker.


Adding DNS to a HomeLab
The most important thing is to do your planning beforehand. Fixing a messed up DNS Server is not a easy task.
- You need a solid plan
- A running VM with Docker installed
- A HD or enterprise SSD for your cache and history – a DNS is writing there 24/7
Note that changing Name Servers can take a little bit to propagate through the entire network, especially if it's large and complicated.
I have a long relationship with Bind. Bind 9 is the industry standard for enterprise setups. For my lab I used it for years and I can tell you it's a total overkill. Same is with PowerDNS, but SDN likes it. For many years I used a synchronized pair of Pi-hole's with Unbound using gravity- and later nebula-sync. Then AdGuard Home and another new kid on the block, Technitium, and Technitium has clustering built in as any DNS for enterprise use need to have.
To setup a cluster you need to create a separet cluster domain for the DNS Servers and not use your real doimain. E.g., dns-cluster.lan for the DNS servers and the real zone used for your homelab and/or home is lab.casaursus.net.
The basics
As all my Proxmox nodes have at least one VM running Docker - that's what I use.
If you need to set one up see my post how to use Templates for easy implementation.
Using Docker
See the details and version on the Docker Hub. If you only have one node, you should still setup two or more VMs. This is to prevent DNS crashes if you do updates and other things requiring the VM to be rebooted. Actually, you can use any server or workstation you have as a DNS server with the use of Docker.
The image to will use is the latest one. But, you need to pin the version.
Now the version of the image is: docker.io/technitium/dns-server:15.5.0
The Forwarders are the ones you like. For me the fastest are the ISP ones.
For the container_name You can use technitium, NS1 or DNS
The hostname for the first is ns1 then ns2, ns3 ...
In the Environment section:
| Setting | Set to | Comment |
|---|---|---|
| DNS_SERVER_DOMAIN | ${DOMAIN} | e.g., dns-1.dns-cluster.lan |
| DNS_SERVER_ADMIN_PASSWORD | ${PASSWD} | Stored in the .env file |
| DNS_SERVER_RECURSION | AllowOnlyForPrivateNetworks | Do not expose an open recursive resolver! |
| DNS_SERVER_FORWARDERS | ${FORWARDERS} | Sometimes the ISP has the snappiest ones |
In the ports section:
| Port | Comment |
|---|---|
| "192.0.2.53:53:53/tcp" | DNS needs TCP for large replies and zone operations |
| "192.0.2.53:53:53/udp" | The main port for DNS clients |
| "5380:5380/tcp" | The Admin interface port |
| "53433:53443/tcp" | Used for the clustering endpoints |
Volumes
| Volume | Comment |
|---|---|
| technitium_config:/etc/dns | Persistent storage for server, zone and cluster config |
sysctls
| Setting | Value | Comment |
|---|---|---|
| net.ipv4.ip_local_port_range | "1024 65535" | The Technitium's recommended outbond port range |
Docker Compose
services:
  technitium:
    image: docker.io/technitium/dns-server:15.5.0
    container_name: technitium
    hostname: ns1
    restart: unless-stopped
    environment:
      DNS_SERVER_DOMAIN: ${DOMAIN}
      DNS_SERVER_ADMIN_PASSWORD: ${PASSWD}
      DNS_SERVER_LOG_FOLDER_PATH: /var/log/technitium/dns
      DNS_SERVER_LOG_USING_LOCAL_TIME: "true"
      DNS_SERVER_RECURSION: AllowOnlyForPrivateNetworks
      DNS_SERVER_FORWARDERS: ${FORWARDERS}
      DNS_SERVER_FORWARDER_PROTOCOL: Udp
    ports:
      - "192.0.2.53:53:53/tcp"
      - "192.0.2.53:53:53/udp"
      - "5380:5380/tcp"
      - "53443:53443/tcp"
    volumes:
      - technitium_config:/etc/dns # Holds server, zone and cluster config
      - technitium_logs:/var/log/technitium/dns
    sysctls:
      net.ipv4.ip_local_port_range: "1024 65535" #Technitium's recommended outbond port range

volumes:
  technitium_config:
  technitium_logs:
.env
DOMAIN="ns-1.dns-cluster.lan"
PASSWD="A long and complicated one"
FORWARDERS="1.1.1.1,9.9.9.9"
The Cluster
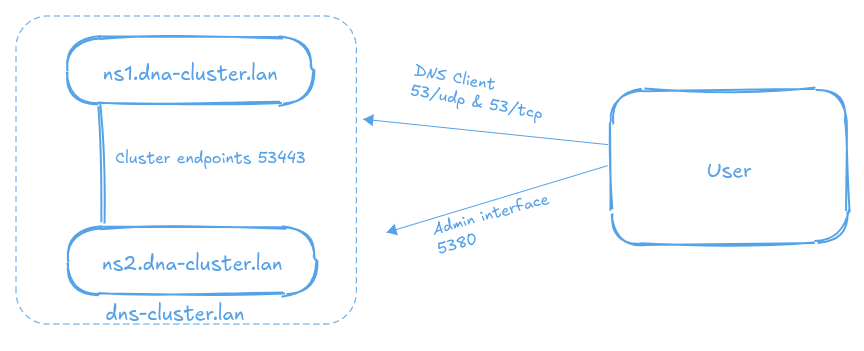
A DNS cluster is rely way better than a single instance.
For a DNS Cluster you need two or more instances of Technitium.
After the initial setup of the first one, ns1, you go to Administration -> Cluster and Initialize the cluster. Like this Node name: ns1.dns-cluster.lan, IP Address: 192.0.2.53 and URL: https://ns-1.dns-cluster.lan:53443/
Then go to the next, ns2.dns-cluster.lan, and to Administration -> Cluster and Initialize Joining the cluster. If you have more nodes for the cluster keep going.
References
Technitium [1] About IPs [2] RFC 6762 [3] RFC 8375 [4] Bind 9 [5]
Technitium DNS server has 30+ contributors homepage and on GitHub ↩︎
IPv4 Address Blocks for Documentation are by RFC 5737:
TEST-NET-1 =192.0.2.0/24, -2 =198.51.100.0/24, -3 =203.0.113.0/24↩︎Proposed Standard: Multicast DNS RFC 6762 ↩︎
Proposed Standard: Special-Use Domain '.home.arpa' RFC 8375 ↩︎
The industry standard DNS Bind 9, ISC DHCP, KEA DHCP and the GUI Stork. All provided by the Internet Systems Consortiom homepage ↩︎


