Talos on Proxmox
Running a Kubernetes cluster using Talos on Proxmox. Talos is small, efficient and has safety by design. Adding my new favorite to my cluster to replace my K8s and K3s clusters. I will still keep the K0s cluster I have.

Prepare for Installation
On your PC
Install talosctl
wget https://talos.dev/install -o talosINSTALL.sh
chmod +x talosINSTALL.sh
./talosINSTALL.sh

curl -sL https://talos.dev/install | sh
Create the Directories
Talos ISO
mkdir -p ~/ISO/talos/1.7/Talos Configurations
mkdir -p ~/K8s/talos/clusterOn Proxmox
Minimum Requirements of Memory and Disk
| Role | Memory | Cores | Disk |
|---|---|---|---|
| Control Plane | 2 Gib | 2 | 10 GiB |
| Worker | 1 GiB | 1 | 10 Gib |
Recommended size of Memory and Disk
| Role | Memory | Cores | Disk |
|---|---|---|---|
| Control Plane | 4 Gib | 4 | 100 GiB |
| Worker | 2 GiB | 2 | 100 Gib |
Notes
Memory
Talos do NOT support memory hot plugging, if creating the VM programmatically don’t enable memory hotplug on your Talos VM. Doing so will cause Talos to be unable to see all available memory and have insufficient memory to complete installation of the cluster.
Storage
Talos itself only requires < 100 MB of disk space, but the EPHEMERAL partition is used to store pulled images, container work directories, and so on.
Thus, a minimum is 10 GiB of disk space is required, but 100 GiB is better.
Microarchitecture
As of Talos v1.0 the x86-64-v2 or later, is a requirement.
- Before Proxmox V8.0, the default Processor Type was kvm64.
Booting with it will not work for Talos.- You can enable the required CPU features after creating the VM by adding the following line in the corresponding
/etc/pve/qemu-server/<vmid>.conf-file:args: -cpu kvm64,+cx16,+lahf_lm,+popcnt,+sse3,+ssse3,+sse4.1,+sse4.2. - Or you can set the Processor Type to
hostif your Proxmox host CPU supports these features, this prevents using live VM migration.
- You can enable the required CPU features after creating the VM by adding the following line in the corresponding
Use this script to check
#!/bin/sh -eu

flags=$(cat /proc/cpuinfo | grep flags | head -n 1 | cut -d: -f2)

supports_v2='awk "/cx16/&&/lahf/&&/popcnt/&&/sse4_1/&&/sse4_2/&&/ssse3/ {found=1} END {exit !found}"'
supports_v3='awk "/avx/&&/avx2/&&/bmi1/&&/bmi2/&&/f16c/&&/fma/&&/abm/&&/movbe/&&/xsave/ {found=1} END {exit !found}"'
supports_v4='awk "/avx512f/&&/avx512bw/&&/avx512cd/&&/avx512dq/&&/avx512vl/ {found=1} END {exit !found}"'

echo "$flags" | eval $supports_v2 || exit 2 && echo "CPU supports x86-64-v2"
echo "$flags" | eval $supports_v3 || exit 3 && echo "CPU supports x86-64-v3"
echo "$flags" | eval $supports_v4 || exit 4 && echo "CPU supports x86-64-v4"
Read more about Talos system requirements. Assign VM resources accordingly.
Quick Guide
Install the talosctl and create the directories you need.
Download the ISO
curl https://github.com/siderolabs/talos/releases/download/v1.7.6/metal-amd64.iso -L -o talos/1.7/Talos.1.7.6.isoOr download one with QEMU Guest Agent. See below in TLD;/Download an ISO: /Latest standard release or /Standard release with QGA support
Create VM
- 1 Control Plane VM, 2 core 2 GiB RAM, 32 GiB Disk – start it
- 1 Worker, 2 core, 1 GiB RAM, 10 GiB Disk – start it
Pull Down the Kubernetes Config
In your Talos/Cluster -directory
talosctl gen config talos-cluster https//$IP_CONTROL_PLANE:6443 --output-dir _outCreate the Control Plane
export CONTROL_PLANE_IP=<IP of Control Plane VM>talosctl apply-config -i -n $CONTROL_PLANE_IP -f _out/controlplane.ymlWait until the VM boots and the cluster is ready
Create the Worker node
talosctl gen config talos-cluster https//$IP_WORKER:6443 --output-dir _outexport WORKER_NODE_IP=<IP of Worker VM>talosctl apply-config --insecure --nodes $WORKER_NODE_IP --file _out/worker.yml📔 When booted without a machine configuration, it starts in maintenance mode.
Set the API Configuration
export TALOSCONFIG="_out/talosconfig"
talosctl config endpoint $CONTROL_PLANE_IP
talosctl config node $CONTROL_PLANE_IP
Bootstrap ETCD
talosctl bootstrapPause until Kublet and API is up
Get Kubeconfig
talosctl kubeconfigTest for Success kubectl get nodes --kubconfig=kubeconfig and kubectl get pods —n kube-system kubconfig=kubeconfig
TL;DR;
Download a ISO
Latest standard release
To install Talos in Proxmox, you need a ISO. ISO images for amd64 or arm64 architectures are available on the Talos releases page, on GitHub, download metal-amd64.iso. The latest stable release is version v1.8.0.
mkdir -p talos/1.8/
curl https://github.com/siderolabs/talos/releases/download/v1.8.0/metal-amd64.iso -L -o talos/1.8/Talos.1.8.0.iso
Standard release with QGA support
You should consider using QEMU Guest Agent support so you can do VM shutdowns of your Talos VMs. You will need a custom ISO.
- Navigate to https://factory.talos.dev/
- Select
- Hardware Type:
Bare-metal MachineclickNext → - Machine Architecture: Choose
amd64clickNext → - System Extensions: Tick the
siderolabs/qemu-guest-agentclickNext → - Customization: click
Next →
- Hardware Type:

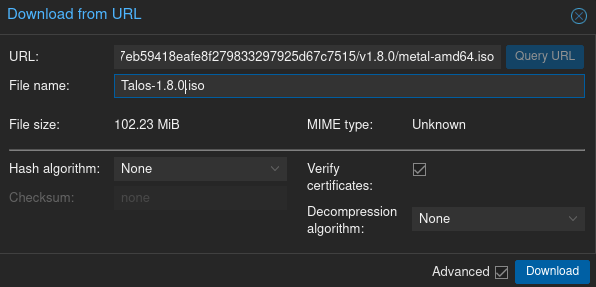
- Copy the ISO URL
- Go to your Proxmox ISO storage, hit
[Download from URL]and paste it in, - hit
[Query URL], - change the File name to something like Talos-1.8.0.iso,
- hit
[Download].
- Go to your Proxmox ISO storage, hit
📒 We use the ISO, NOT theDisk Image (RAW)norDisk Image (QCOW2)and not the BootiPXE boot (iPXE script). They are useful, but not for this example.
Using PXE
Talos can be installed on bare-metal using PXE service. First, download the vmlinuz and initramfs assets from GitHub. Set up the machines to PXE boot from the network (usually by setting the boot order in the BIOS). There might be options specific to the hardware being used, booting in BIOS or UEFI mode, using iPXE, etc.
Talos requires the following kernel parameters to be set on the initial boot:
talos.platform=metalslab_nomergepti=on
Install Talos
Create VMs
Create a new VM for the Control Plane
- Name for the new VM, we can use
talos-cp1 - In the OS tab, select the ISO we uploaded earlier,
Talos.1.7.6.iso - Keep the defaults set in the System tab, but set QGA tag on if your image has it.
- Keep the defaults in the Hard Disk tab as well,
- only changing the size to what you desire.
- In the CPU section, give at least 2 cores, CPU unit set to 1024
Verify that the RAM is set to at least 2 GB:
Keep the default values for networking, verifying that the VM is set to come up on the bridge interface.
Finish creating the VM by clicking through the “Confirm” tab and then “Finish”.
📔 When booted without a machine configuration, it starts in maintenance mode.
📔 Talos doesn’t install itself to disk when booted from an ISO until the machine configuration is applied.
Add a Worker
Repeat this process for a second VM to use as a worker, worker-1.
We can add more Workers and Control Plains later.
Start the Control Plane Node
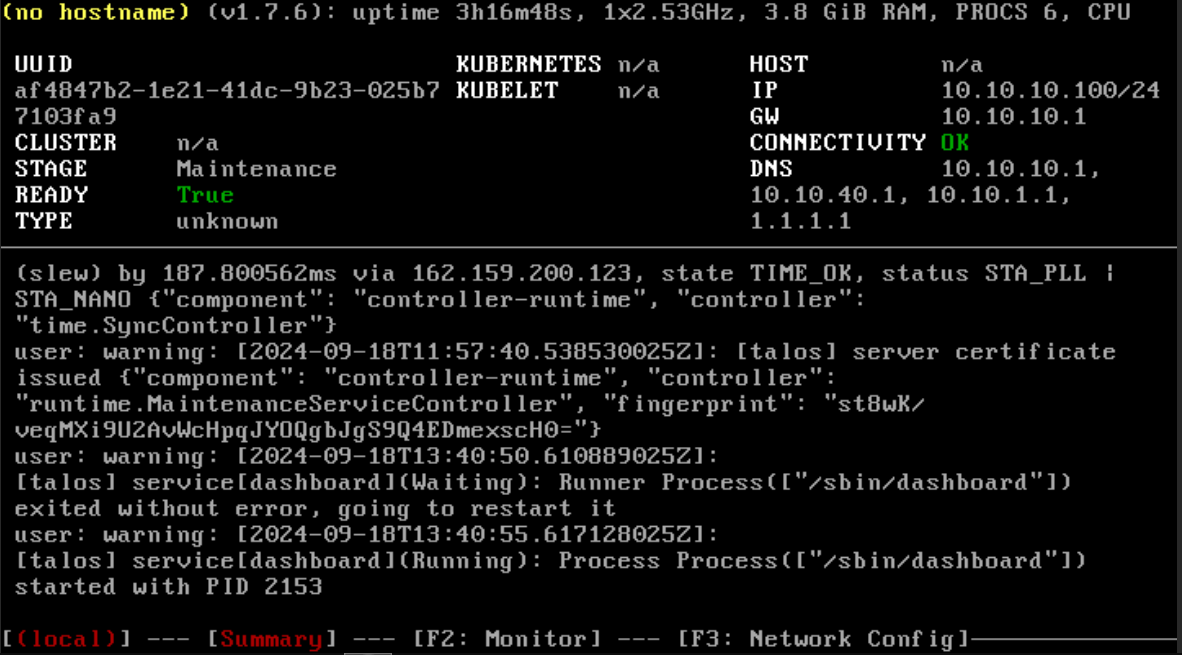
Once the VMs have been created and updated, start the VM that will be the first control plane node. This VM will boot in maintenance mode.
With DHCP server
Once the machine has entered maintenance mode, there will be a console log that details the IP address that the node received.
- Take note of this IP address, which will be referred to as
$CONTROL_PLANE_IPfor the rest of this guide. I have10.10.10.100 - You may export this IP as a bash variable, by
export CONTROL_PLANE_IP=10.10.10.100.
Without DHCP server
To apply the machine configurations in maintenance mode, VM has to have IP on the network. So you can set it on boot time manually.

Press e on the boot time. And set the IP parameters for the VM. Format is:
ip=<client-ip>:<srv-ip>:<gw-ip>:<netmask>:<host>:<device>:<autoconf>
For example, $CONTROL_PLANE_IP will be 10.10.10.100 and gateway 10.10.10.1
linux /boot/vmlinuz init_on_alloc=1 slab_nomerge pti=on panic=0 consoleblank=0 printk.devkmsg=on earlyprintk=ttyS0 console=tty0 console=ttyS0 talos.platform=metal ip=10.10.10.100::10.10.10.1:255.255.255.0::eth0:off
Then press Ctrl-x or F10
Generate Machine Configurations
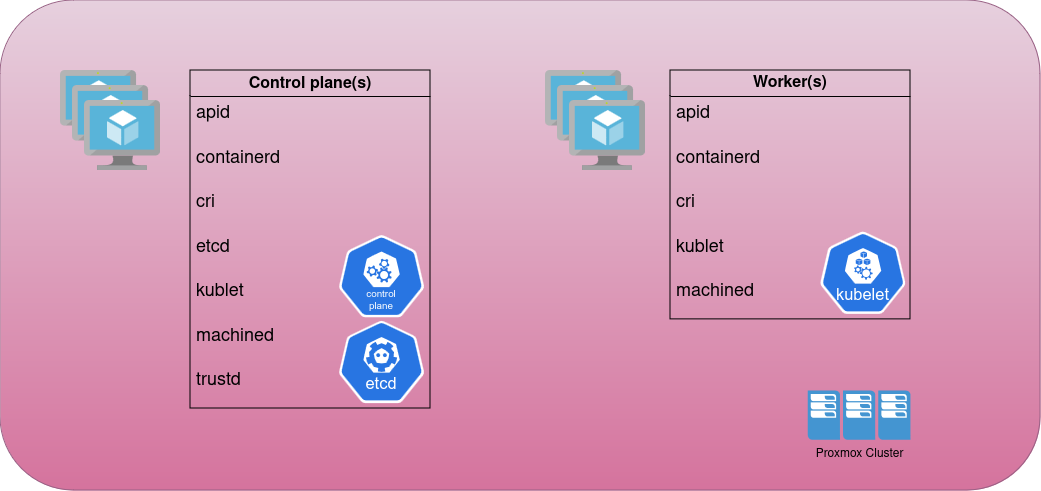
The two types of Machine Configs correspond to the two roles of Talos nodes:
- control plane nodes (which run both the Talos and Kubernetes control planes)
- worker nodes (which run the workloads).
Using the IP from the VM, we can now generate the machine configurations to use for installing Talos and Kubernetes. Issue the following command, talosctl gen config talos-proxmox-cluster https://$CONTROL_PLANE_IP:6443 --output-dir _out, updating the as of your design.
Setting the CONTROL_PLANE variable
CONTROL_PLANE_IP=10.10.10.1- You may export this IP as a bash variable, by
export CONTROL_PLANE_IP=10.10.10.100.
Generate the Configuration Files
talosctl gen config talos-c1 https://$CONTROL_PLANE_IP:6443 --output-dir _outThis will create several files in the _out directory: controlplane.yaml, worker.yaml, and talosconfig.
📒 The Talos config by default will install to/dev/sda. Depending on your setup the virtual disk may be mounted differently Eg:/dev/vda. You can check for disks running the following command:
talosctl disks --insecure --nodes $CONTROL_PLANE_IPUpdate controlplane.yaml and worker.yaml config files to point to the correct disk locations of your environment.
QEMU guest agent support
For QEMU guest agent support, you can generate the config with the custom installation image:
talosctl gen config talos-proxmox-cluster https://$CONTROL_PLANE_IP:6443 --output-dir _out --install-image factory.talos.dev/installer/ce4c980550dd2ab1b17bbf2b08801c7eb59418eafe8f279833297925d67c7515:v1.7.6
- In Proxmox, go to your VM –> Options and ensure that
QEMU Guest AgentisEnabled - The QEMU agent is now configured
Create Control Plane Node
Using the controlplane.yaml generated above, you can now apply this config using talosctl. Issue:
talosctl apply-config --insecure --nodes $CONTROL_PLANE_IP --file _out/controlplane.yaml
You should now see some action in the Proxmox console for this VM. Talos will be installed to disk, the VM will reboot, and then Talos will configure the Kubernetes control plane on this VM.
Note: This process can be repeated multiple times to create an HA control plane.
Create Worker Node
Create at least a single worker node using a process similar to the control plane creation above. Start the worker node VM and wait for it to enter “maintenance mode”. Take note of the worker node’s IP address, which will be referred to as $WORKER_IP
Issue:
talosctl apply-config --insecure --nodes $WORKER_IP --file _out/worker.yaml
Note: This process can be repeated multiple times to add additional workers.
Using the Cluster
Once the cluster is available, you can make use of talosctl and kubectl to interact with the cluster. For example, to view current running containers, run talosctl containers for a list of containers in the system namespace, or talosctl containers -k for the k8s.io namespace. To view the logs of a container, use talosctl logs <container> or talosctl logs -k <container>.
First, configure talosctl to talk to your control plane node by issuing the following, updating paths and IPs as necessary:
export TALOSCONFIG="_out/talosconfig"
talosctl config endpoint $CONTROL_PLANE_IP
talosctl config node $CONTROL_PLANE_IP
Bootstrap Etcd
talosctl bootstrap
Retrieve the kubeconfig
At this point, we can retrieve the admin kubeconfig by running:
talosctl kubeconfig .
Cleaning Up
To clean up, simply stop and delete the virtual machines from the Proxmox UI.
WORKER_IP=
CONTROL_PLANE_IP=
References
Talos Distro [1] Omni [2] Running in Docker [3] Talos on Proxmox [^p]
Talos homepage, version 1.7 Documentation GitHub
Talos gRPC API reference.
Talosctl CLI tool reference.
Talos Linux machine configuration reference.
Linux kernel reference. ↩︎Omni SaaS Homepage, Pricing See Omni for Home, Documentation ↩︎


