OPNsense – a NG Firewall
After all the bad things pfSense brought to the table in the form of broken promises vi-a-vie the pfSense +, I think it's time for even me to start going with OPNsense. To make it more interesting, I set it up using only one NIC. There is one use-case - the Data Center bare metal setups.


After all the bad things pfSense brought to the table in the form of broken promises vi-a-vie the pfSense+, I think it's time for even me to start going with OPNsense. To make it more interesting I set it up using only one NIC. Why? Not because it's easy but because it's hard. That is the way we learn. Actually it was the same as setting up pfSense on one NIC. You use VLAN's.
There is one use-case - the Data Center bare metal setups. And boy are they strange. Every one has there own ways and peculiarities.
I also setup one for my test cluster to separate it from the family LAN.
My first long time love was IPcop and then trying all kinds of firewalls, I fell for pfSense very early in it's history. It wasn't perfect in the beginning but still it was extremely good. I newer used OPNsense for any commercial stuff but did have it from time to time in my lab.
The feature set of OPNsense includes high-end features such as forward caching proxy, traffic shaping, intrusion detection and easy OpenVPN client setup. The latest release is based upon FreeBSD for long-term support and uses a newly developed MVC-framework based on Phalcon.
OPNsense’s focus on security brings unique features such as the option to use LibreSSL instead of OpenSSL (selectable in the GUI) and a custom version based on FreeBSD.

A solution is also to get a box, rack mount or tabletop, prices from € 550 - 16.000.
Business Edition Licenses are € 149/ 1 year or 359/3 years (on sale - normal 447)
First step - Planning
As always in Networking it's the fundamental key to success is planning.
Plan your network, what, why and who it is to serve.
Issues in Networking are usually always caused by bad planning
In this case we setup a firewall in a Proxmox host that has only one NIC . We are to using a VM, 1-2 cores and 1-2 G RAM and a minimal 8-16 G disk. Mine is running on SSDs.
The WAN part is going to my ISPs WAN or LAN and can be DMZ.
The LAN is to be VLAN aware and serve the internal guests (VM/CT) on 10.0.0.0/24. Each VLAN will have a DHCP.
The network also have, not discussed here or used for the demo, a set ot DNS servers, a set of DHCP servers and a set of NTP servers, a PXE and TFTP server.
A typical small business setup.
The box or the VM?

Minimum OPNsense VM
The minimum specification to run all OPNsense standard features that do not need disk writes, means you can run all standard features.
Except for the ones that require disk writes, e.g. a caching proxy (cache) or intrusion detection and prevention (alert database).
The basic HomeLab
- 2 core, 1 GHz or faster (1 core may work, I have one running)
- 2 GB RAM
- 4 GB Disk
A all features loaded OPNsense VM
The reasonable specification to run all OPNsense standard features, means every feature is functional, but perhaps not with a lot of users or high loads.
The large HomeLab or a SoHo install (add a Licence)
- 2 core, 1 GHz or faster
- 4 GB RAM
- 40 GB SSD
Recommended OPNsense VM
The recommended specification to run all OPNsense standard features, means every feature is functional and fits most use cases in a corporation.
The last step before going HW. License and even Extra Hour contract.
- 2 core, 1,5 GHz or faster
- 8 GB RAM
- 120 GB SSD
Second step - Download and extract OPNsense
Go to the download page and set the following: Architecture amd64, Image type dvd and select the Mirror Location to a location near you.
After downloading extract the ISO and move it to your ISO storage (on the node or the NAS).

Third step - Setup the node
We need to setup the bridges and the VM to be used.
Virtual Bridges
As normal we have the vmbr0 as the management interface, I use a VLAN. There are other NICs reserved for special duty lice CoroSync, Migration, HA redundant networks 2 NICs needed, and on large systems CEPH NICs.
But for a normal HomeLab:
- vmbr1 CoroSynk Cluster Management, need to be on a separate NIC 100M is OK but today we tend to use 1G here
- vmbr2 VM traffic, VLAN aware, usually a bond of the other NICs
- vmbr3 for internal special traffic
- vmbr4 for internal special traffic might be the Migration Network in
We need to have 2 virtual bridges assigned
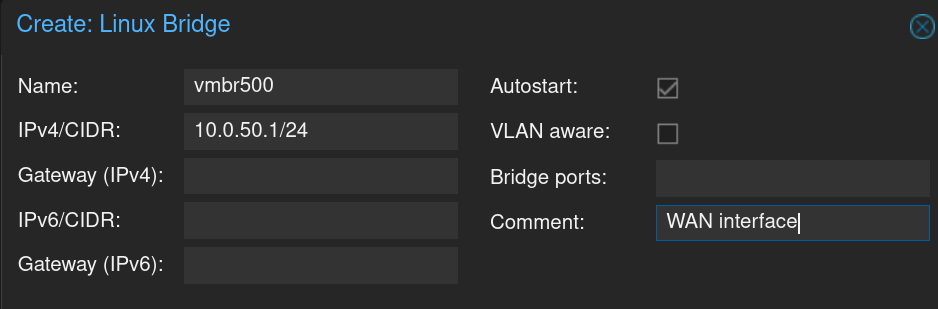
- vmbr500 WAN, the WAN input from vmbr0 to the OPNsense
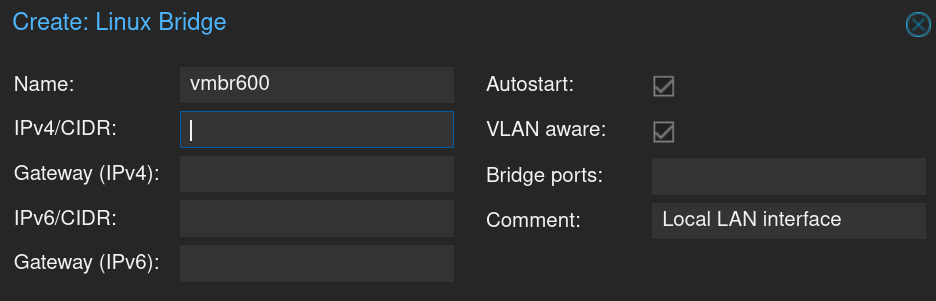
- vmbr600 LAN, the local LAN side of OPNsense
Virtual Machine
The OPNsense needs to run in a VM and there is things you need to do to secure it, that is not the focus here.
Choose between building it, use the DVD media or get a OVA file from Desico.
This blog post is about installing from the DVD ISO.
My use case
I don't really need disk wrights as such. This one is running on a remote server with a limited set of services, web pages and some supporting apps.
The Proxmox Server is running in a local Data Center. I try to cut out their specific stuff and just present the essentials. I would recommend you to use UFW, IP Tables was not the best choice I could have made.
Two ways to get to the Web Server and other apps
- NAT into Proxmox -> OPNsense -> Apache on 80/443
- More work and
- Double NATting
- Extra IP and MAC Address to OPNsense -> Apache on 80/443
- Expensive due to the cost of an extra IP
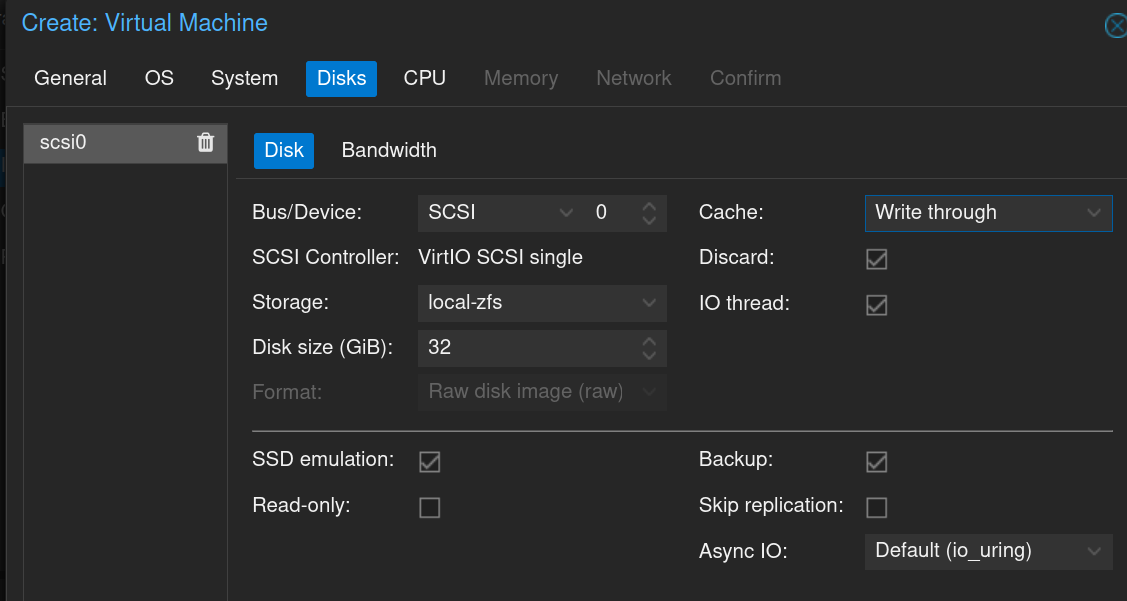
We will set up a Type 2 VM in this blog post. The type 1 is for reference only.
- 2 core, 1 GHz or faster
- 2 GB RAM
- 32 GB Disk
- no networks jet
Type 1 - Remote node 2
nano /etc/network/interfacesiface enp3s0 inet manual
auto vmbr0
iface vmbr0 inet static
address 192.0.2.250/27 (your IP here)
gateway 192.0.0.225 (your gateway IP)
bridge-ports enp3s0
bridge-stp off
bridge-fd 1
pointtopoint 192.0.0.225 (your gateway IP)
bridge_hello 2
bridge_maxage 12
auto vmbr100
iface vmbr100 inet manual
bridge-ports none
bridge-stp off
bridge-fd 0ifup -a
rebootType 2 - Remote node 3
We need to add two virtual bridges to the server, vmbr500 and vmbr600.
We need to edit the vmbr500 to use iptables to nat the traffic in from vmbr0 NIC.
You can create the Bridges in the GUI if you like or create them when you edit the interfaces file. You need to edit the vmbr500 later. Apply Configuration
Apply Configuration
Edit the network interfaces
We need to activate NAT forwarding on the WAN interface
nano /etc/network/interfacesauto vmbr600
iface vmbr600 inet manual
bridge-ports none
bridge-stp off
bridge-fd 0
bridge-vlan-aware yes
bridge-vids 2-4094
#Local LAN interfaceauto vmbr500
iface vmbr500 inet static
address 10.0.50.254/24
bridge-ports none
bridge-stp off
bridge-fd 0
post-up echo 1 > /proc/sys/net/ipv4/ip_forward
post-up iptables -t nat -A POSTROUTING -s '10.0.50.0/24' -o vmbr0 -j MASQUERADE
post-down iptables -t nat -D POSTROUTING -s '10.0.50.0/24' -o vmbr0 -j MASQUERADE
#WAN interfaceThe last rows are the commands associated with post-up and post-down
Then activate the interfaces
ifreload -aSecuring the node
Securing the SSH, setup and start the Firewall and install and setup Fail2Ban.
Securing SSH
Secure the SSH by uploading your keys and editing /etc/ssh/sshd_config
PermitRootLogin yes(default is#PermitRootLogin yes)PubkeyAuthentication yes(default isPubkeyAuthentication yes)PasswordAuthentication no(default is#PasswordAuthentication yes)
Restart the SSH daemon systemctl reload sshd.
Setup the Firewall
As the system is wide open from start you need to tighten security, especially in my use-case of a remote server located in the local Data Center.
Then edit the Firewall. This is just to get things started - not the final firewall settings. We need to set these to be able to activate the Firewall without locking us out! The first row is optional, but 2 and 3 mandatory.
Action Accept Protocol icmp Log level nolog                # Allow Ping
Action Accept Protocol tcp Dest.port 22 Log level notice   # Allow SSH
Action Accept Protocol tcp Dest.port 8006 Log level notice # Allow GUI
Do NOT lock yourself out! Open the ports 22 and 8006 (8007 for Pbs]
Go to Datacenter and activate the Firewall
Add Fail2Ban
Fail2ban is a go to tool to securing server logins from try and error attacks by introducing a wait time, hackers can't afford to wait like 1 hour between attempts.
Here I describe in short how you can set up fail2ban for the Proxmox VE API to block IP addresses (temporarily) if there were to many wrong login tries submitted through them.
apt update && apt-get install -y fail2ban systemctl enable fail2banSetup Fail2ban Base Config
SSH is activated by default.
Add the following section [Proxmox] to the end of the file jail.local.
For older installs of Pve see the wiki.
nano /etc/fail2ban/jail.local[proxmox]
enabled = true
port = https,http,8006
filter = proxmox
backend = systemd
maxretry = 3
findtime = 2d
bantime = 1hFilter Config
Create the proxmox.conf file and add the info below
/etc/fail2ban/filter.d/proxmox.conf[Definition]
failregex = pvedaemon\[.*authentication failure; rhost=<HOST> user=.* msg=.*
ignoreregex =Restart Service to Enable Config
systemctl restart fail2banCreate the OPNsense VM
We will now use the downloaded, extracted and moved DVD image as our ISO. and the tho bridges we created.
See the guidelines on VM sizes above and mach to your planned usage.
Give the VM a number in your style and give it a name like router.
The CPU is mostly up to your node, set as 2 Cores.
Add no Network Devices, that can be done when the VM is ready.
Add the vmbr500 and vmbr600
Add the vmbr500 and vmbr600 to your VM and any other you might need.
Start the VM and install OPNsense
Check your VM Hardware tab for MAC addresses to know what is what
When the VM starts the install starts and you need to choose the interface for WAN and setup the LAN IP addresses from your plan.
The basic LAN is 192.168.1.1/24 meaning you should do the interfaces manually and not automatically. We will address this after the install if you do not set it manually at this stage.
Option: When you see Press any key to start the manual interface assignment hit a key and enter vtnet0 for WAN and vtnet1 for LAN (check the MAC's).
Login and Install
login: installer password: opnsense
- After login you will run the installer.
- I prefer ZFS but here its OK with UFS, we are running ZFS on the node any how. We only use one virtual disk so stripe our thing. Install to da0
- Accept the swap of 8 GB
- Now install OPNsense on the virtual disk. It will take some minutes to finish.
- Setup your Root Password, you need a really strong one - it's a firewall and router!
Reboot
login: root password: opnsense
Remove the ISO from the VM
Final step is to set the WAN IP and the LAN IP range.
The auto detect will fail the WAN setup but that is expected
Now change the password and set the IPs.
E.g. Wan 10.0.50.1/24 and GW 10.0.50.254.
If you need external web connection add a Public WAN
Private Proxmox Internal LAN
Now we have an internal LAN. VMs will get IPs from the DHCP and we can communicate from VM to VM as the OPNsense firewall allows.
Personal Notes
My personal notes of using/setting up OPNsense
The Theme
I want a dark theme and the OPNsense dark is to bright, try Cicada.
The vCPU's
In the summer of 2020, AMD, Intel, Red Hat, and SUSE collaborated to define three x86-64 micro-architecture levels on top of the x86-64 baseline, with modern flags enabled. For details, see the x86-64-ABI specification.
Host is only usable for non migrating VM's or if all nodes are identical.
VCPU Compatible with Intel and AMD as below
- kvm64 (x86-64-v1)
- Intel CPU >= Pentium 4,
- AMD CPU >= Phenom.
- x86-64-v2
- Intel CPU >= Nehalem,
- AMD CPU >= Opteron_G3.
- Added CPU flags compared to x86-64-v1:
- +cx16, +lahf-lm, +popcnt, +pni, +sse4.1, +sse4.2, +ssse3.
- x86-64-v2-AES
- Intel CPU >= Westmere
- AMD CPU >= Opteron_G4.
- Added CPU flags compared to x86-64-v2: +aes.
- x86-64-v3
- Intel CPU >= Broadwell
- AMD CPU >= EPYC.
- Added CPU flags compared to x86-64-v2-AES:
- +avx, +avx2, +bmi1, +bmi2, +f16c, +fma, +movbe, +xsave.
- x86-64-v4
- Intel CPU >= Skylake
- AMD CPU >= EPYC v4 Genoa.
- Added CPU flags compared to x86-64-v3:
- +avx512f, +avx512bw, +avx512cd, +avx512dq, +avx512vl.
Storage
This is just a quick example and not a guide how to setup ZFS Storage
zpool create storage /dev/nvme0n1p1kzfs create storage/ISOzfs create storage/disk
Go to Datecenter and Add them
localISO[ISOimage]localVMdisks[Disk image, Container]
Check status
zpool status
Firewall
Datacenter incoming/outgoing DROP/REJECT
If the input or output policy for the firewall is set to DROP or REJECT, the following traffic is still allowed for all Proxmox VE hosts in the cluster:
- traffic over the loopback interface
- already established connections
- traffic using the IGMP protocol
- TCP traffic from management hosts to port 8006 in order to allow access to the web interface
- TCP traffic from management hosts to the port range 5900 to 5999 allowing traffic for the VNC web console
- TCP traffic from management hosts to port 3128 for connections to the SPICE proxy
- TCP traffic from management hosts to port 22 to allow ssh access
- UDP traffic in the cluster network to ports 5405-5412 for corosync
- UDP multicast traffic in the cluster network
- ICMP traffic type 3 (Destination Unreachable), 4 (congestion control) or 11 (Time Exceeded)
The following traffic is dropped, but not logged even with logging enabled:
- TCP connections with invalid connection state
- Broadcast, multicast and anycast traffic not related to corosync, i.e., not coming through ports 5405-5412
- TCP traffic to port 43
- UDP traffic to ports 135 and 445
- UDP traffic to the port range 137 to 139
- UDP traffic form source port 137 to port range 1024 to 65535
- UDP traffic to port 1900
- TCP traffic to port 135, 139 and 445
- UDP traffic originating from source port 53
The rest of the traffic is dropped or rejected, respectively, and also logged. This may vary depending on the additional options enabled in Firewall → Options, such as NDP, SMURFS and TCP flag filtering.
Minimum settings for the Datacenter level is: ACCEPT macro SSH and D.Port 8006 open, better if you specify the subnet/VLAN and/or NIC that is allowed to connect and set Log level to notice.
If you are Locked-Out
It you do lock your self out this will help:
- go to your KVM switch or DRAC/ iLO/IPMI and type
pve-firewall stop - fix the issue with the firewall on the Datacenter level
QEMU Guest Agent
Using the GUI
Install (Safari, LibreWolf)
Go to System → Firmware → Plugins, select plugin and hit the + (Add)
***GOT REQUEST TO INSTALL***
Currently running OPNsense 25.1.6_4 (amd64) at Tue May 13 08:51:29 UTC 2025
Updating OPNsense repository catalogue...
OPNsense repository is up to date.
All repositories are up to date.
The following 2 package(s) will be affected (of 0 checked):

New packages to be INSTALLED:
	os-qemu-guest-agent: 1.3
	qemu-guest-agent: 9.2.3

Number of packages to be installed: 2

The process will require 2 MiB more space.
230 KiB to be downloaded.
[1/2] Fetching os-qemu-guest-agent-1.3.pkg: . done
[2/2] Fetching qemu-guest-agent-9.2.3.pkg: .......... done
Checking integrity... done (0 conflicting)
[1/2] Installing qemu-guest-agent-9.2.3...
[1/2] Extracting qemu-guest-agent-9.2.3: .......... done
[2/2] Installing os-qemu-guest-agent-1.3...
[2/2] Extracting os-qemu-guest-agent-1.3: .......... done
Stopping configd...done
Starting configd.
Migrated OPNsense\QemuGuestAgent\QemuGuestAgent from 0.0.0 to 1.0.0
Reloading plugin configuration
Configuring system logging...done.
Reloading template OPNsense/QemuGuestAgent: OK


=====
Message from qemu-guest-agent-9.2.3:

--
To run the guest agent on startup:

sysrc qemu_guest_agent_enable="YES"

Start the service with:
service qemu-guest-agent start
Checking integrity... done (0 conflicting)
Nothing to do.
***DONE***
Installing when the without the GUI
This is how I did it on my old pfSense box
pkg install qemu-guest-agentMake it run as a deamon
Edit this file vi /etc/rc.conf.local and add this line
qemu_guest_agent_enable="YES"
or these lines
qemu_guest_agent_enable="YES"
qemu_guest_agent_flags="-d -v -l /var/log/qemu-ga.log"
System → Settings → Tunables and now hit + (= Add) to enter a new Tunable, Name: virtio_console_load and enter the Value: YES
Reboot
Test for success in the Summary window you should see the IP
Troubleshooting
(Shell) Check if agent is running from pfsense shell :
service qemu-guest-agent status
Check qemu logs for errors:
cat /var/log/qemu-ga.logACME
Install
Go to System → Firmware → Plugins, select plugin and hit the + (Add)
***GOT REQUEST TO INSTALL***
Currently running OPNsense 25.1.6_4 (amd64) at Tue May 13 08:36:08 UTC 2025
Updating OPNsense repository catalogue...
OPNsense repository is up to date.
All repositories are up to date.
The following 24 package(s) will be affected (of 0 checked):

New packages to be INSTALLED:
	abseil: 20250127.0
	acme.sh: 3.1.1
	bind-tools: 9.20.8
	fstrm: 0.6.1_1
	jsoncpp: 1.9.6_1
	libgcrypt: 1.11.0
	libgpg-error: 1.55
	liburcu: 0.15.0
	libuv: 1.51.0
	libxslt: 1.1.42
	os-acme-client: 4.9
	protobuf: 29.4,1
	protobuf-c: 1.5.1_2
	py311-beautifulsoup: 4.13.4
	py311-dns-lexicon: 3.21.0
	py311-filelock: 3.17.0
	py311-html5lib: 1.1_1
	py311-lxml: 4.9.3_1
	py311-pyotp: 2.9.0_1
	py311-requests-file: 2.0.0
	py311-soupsieve: 2.0.1_1
	py311-tldextract: 3.3.1_1
	py311-webencodings: 0.5.1_1
	socat: 1.8.0.3

Number of packages to be installed: 24

The process will require 49 MiB more space.
10 MiB to be downloaded.
[1/24] Fetching libxslt-1.1.42.pkg: .......... done
[2/24] Fetching libuv-1.51.0.pkg: .......... done
[3/24] Fetching py311-filelock-3.17.0.pkg: .... done
[4/24] Fetching py311-requests-file-2.0.0.pkg: .. done
[5/24] Fetching bind-tools-9.20.8.pkg: .......... done
[6/24] Fetching acme.sh-3.1.1.pkg: .......... done
[7/24] Fetching liburcu-0.15.0.pkg: .......... done
[8/24] Fetching py311-pyotp-2.9.0_1.pkg: ... done
[9/24] Fetching py311-dns-lexicon-3.21.0.pkg: .......... done
[10/24] Fetching protobuf-c-1.5.1_2.pkg: .......... done
[11/24] Fetching os-acme-client-4.9.pkg: .......... done
[12/24] Fetching py311-webencodings-0.5.1_1.pkg: ... done
[13/24] Fetching abseil-20250127.0.pkg: .......... done
[14/24] Fetching jsoncpp-1.9.6_1.pkg: .......... done
[15/24] Fetching libgcrypt-1.11.0.pkg: .......... done
[16/24] Fetching fstrm-0.6.1_1.pkg: ........ done
[17/24] Fetching py311-lxml-4.9.3_1.pkg: .......... done
[18/24] Fetching socat-1.8.0.3.pkg: .......... done
[19/24] Fetching libgpg-error-1.55.pkg: .......... done
[20/24] Fetching protobuf-29.4,1.pkg: .......... done
[21/24] Fetching py311-html5lib-1.1_1.pkg: .......... done
[22/24] Fetching py311-beautifulsoup-4.13.4.pkg: .......... done
[23/24] Fetching py311-tldextract-3.3.1_1.pkg: .......... done
[24/24] Fetching py311-soupsieve-2.0.1_1.pkg: ......... done
Checking integrity... done (0 conflicting)
[1/24] Installing libgpg-error-1.55...
[1/24] Extracting libgpg-error-1.55: .......... done
[2/24] Installing abseil-20250127.0...
[2/24] Extracting abseil-20250127.0: .......... done
[3/24] Installing jsoncpp-1.9.6_1...
[3/24] Extracting jsoncpp-1.9.6_1: .......... done
[4/24] Installing libgcrypt-1.11.0...
[4/24] Extracting libgcrypt-1.11.0: .......... done
[5/24] Installing libxslt-1.1.42...
[5/24] Extracting libxslt-1.1.42: .......... done
[6/24] Installing py311-webencodings-0.5.1_1...
[6/24] Extracting py311-webencodings-0.5.1_1: .......... done
[7/24] Installing protobuf-29.4,1...
[7/24] Extracting protobuf-29.4,1: .......... done
[8/24] Installing libuv-1.51.0...
[8/24] Extracting libuv-1.51.0: .......... done
[9/24] Installing py311-filelock-3.17.0...
[9/24] Extracting py311-filelock-3.17.0: .......... done
[10/24] Installing py311-requests-file-2.0.0...
[10/24] Extracting py311-requests-file-2.0.0: .......... done
[11/24] Installing liburcu-0.15.0...
[11/24] Extracting liburcu-0.15.0: .......... done
[12/24] Installing protobuf-c-1.5.1_2...
[12/24] Extracting protobuf-c-1.5.1_2: .......... done
[13/24] Installing fstrm-0.6.1_1...
[13/24] Extracting fstrm-0.6.1_1: .......... done
[14/24] Installing py311-lxml-4.9.3_1...
[14/24] Extracting py311-lxml-4.9.3_1: .......... done
[15/24] Installing py311-html5lib-1.1_1...
[15/24] Extracting py311-html5lib-1.1_1: .......... done
[16/24] Installing py311-soupsieve-2.0.1_1...
[16/24] Extracting py311-soupsieve-2.0.1_1: .......... done
[17/24] Installing bind-tools-9.20.8...
[17/24] Extracting bind-tools-9.20.8: .......... done
[18/24] Installing py311-pyotp-2.9.0_1...
[18/24] Extracting py311-pyotp-2.9.0_1: .......... done
[19/24] Installing socat-1.8.0.3...
[19/24] Extracting socat-1.8.0.3: ......... done
[20/24] Installing py311-beautifulsoup-4.13.4...
[20/24] Extracting py311-beautifulsoup-4.13.4: .......... done
[21/24] Installing py311-tldextract-3.3.1_1...
[21/24] Extracting py311-tldextract-3.3.1_1: .......... done
[22/24] Installing acme.sh-3.1.1...
===> Creating groups
Creating group 'acme' with gid '169'
===> Creating users
Creating user 'acme' with uid '169'
===> Creating homedir(s)
[22/24] Extracting acme.sh-3.1.1: .......... done
[23/24] Installing py311-dns-lexicon-3.21.0...
[23/24] Extracting py311-dns-lexicon-3.21.0: .......... done
[24/24] Installing os-acme-client-4.9...
[24/24] Extracting os-acme-client-4.9: .......... done
Stopping configd...done
Starting configd.
Migrated OPNsense\AcmeClient\AcmeClient from 0.0.0 to 4.2.0
Reloading plugin configuration
Configuring system logging...done.
Reloading template OPNsense/AcmeClient: OK


=====
Message from acme.sh-3.1.1:

--
This script will create the following directories if they do not exist:

 ~acme/.acme.sh
 ~acme/certs

The script will also install ~acme/.acme.sh/account.conf.sample which has
sane defaults.  Copy this to ~acme/.acme.sh/account.conf and edit contents
to suit.

If you have EXAMPLES on:

* In the /usr/local/share/examples/acme.sh directory, you can find the dnsapi
  scripts which will be useful if you decide to use dns-01 challenges. Also
  included are the deploy scripts.

* A newsyslog.conf sample file is installed at
  /usr/local/etc/newsyslog.conf.d/acme.sh.conf - you must modify it by
  at least uncommenting the line.

* If you run `newsyslog -NC` it will create the required logfiles.

* Please review /usr/local/share/examples/acme.sh/acme.sh-cron.d - instructions are
  contained in that file.
Checking integrity... done (0 conflicting)
Nothing to do.
***DONE***References
OPNsense [1] webshop [2] Downloads [3] GitHub [4] Installation [5] Fail2Ban [6] ZFS [7]


