Proxmox New Install – Firewall
Security is very important, especially for home labs, we don't have the 24/7 IT-Security Staff to handle things. Several large attacks have recently been utilizing stolen credentials from home users. Yes, home labs are low-hanging fruit for hackers and especially wannabees.


Why Configure the Firewall on Proxmox?
Setting up a firewall on Proxmox is a good way to make Proxmox more secure. Proxmox has many virtual machines and storage devices that could be hacked. It's important to set up firewall rules to allow or deny access.
The firewall serves as a crucial safeguard, regulating the ingress and egress of traffic based on predetermined rules. It will block unauthorized access, which will protect your virtual machines and the data contained within them.
If your VMs are exposed to the internet, such as web servers or remote access portals, the firewall is absolutely necessary to help mitigate the risk of cyber threats. While it is best to configure a DMZ in scenarios like this, the Proxmox firewall is something that can easily be completed and offers strong protection.
Since firewall rules permit or block specific types of traffic, they can improve overall network and system performance.
A DMZ is a subnetwork that is used to expose external-facing services. The purpose of this subnet is to expose it to untrusted networks and block access to trusted subnets.
Allowing untrusted devices to communicate with the DMZ, but they will have no communication with trusted subnets or devices.
Here we consider the local subnet as trusted.
It’s best to separate the DMZ network on its own physical switch
Defaults
The configuration is in:
- Cluster:
/etc/pve/firewall/cluster.fw - Nodes:
/etc/pve/nodes/<nodename>/host.fw - VM:
/etc/pve/firewall/<VMID>.fw
Datacenter Level
- By default, firewall is disabled at Datacenter level
How to Enable or Disable
- Disable/Enable firewall at datacenter level will affect all nodes under the same datacenter (cluster nodes).
Node Level
- By default, firewall is enabled at Node level
- If the firewall option is disabled at datacenter level, even the firewall option is enabled at node level, it will not work
- First, enable the firewall both at Datacenter level, then at the Node level.
How to Disable or Enable
- To enable/disable firewall for Datacenter, you configure it at Datacenter level
- To enable/disable firewall for a Node
- Enable firewall for a node you have to enable at Datacenter level first
- Disable firewall for a node, you can disable it at node level
or at Datacenter level or at both level
VM Level
- By default, firewall is disabled at VM level
- To be able to enable/disable the firewall for a VM:
- First, you have to enable/disable the firewalls both at Datacenter level
- Then, you have to enable/disable the firewalls at Node level
- Now, you can enable/disable the firewall settings for each VM
How to Disable or Enable
- You should
EnabletheFirewallfor each of the desiredNetwork Device - To enable/disable firewall for a VM, to enable firewall for a node,
- Enable at Datacenter level
- Enable at Node level
- Enable for that VM at VM level
- Now you can enable the Firewall option for a Network Device in
Hardware panelindividually
- Now you can enable the Firewall option for a Network Device in
- Disable firewall for a VM
You can disable at Network Device level or VM level or node level or Datacenter level or at all levels.
Zones
For each zone, you can define firewall rules for incoming and/or outgoing traffic. The firewall groups the network into the following logical zones:
- Host (Node) – Traffic from/to a cluster node
- VM – Traffic from/to a specific VM
Security Groups
Security groups and IP aliases can be utilized within the Proxmox firewall configuration files. These can then be used to create firewall rules that allow or block traffic based on the group or alias.
For example, you can define a group named webserver with rules to open the http and https ports. To ban HTTP globaly, comment out HTTP in this group. And it's done for all VM/CT using this group.
[group webserver]
IN  ACCEPT -p tcp -dport 80
IN  ACCEPT -p tcp -dport 443
/etc/pve/firewall/cluster.fw
[RULES]
GROUP webserver
/etc/pve/firewall/<VMID>.fw
Anti Lockout
[group antilockout] # Allow GUI and SSH access

IN ACCEPT -source dc/management -p tcp -dport 8006 -log nolog # PVE GUI
IN ACCEPT -source dc/management -p tcp -dport 8007 -log nolog # PBS GUI
IN SSH(ACCEPT) -source dc/management -log nolog
IN DROP -source +dc/all_private_ipv4 -p tcp -dport 8006,8007 -log nolog
Even better, is to only allow individual IP addresses. On DROP consider logging.
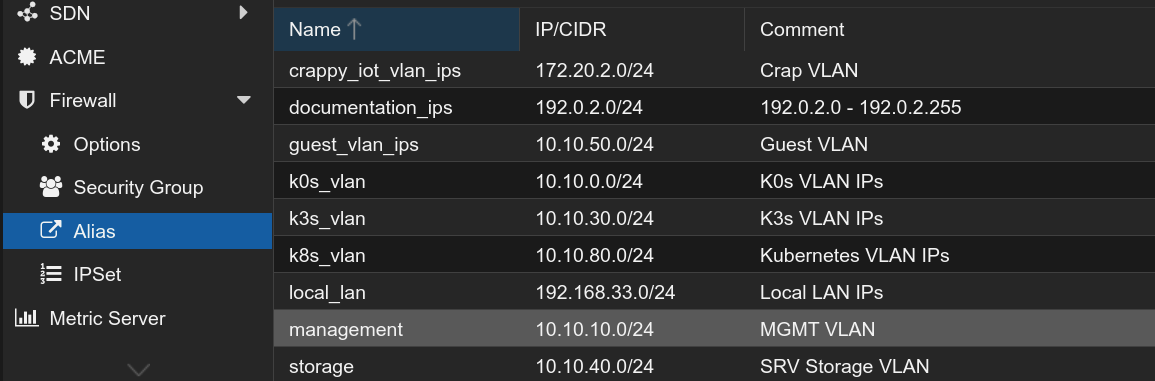
IP Aliases
Firewall→Aliases: IP aliases allow us to associate the IP address of a network with a name. We can then refer to those names.
For example, we could define multiple aliases for different private networks.
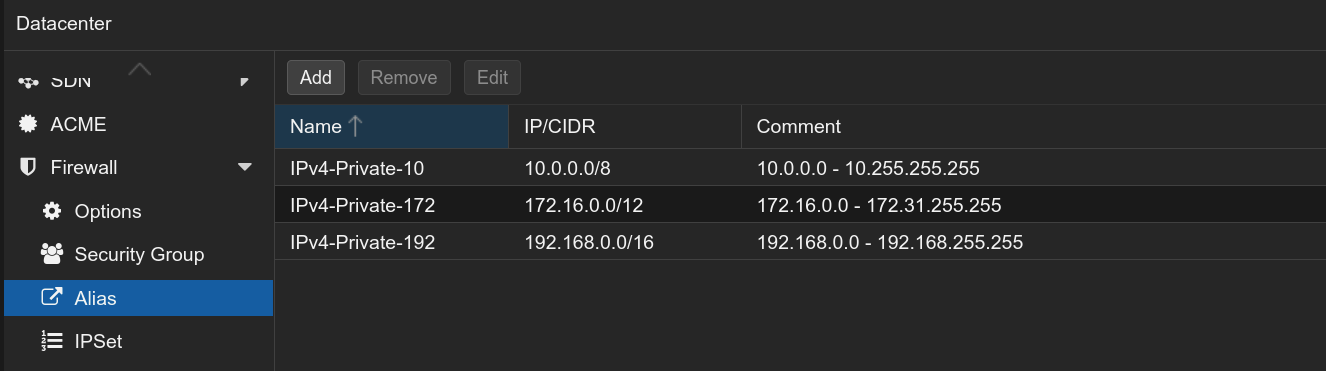
Now, we add all our subnets and VLAN. Remember to comment for future You.
IP Sets
Firewall→IPSet: IP sets can be used to defined groups of networks and hosts. We can refer to them with +name in the firewall rules source and dest properties?
The following example allows HTTP traffic from the webhost IP set.
IN HTTP(ACCEPT) -source +management #allow acces to GUI from MGMT VLANWe can create an IPset which will include all aliases where all private networks are defined. This way, we will have all private IP addresses in an IPset to use in our firewall rules.
Now, we add all our subnets and VLAN. Remember to comment for future You.
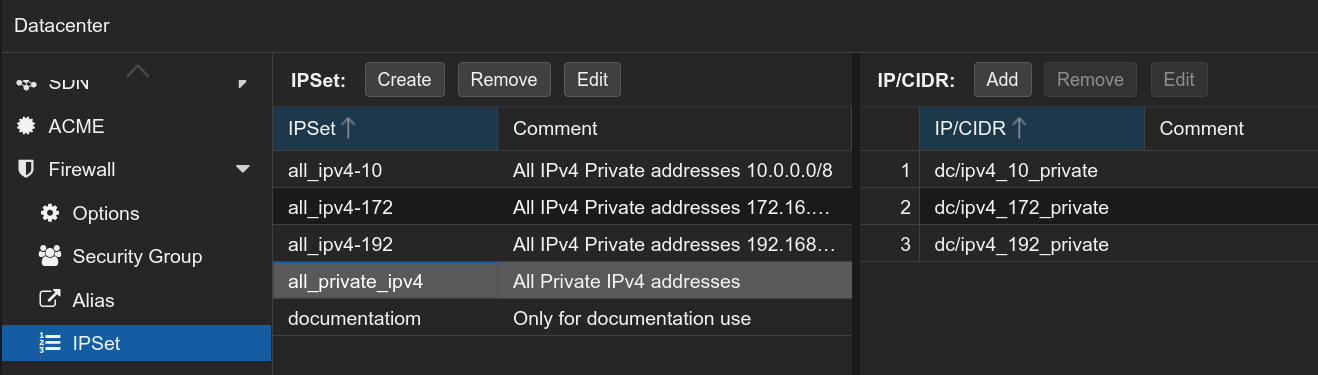
Create IPSet at Datacenter level
If we create IPset at Datacenter level, we can reuse them in all VM firewall rules.
Firewall → IPset
Hit: [Create] and in the window Edit: IPSet give it a clear name
Rules
Hera are some examples, SSH traffic
[RULES]
IN SSH(ACCEPT) -i net0 # with a comment
IN SSH(ACCEPT) -i net0 -source 192.0.2.100 # only allow from one IP
IN SSH(ACCEPT) -i net0 -source 10.0.0.1-10.0.0.10 # accept for a IP range
IN SSH(ACCEPT) -i net0 -source 10.0.0.1,10.0.0.2 # accept for an IP list
IN SSH(ACCEPT) -i net0 -source +mygroup # accept for ipset mygroup
IN SSH(ACCEPT) -i net0 -source myalias #accept ssh for alias myalias
IN SSH(ACCEPT) -source +management

|IN SSH(ACCEPT) -i net0 # disabled rule

IN  DROP # drop all incoming packages
OUT ACCEPT # accept all outgoing packages
Implementation
Security
Remember that, as you can'tr supply security support for your serves 24/7 on the same level as enterprise or corporate IT do, you are a soft target for many hackers (state, criminal, malicious or just curious ones). Be careful out there.
A freshly installed Ubuntu/Debian Server VM is only scoring 60-70/100.
You need to harden any server you have. If one is penetrated, all are at risk.
- block all traffic to 8006 globally, except on the Management VLAN.
- Block everything that is not needed.
- Opening the FW for something, as narrow as possible
Not just open a port, but also specify what VLAN is allowed - Specify source and destination networks
- Have expiry dates on keys, certs, and on passwords
- Use 2FA.
- Use a special VLAN for services over special pots.
- Use Fail2ban on all nodes.
- Don't use FTP use SFTP
- Use keys all around the cluster
- Block
rootlog in with passwords - Use superusers and not
rooton all servers
I do not use Suricata, yes it's possible.
Standard IP set management
This IP set applies only to host firewalls (not VM firewalls). Those IPs are allowed to do normal management tasks (Proxmox VE GUI, VNC, SPICE, SSH).
The local cluster network is automatically added to this IP set (alias cluster_network), to enable inter-host cluster communication. (multicast,ssh,…)
[IPSET management]
192.0.2.10
192.0.2.10/24
/etc/pve/firewall/cluster.fw
Standard IP set blacklist
Traffic from these IPs is dropped by every host’s and VM’s firewall.
[IPSET blacklist]
77.240.159.182
213.87.123.0/24
/etc/pve/firewall/cluster.fw
Basic Lockout rules
IN ACCEPT -source dc/management -p tcp -dport 8006 -log nolog
IN SSH(ACCEPT) -source dc/management -log nolog
Proxmox VE Firewall
Proxmox VE Firewall provides an easy way to protect your IT infrastructure. You can set up firewall rules for all hosts inside a cluster, or define rules for virtual machines and containers. Features like firewall macros, security groups, IP sets and aliases help to make that task easier.
While all configuration is stored on the cluster file system, the iptables-based firewall service runs on each cluster node, and thus provides full isolation between virtual machines. The distributed nature of this system also provides much higher bandwidth than a central firewall solution.
The firewall has full support for IPv4 and IPv6. IPv6 support is fully transparent, and we filter traffic for both protocols by default. There is no need to maintain a different set of rules for IPv6.
Configuration Files
All firewall related configuration is stored on the Proxmox cluster file system. So those files are automatically distributed to all cluster nodes, and the pve-firewall service updates the underlying iptables rules automatically on changes.
You can configure anything using the GUI (i.e. Datacenter → Firewall, or on a Node → Firewall), or you can edit the configuration files directly.
Firewall configuration files contain sections of key-value pairs.
Lines beginning with a # and blank lines are considered comments.
Sections start with a header line containing the enclosed like this [section name].
Firewall Rules
Firewall rules consists of a direction and an action.
- Direction is:
INorOUT - An action is:
ACCEPTorDENYorREJECT.
You can also specify a macro name. Macros contain predefined sets of rules and options. Rules can be disabled by prefixing them with | .
Services and Commands
The firewall runs two service daemons on each node:
- pvefw-logger: NFLOG daemon (an ulogd replacement).
- pve-firewall: updates iptables rules
There is also a CLI command named pve-firewall, which can be used to
- Start the firewall service:
pve-firewall start - Stop the firewall service:
pve-firewall stop - Status of the firewall:
pve-firewall status - Local networks list:
pve-firewall localnet - List iptables:
iptables -L
The above command reads and compiles all firewall rules, so you will see warnings if your firewall configuration contains any errors.
If you want to see the generated iptables rules, you can use: iptables-save
Logging of firewall rules
By default, all logging of traffic filtered by the firewall rules is disabled. To enable logging, the log level for incoming and/or outgoing traffic has to be set in Firewall → Options. This can be done for the host as well as for the VM/CT firewall individually. By this, logging of Proxmox VE’s standard firewall rules is enabled, and the output can be observed in Firewall → Log. Further, only some dropped or rejected packets are logged for the standard rules (see default firewall rules). In case of the host firewall, VMID is equal to 0.
loglevel does not affect how much of the filtered traffic is logged. It changes a LOGID appended as prefix to the log output for easier filtering and post-processing. loglevel is one of the following flags:
Loglevel | LOGID:
nolog|—This is the default settingemerg|0,alert|1,crit= 2,error |3,warning|4,notice|5,info|6,debug|7.
The following traffic is dropped, but not logged
Even with logging enabled:
- TCP connections with invalid connection state
- Broadcast, multicast and anycast traffic not related to corosync,
i.e., not coming through ports 5405-5412 - TCP traffic to port 43
- UDP traffic to ports 135 and 445
- UDP traffic to the port range 137 to 139
- UDP traffic form source port 137 to port range 1024 to 65535
- UDP traffic to port 1900
- TCP traffic to port 135, 139 and 445
- UDP traffic originating from source port 53
Ports used by Proxmox VE
- Web interface: 8006 (TCP, HTTP/1.1 over TLS)
- VNC Web console: 5900-5999 (TCP, WebSocket)
- SPICE proxy: 3128 (TCP)
- sshd (used for cluster actions): 22 (TCP)
- rpcbind: 111 (UDP)
- sendmail: 25 (TCP, outgoing)
- corosync cluster traffic: 5405-5412 UDP
- live migration (VM memory and local-disk data): 60000-60050 (TCP)
And depending on your setup, there might be more if you have added apps.
Proxmox Backup Server
- Web interface: 8007 (TCP, HTTP/1.1 over TLS)nftables
Generic ports
As you will use SSH on all servers and remote servers and VPS servers.
- sshd (used for cluster actions): 22 (TCP)
You might change the port to something else, but it might not be of much help. Braking that security by obscurity takes for port 2222 about 5 min, and for something really strange 10-15 min. Using a port higher than 1024 is opening another can of worms, see the documentation.
nftables
As an alternative to pve-firewall there is proxmox-firewall.
- pve-firewall uses iptables
- proxmox-firewall, (not for production) uses the newer nftables
– There might be bugs or incompatibilities with the original firewall.
– It is currently not suited for production use.

If you Lock Yourself Out
Been there, done that 🙊
Using the Console or SSH
If you do lock yourself out, using the console access or an SSH session if possible, you can disable the firewall entirely
nano /etc/pve/firewall/cluster.fwIn section [OPTIONS] change enable: 1 to enable: 0, save the file.
When the issue is fixed, you should restart the firewall.
On the CLI
You can stop the firewall service through the CLI to regain access
pve-firewall stopWhen the issue is fixed, you should restart the firewall.
pve-firewall startReferences
Proxmox Documentation ↩︎
PVE Firewall Documentation ↩︎


