High Availability Pi-hole 6
After a long time, a totally new under the hood, Pi-hole is here. This is an update to my old post, A redundant DNS - Pi-Stack. This HA DNS will use Pi-hole, Unbound, Nebula-sync and keepalived.

Why a High Availability DNS?
Because without DNS, nothing works. In corporate networks, infrastructure servers, like DNS, are run as HA or at least redundant by number. Usually, this is a feature of the app. But, we will do it with the humble Pi-hole.
How will this all work?
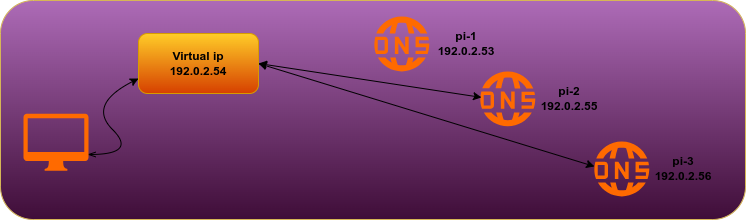
- Running 3 Pi-hole servers on different nodes, one preferably on real rust like a Raspberry Pi. They will use Unbound.
- One will be the master (192.0.2.53) from where all data is synchronized to the other two. Enter on one, use on many, performed by nebula-sync.
- The other two are used as a HA pair using one external IP 192.02.54. The HA Master is 192.0.2.55 and .192.02.56 will act as the HA Backup. Powered by keepalived
Upgrading a standalone Pi-hole 5 → 6
Upgrading to Pi-hole v6 should be straightforward. For existing users, we recommend backing up your current configuration before proceeding, as the upgrade is strictly a one-way operation.
As always, you can upgrade using the command pihole -up on the terminal.
During the upgrade operation, you will be presented with a dialog box, asking if you wish to disable lighttpd. Doing so is probably appropriate for most users.
If you host other web pages than Pi-hole’s, you may choose to keep it enabled.
IF lighttpd is disabled, pihole-FTL will attempt to bind to ports 80 and 443.
If there is any conflict on these ports, it will revert to port 8080 for HTTP.
It lacked the HA component and relayed on just using many.
Installation types
How to install? It's your choice, as always on Linux, how you do it:
- on bare metal like a Raspberry Pi
- a VM for max security
- a CT for easy installation
- Docker installation see later to be post: A Docker Based HA Pi-hole 6
Pi-hole version 6 – Docker image
The docker image has undergone a complete rewrite from the ground up, and is now based on Alpine rather than Debian. The same migration scripts that run on bare metal will also run on Docker – your configurations will be migrated to the new format.
The exception to this is environment variables. You can start the container with the old variables in place but don’t expect them to work! It is recommended to read the docker section of our docs page before upgrading.
Fresh Installation – Pi-hole and Unbound
We will be utilizing the following apps:
- Pi-hole will be our interface for DNS, DHCP and Blocking of ads and bad IPs.
- Unbound is a validating, recursive, caching DNS resolver. It is designed to be fast and lean and incorporates modern features based on open standards.
For redundancy and HA, we set up a Pi-hole on each node in the cluster or on several servers. This can also be a good project for all those unused Raspberry Pi everyone has in their drawers. - Nebula-sync, synchronize Pi-hole v6.x configuration to replicas. It's not a part of the official Pi-hole project, but uses the API provided by Pi-hole instances to perform the synchronization actions.
- Keepalived, for high-availability, is achieved by using the VRRP protocol. VRRP is a fundamental brick for router failover.
Create the nodes
Roles by IP
- 192.0.2.53: The master DNS and DHCP, will be synced to the 2 HA nodes
- 192.0.2.54: The virtual IP for the HA DNS nodes
- 192.0.2.55: pi-2 HA master node
- 192.0.2.56: pi-3 HA node
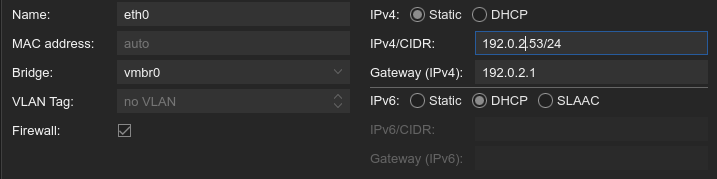
For this example, we will set up the Pi-holes using a CT. Give it an ID and a name, enter the password and an SSH public key, select your OS, and accept the Disk and CPU as is. Always use SSH keys for security.
If you aren't going to use the Pi-hole for DHCP
- Set Network to DHCP and we are ready with the setup
- Set Firewall on
- Copy the MAC and set up your current DHCP to supply the correct IP and the other stuff a good DHCP can do
If you are using the Pi-hole for DHCP
Start the first VM 192.0.2.53
Upgrade the CT
apt-get update && apt-get dist-upgrade -yInstall other required parts
apt-get install ca-certificates curl gnupg -yAdd a user and add to sudo ans docker groups
adduser <username>usermod -ag sudo <username>Install Pi-hole
First, download the file and rename it.
wget -O pi-install.sh https://install.pi-hole.net Carefully read the file, change anything you don't like, and make sure you understand and accept the implications of running this script.
Make it executable, chmod 700 pi-install.sh or chmod +x pi-install.sh
Run the script ./pi-install.sh
- you will be asked to select your upstream DNS select Custom.
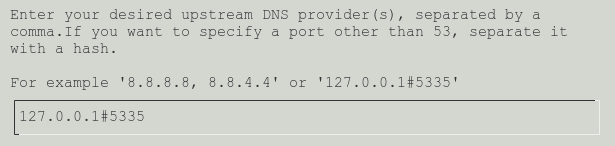
- I also recommend selecting the default
StevenBlack's Unified Hosts Listto be installed. - Query logging on/off is your choice, read the documentation
Set your own password, pihole setpassword, otherwise use the random one as generated like AbDOlq83
Reboot and all is done for now, reboot now
Check for success
Login at the IP displayed to you, 192.0.2.53/admin
Install Unbound
apt install unbound -yConfigure Unbound
Copy the configuration file from the Unbound documentation and paste it into the configuration file pi-hole.conf. In my cleanup version, IPv6 is set to no.
You can modify it, there’s a lot that can be done with Unbound. For an initial set up we are using a generic setup.
pi-hole.conf clean no IPv6
server:
verbosity: 0
interface: 127.0.0.1
port: 5335
do-ip4: yes
do-udp: yes
do-tcp: yes
do-ip6: no
prefer-ip6: no
harden-glue: yes
harden-dnssec-stripped: yes
use-caps-for-id: no
edns-buffer-size: 1232
prefetch: yes
num-threads: 1
# Ensure privacy of local IP ranges
private-address: 192.168.0.0/16
private-address: 169.254.0.0/16
private-address: 172.16.0.0/12
private-address: 10.0.0.0/8
private-address: fd00::/8
private-address: fe80::/10
cd /etc/unbound/unbound.conf.d && nano pi-hole.confAfter it's saved, restart the Unbound service.
service unbound restartCheck for success
First, by systemctl status unbound
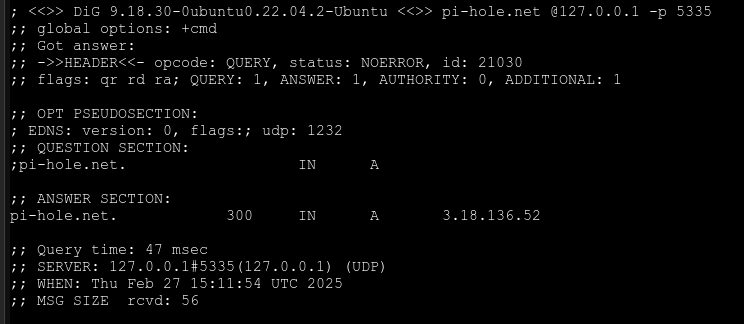
Then, you test that Unbound is running properly by running the three commands below (see the Unbound documentation).
Test 1: dig pi-hole.net @127.0.0.1 -p 5335 should return an IP address
Test 2: Run this twice: dig fail01.dnssec.works @127.0.0.1 -p 5335 you should return SERVFAIL at the second time

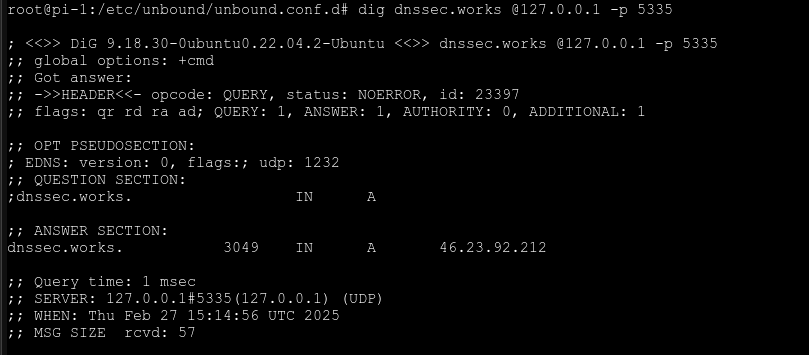
Test 3: dig dnssec.works @127.0.0.1 -p 5335 should return NOERROR.
Configure Pi-hole to use Unbound
If you didn't already do it during the installation, do it now:
- In the GUI, go to
Settings→DNS, uncheck all Upstream DNS Servers and add a Custom DNS server. In the entry field enter127.0.0.1#5335
But, we will go a step further, we will make it HA.
Making the DNS Highly Available
Create the other nodes
You should now create the two other Pi-hole servers, before you continue.
You will need their IP addresses and passwords later. They should have Pi-hole and Unbound as on the main one.
Keep Nodes in sync – Nebula-sync
Check their GitHub for the latest releases and download it
wget https://github.com/lovelaze/nebula-sync/releases/download/v0.3.0/nebula-sync_0.3.0_linux_amd64.tar.gzUnpack
tar -xvzf nebula-sync_0.3.0_linux_amd64.tar.gzCreate the .env file.
Use CRON=* * * * * for testing, and CRON=0 * * * * for production.
Updating every minute is a bit excessive, hourly may be a better choice.
PRIMARY='http://ph1.example.com|password'
REPLICAS='http://ph2.example.com|password,http://ph3.example.com|password'
FULL_SYNC=true
CRON=* * * * *
CRON= 0**** is once an hour (@hourly in the non-standard way), ***** is once a minute.
Start nebula-sync
nebula-sync run --env-file .env
Run as a daemon
First, copy the executable to /usr/bin by cp nebula-sync /usr/bin then, you need to create a service file for systemd to be manage the service.
Create the service file
nano /etc/systemd/system/nebula-sync.serviceEdit with sudo or run as root su -
[Unit]
Description=Nebula Sync Daemon

[Service]
ExecStart=/usr/bin/nebula-sync run --env-file /home/<user>/.env
WorkingDirectory=/home/<user>
Restart=always

[Install]
WantedBy=multi-user.target
Reload the systemd daemon to recognize the new service
sudo systemctl daemon-reload
Start your service
sudo systemctl start nebula-sync
Check for success
systemctl status nebula.serviceEnable it to start on boot
sudo systemctl enable nebula-sync
High Availability with keepalived
Keepalived is designed to run on two separate hosts but share a virtual IP address. This ensures that if one goes down (the master), the backup will take over using the same virtual IP. In this example, the virtual IP is used as our backup DNS server.

Setup keepalived
Install Keepalived on both backup instances of Pi-hole (pi-2 and pi-3). Here we would like to have High Availability.
apt install keepalivedGet the interface name
ip aLook for something like eth0@if36: ... the eth0 is what we need
Configure keepalived
Create and edit the file /etc/keepalived/keepalived.conf
Paste this information into the configuration file of the master and modify it as needed.
Create a password
Use any way you like, below 2 examples
< /dev/urandom tr -dc _A-Z-a-z-0-9 | head -c${1:-32};echo;openssl rand -base64 32Copy and edit the keepalived.conf files on pi-2 and pi-3
cp /etc/keepalived/keepalived.conf /etc/keepalived/keepalived.conf.orig && nano /etc/keepalived/keepalived.confThe Keepalived Master – pi-2
Paste this into the keepalived.conf file, modify it with your password and IPs.
vrrp_instance VI_1 {
  state MASTER
  interface eth0
  virtual_router_id 54
  advert_int 1
  unicast_src_ip 10.10.1.55
  unicast_peer {
    10.10.1.56
  }
  priority 20
  authentication {
    auth_type PASS
    auth_pass C35RUyBq
  }
  virtual_ipaddress {
    10.10.1.54/24
  }
}
The Keepalived Backup – pi-3
Paste this into the keepalived.conf file, modify it with your password and IPs.
vrrp_instance VI_1 {
  state BACKUP
  interface eth0
  virtual_router_id 54
  advert_int 1
  unicast_src_ip 10.10.1.56
  unicast_peer {
    10.10.1.55  }
  priority 10
  authentication {
    auth_type PASS
    auth_pass C35RUyBq
  }
  virtual_ipaddress {
    10.10.1.54/24
  }
}
Enable the Keepalived service
Do this on both pi-2 and pi-3 on both instances
systemctl enable keepalived.serviceReboot
reboot nowCheck for success
systemctl status keepalived.serviceTest 1: Run a continuous ping to IP 192.0.2.54 and it should not break if you stop pi-2 or pi-3
Test 2: shutdown pi-2 and on pi-3 issue systemctl status keepalived.service and you should see a Entering MASTER STATE message

If you restart pi-2 you will see a Entering BACKUP STATE message.
Final tasks
Use the new DNS on your devices
Set up accordingly, use DHCP, set up on the device or any way you have to do it.
Remember, if you are using VLANs, to make them be able to access this setup or create their own setups, that is a bit extreme but sometimes needed.
Options
For things like DNS, we want them to be up and running after a boot. Go to the CT → Options and set Start at boot: ☑️. Select the boot order according to your needs.
Backup
Remember to set up Proxmox Backup Servers to keep backups.
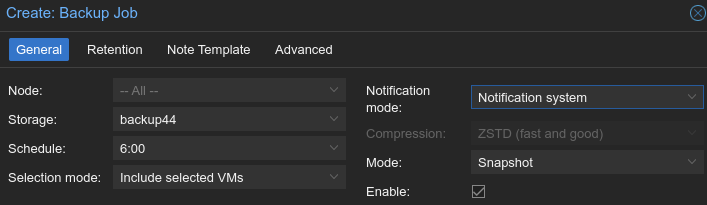
Datacenter → Backup → hit Add to create a Backup Job
Backup Retention of snapshots
The retention of old backups depends on how often data changes and how important an older state may be in a specific workload.
For this example, we assume that you are doing daily backups, have a retention period of 10 years, and the period between backups stored gradually grows.
- keep-last:
3- even if only daily backups, an admin may want to create an extra one just before or after a big upgrade. Setting keep-last ensures this. - keep-hourly: not set - for daily backups this is not relevant. You cover extra manual backups already, with keep-last.
- keep-daily:
13- together with keep-last, which covers at least one day, this ensures that you have at least two weeks of backups. - keep-weekly:
8- ensures that you have at least two full months of weekly backups. - keep-monthly:
11- together with the previous keep settings, this ensures that you have at least a year of monthly backups. - keep-yearly:
9- this is for the long term archive. As you covered the current year with the previous options, you would set this to nine for the remaining ones, giving you a total of at least 10 years of coverage.
Set Note Template to {{cluster}}, {{guestname}}, {{node}}, {{vmid}}
Update root certificates with Crontab
To edit the crontab, you type crontab -e and create this script and condition or edit the /etc/crontab file for running as root.
E.g. Run the script, update_root.sh, every 4 months on the 1st morning at 4:00 and report possible errors into the cron.log.Create the script
Go to your stack and the folder for Pi-hole
Execute this command:
touch update_root.sh && echo 'wget https://www.internic.net/domain/named.root -O /home/USER-ID/docker-stack/pi/unbound/root.hints' > update_root.sh Make the script executable
chmod +x update_root.sh
Edit the CRONTAB script
EDIT USER-ID and location of files. Command crontab -e and add your line
0 4 1 */4 * USER-ID /home/USER-ID/docker-stack/pi/root_update.sh >> /home/USER-ID/docker-stack/pi/cron.log References
Pi-hole [1] Unbound [2] Nebula-sync [3] Keepalived [4] CRON [5]
My old post [6]
Unbound is a validating, recursive, caching DNS resolver. It is designed to be fast and lean and incorporates modern features based on open standards. homepage, GitHub, DockerHub ↩︎
Keepalived is a routing software written in C. The main goal of this project is to provide simple and robust facilities for loadbalancing and high-availability to Linux system and Linux based infrastructures.
Homepage, GitHub ↩︎CRON - a daemon to execute scheduled commands man page, a quick and simple editor for cron schedule expressions by Cronitor
Crontab guru ↩︎A redundant DNS - Pi-Stack older post ↩︎


