Stop Brute Force Attacks
It's common practice to harden any server beyond the typical 60-70% state they are at end of installation. Fail2ban is one of the tools. As all a home lab is a prime target, we need to take extra steps to secure the servers we have, exposed and not exposed ones alike.


Protect Proxmox Against Brute Force Attacks
How you set up fail2ban for the Proxmox API to block IP addresses (temporarily) if there were too many wrong login tries submitted through them. This is important to do on all your servers.
Ban Hosts that Cause multiple Authentication Errors
Fail2Ban scans log files like /var/log/auth.log and bans IP addresses conducting too many failed login attempts. It does this by updating system firewall rules to reject new connections from those IP addresses, for a configurable amount of time. Fail2Ban comes out-of-the-box ready to read many standard log files, such as those for sshd and Apache, and is easily configured to read any log file of your choosing, for any error you wish.
⚠️ Fail2Ban can reduce the rate of incorrect authentication attempts, but it cannot eliminate the risk presented by weak authentication.
Recommendation
📒 Set up services to use only Two-Factor Authentication (2FA/MFA), or public/private authentication mechanisms if you really want to protect services.
Install Fail2ban
SSH into your server or use the shell, we need to run as root.
apt-get update && apt-get intsll fail2ban -yConfigure jail.conf
We use jail.conf as a template to create our configuration, /etc/fail2ban/jail.local. Using a .local file, protect us from having it overwritten by a future upgrade.
cp /etc/fail2ban/jail.conf /etc/fail2ban/jail.localChange or delete things to your liking in the copied over jail.local.
Setup Jail Using systemd Backend
About logs on Proxmox systems:
- since 4.0 systemd-journald is enabled by default
- since 7.0 the log is also persisting reboots – meaning that attacks can, by defaults also found if the started before a reboot.
Basic Add-on Config for Proxmox
Add the following to the end of the copied over file /etc/fail2ban/jail.local
[proxmox]
enabled = true
port = https,http,8006
filter = proxmox
backend = systemd
maxretry = 3
findtime = 2d
bantime = 1h
📒 Consider usingbantime = 7dandfindtime = 1handmaxretry = 5.
📒 Time properties allows for combinations likebantime = 7h 30mandfindtime = 8m 30s. You can test if it's valid and what the actually resulting ban seconds are using thefail2ban-client --str2sec '1d 5h'.
ℹ️ See the Fail2ban manual page for information on all options.
Proxmox Filter Config
Create the file /etc/fail2ban/filter.d/proxmox.conf with the following content:
[Definition]
failregex = pvedaemon\[.*authentication failure; rhost=<HOST> user=.* msg=.*
ignoreregex =
journalmatch = _SYSTEMD_UNIT=pvedaemon.service
Enable the New Config
Activate the new config and arm fail2ban for the Proxmox API
systemctl restart fail2banTest Fail2ban Config
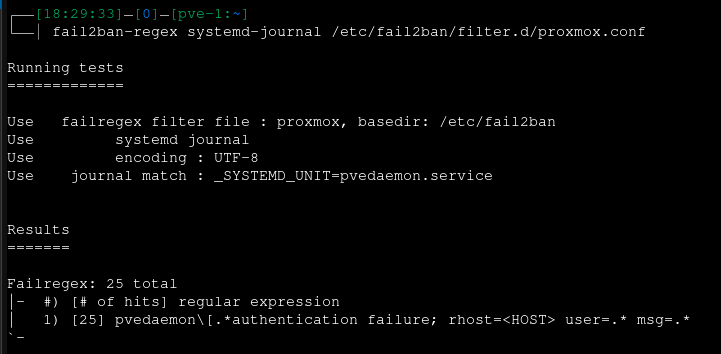
Now, test by trying to log in through the GUI with a wrong password or a wrong user, and then issue the command:
fail2ban-regex systemd-journal /etc/fail2ban/filter.d/proxmox.confIn theResultssection, you should have at least
- at the top aFailregex: 1 total
- at the bottom a1 matched(I have missed 25 times, it,s a old serversp.)

Problem-solving
Check Banned IP
fail2ban-client get proxmox bannedUnban your IP
fail2ban-client unban <your IP>⚠️ If you try too often with wrong credentials – you will be banned!
Manage Fail2ban Service
After making all the changes, save your file and restart Fail2ban service using the following command.
sudo systemctl restart fail2ban.service sudo systemctl enable fail2ban.service sudo systemctl status fail2ban.service With that done, you should now check your iptables rules for the newly added jail sections on each of the application modules you enabled.
To check the status of one service: sudo fail2ban-client status sshd
Ban an IP
sudo fail2ban-client set <jail> banip <ip address>If you log in now, it should fail, if Fail2ban is working correctly.
Unban an IP
sudo fail2ban-client set <jail> unbanip <ip address>If you log in now, it succeeds if, Fail2ban is working correctly.
List status
Example, list status of the sshd jail
sudo fail2ban-client status sshdWhitelist an IP
For fixed IPs, you might go for whitelisting
sudo nano -l /etc/fail2ban/jail.localAnd add your IPs you trust fully under [Default] as a new line
ignoreip = 127.0.0.1/8 ::1 192.168.1.100sudo systemctl reload fail2banReferences
Fail2ban [1] [2] Hardening Servers [3]


