Manage and Deploy any VPS or VM
Deploy with Terraform and manage with Ansible. Automation for the Cloud and Home Lab. Setting up VM or K8s/K3s clusters are pretty boring, I prefer to use automation. What are the benefits of using Automation: Cost Reduction, Easy to Manage, Productivity, Security and Flexibility. IaC and CI/CD.


There are many ways, you can automate your deployment, you may freely choose your way.
The traditional way we already used, last century, was to run scripts. If you think about the typical IT-shop that time we had ten or a hundred customers with many sites and duplicated over a number of countries. To be effective, you needed to standardize and automate the deployment and update cycles.
Today, we have Infrastructure as Code (IaC). A wide range of tools is available to help IT Management to address the following infrastructure management tasks:
- Provisioning
- Deployment
- Configuration
- Orchestration
Define everything as code
The first core practice for implementing IaC is to define everything as code.
- Reusability
- You can create many instances of the thing.
- You can repair and rebuild your things faster
- Other people can build identical instances of the thing.
- Consistency
- Things built as code are executes the same way every time
- Makes system behavior predictable
- Makes testing more reliable by continuous testing/delivery of the thing.
- Transparency
- Everyone can see how the thing is built by looking at the code.
- Other people can review your code and suggest improvements.
- Gain insight to use when troubleshooting, and review and audit for compliance.
Continuously Test and Deliver
The idea is to ‘build quality in’ rather than trying to ‘test quality in.’ One important practice involves integrating and testing all work in progress.
Teams get better results when everyone integrates their work, at least on a daily schedule.
- CI involves merging and testing everyone’s code throughout development.
- CD takes this further, keeping the merged code always production-ready.
Build Small
Build using small, simple pieces that you can test and change independently. Each piece is easy to understand and has clearly defined interfaces. The team can easily change each component on its own and can deploy and test each component in isolation. Remember KISS.
The larger a system is:
- the harder it is to change,
- the easier it is to break.
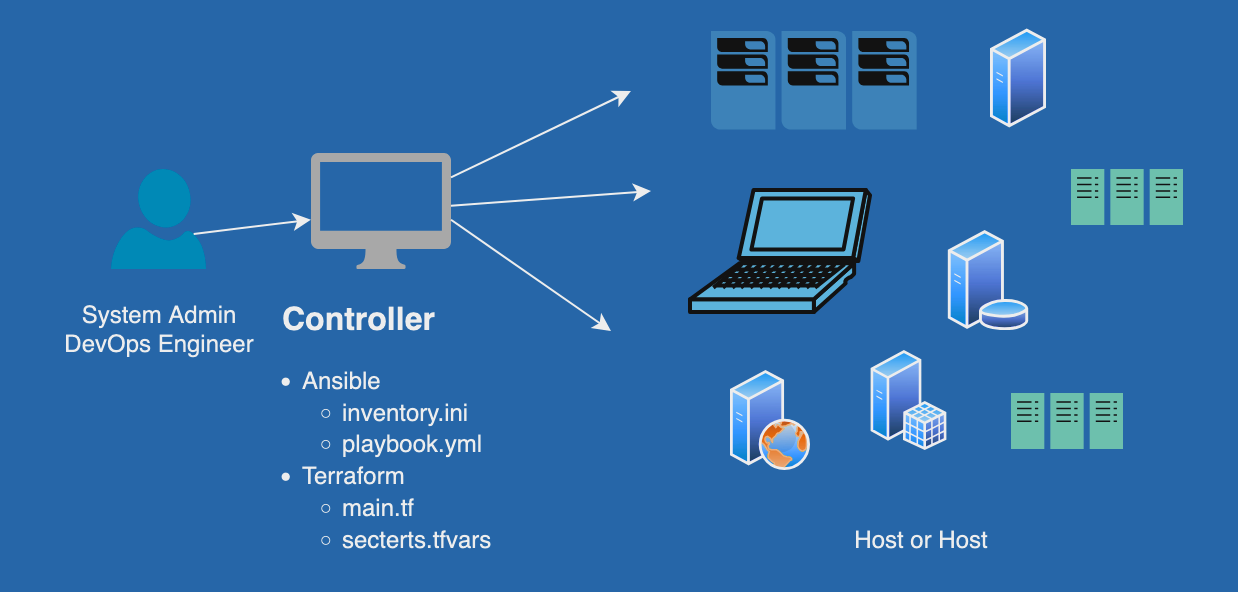
My main tools
I use tools like Terraform and Ansible to use. They do overlap, but in my mind they can be classified like this:
- Terraform, mainly for VM deployment
- Ansible, SW installation and upgrade
About the Installation
There are many ways to install them. Here, we install them for a specific user and not as root. Why? – Answer: Security. A key method is segregation of duty.
In some places, you need to sign in to a shared computer where you can't install anything as root, or at least you should not do it.
For a home lab, you can install them on your PC or a VM, as user or root.
We will use SSH to communicate from the Controller to the Hosts. We also need a set of SSH keys, ED25519 are preferred for safety and easy-of-use.
As these are powerful tools, we need to follow strict security protocols.
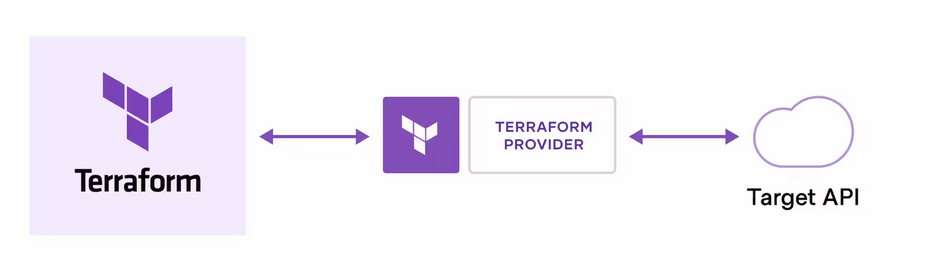
What is Terraform?
Terraform is a fantastic tool for deploying stuff like Cloud nodes or a VM.
Terraform is an infrastructure as code tool that lets you build, change, and version infrastructure safely and efficiently. This includes low-level components like compute instances, storage, and networking, and high-level components like DNS entries and SaaS features.
Installing
Check for your OS and your CPU, AMD64 or ARM64 and
Ubuntu/Debian machines
We shall install it in .local/bin. We.want to run as a normal user, not root.
⚠️ Don't install as sudo. This will allow us to run as user and not as root.
Using the binary download
wget https://releases.hashicorp.com/terraform/1.9.4/terraform_1.9.4_linux_amd64.zipunzip terraform_1.9.4_linux_amd64.zipUsing the package manager
wget -O- https://apt.releases.hashicorp.com/gpg | sudo gpg --dearmor -o /usr/share/keyrings/hashicorp-archive-keyring.gpg
echo "deb [signed-by=/usr/share/keyrings/hashicorp-archive-keyring.gpg] https://apt.releases.hashicorp.com $(lsb_release -cs) main" | sudo tee /etc/apt/sources.list.d/hashicorp.list
sudo apt update && sudo apt install terraform
Or using the binary download
wget https://releases.hashicorp.com/terraform/1.9.4/terraform_1.9.4_linux_amd64.zipunzip terraform_1.9.4_linux_amd64.zipOn macOS
Update your brew brew upgrade and then install Terraform.
brew tap hashicorp/tap
brew install hashicorp/tap/terraform
Test for success
terraform --versionAnd you should see something like this:
❯ terraform --version
Terraform v1.9.4
on linux_amd64
And we are ready to go!
Troubleshooting
Make sure this is the right place by checking your .profile. You should have:
# set PATH so it includes user's private bin if it exists
if [ -d "$HOME/.local/bin" ] ; then
    PATH="$HOME/.local/bin:$PATH"
fi
If not, adjust accordingly. E.g. using .zsh_profile, you could include the .profile to it on line 1 by enter . ~/.profile.
Using Terraform
My example is to set up a VPS on Hetzner, feel free to use the one you like. Hetzner has 3 places in Europe (HEL-1, FSN-1 and NBC-1), 2 in the US (HIL and ASH)and 1 in Singapore (SIN). They are cheap for testing purposes and one is located pretty close to my home.
⚠️ Warning
Hard-coding credentials into any Terraform configuration is not recommended, and risks secret leakage should this file ever be committed to a public version control system.
You can have shared vCPUs
- CX## – Intel Xeon Gold series processors
- CPX## series – AMD EPYC 7002 series processors
- CAX## series – Ampere Altra series processors
Dedicated vCPUs
- CCX## – AMD Milan EPYC 7003 and AMD Genoa EPYC 9654 processors
Create a VPS
You need to create an account.
Select your project and enter
Create a read/write token for Terraform to use. Copy it – it's visible only one time!
Store it in a super safe place and in a safe format (use a strong crypto).
Hetzner Cloud Provider
Now, we do activate the Hetzner Cloud Provider -tool – hcloud. GitHub Documentation. We will utilize the Cloud-init for our base.
Cloud-init.yml
- ensure to set your user, group for the normal user you want to use
ssh_import_idcan be used with GitHub usernames instead ofssh_authorized_keysdisable_root: trueensures root can't ssh in- optionally add a SSHD extra config that will secure more; tweak
TcpForwardingandPermitTunnelas your requirements are!
#cloud-initThe first line has to be #cloud-init.
Create your directory for this project
mkdir -p Terraform/testserver
cd Terraform/testserver
The Hetzner Cloud (hcloud) provider is used to interact with the resources supported by Hetzner Cloud. The provider needs to be configured with the proper credentials before it can be used.
Change the name, image and location. Also edit any other things you need to change. Start editing the main.tf file:
nano main.tfterraform {
required_providers {
hcloud = {
source = "hetznercloud/hcloud"
version = "~> 1.45"
}
}
}
# Set the variable value in *.tfvars file
# or using the -var="hcloud_token=..." CLI option
variable "hcloud_token" {
sensitive = true
}
# Configure the Hetzner Cloud Provider
provider "hcloud" {
token = var.hcloud_token
}
# Create a new server running Debian or somthing else
resource "hcloud_server" "node1" {
name = "node1"
image = "debian-12"
server_type = "cx22"
location = "hil"
public_net {
ipv4_enabled = true
ipv6_enabled = true
}
}
Tell terraform to use the provider and select a version.
Create the secrets file nano secrets.tfvars. Add the token and a newline.
hcloud_token = "<The Hetzner token>"
other_tokens = "<put them 1 per line>"
Add the file to git ignore!
Create the user data file, nano user_data.yml
#cloud-config
system_info:
  default_user:
    name: boss
    primary_group: boss
    groups: users,sudo
    shell: "/bin/bash"
    ssh_authorized_keys:
      - "ssh-ed25519 <SET YOUR KEY>"
    lock_passwd: true
    sudo: "ALL=(ALL) NOPASSWD:ALL"

users:
  - default

disable_root: true
ssh_pwauth: false

write_files:
  - path: /etc/ssh/sshd_config.d/zz-cloud-init.conf
    content:
      Port 54321
      AllowAgentForwarding yes
      AllowTcpForwarding yes
      PermitTunnel yes
      TCPKeepAlive yes
Run terraform initand then terraform plan, if all is good, you see no errors but a listing of what is to be created.
Start the VPS by terraform apply to create the new VPS.
Edit the Firewall and apply it to the VPS.
Now you should be able to ssh into it ssh -p 54321 boss@<IP>
We did change the port from 22 → 54321 androotcan't log in, only the user we created,boss.
Other useful tools
A linter is designed to catch errors in data before a file is processed. This saves you or your automated workflow from errors. TFLint is a framework and each feature is provided by plugins, the key features are as follows:
- Find possible errors (like invalid instance types) for Major Cloud providers (AWS/Azure/GCP).
- Warn about deprecated syntax, unused declarations.
- Enforce best practices, naming conventions.
Install TFLint
cd ~/Terraform
wget https://raw.githubusercontent.com/terraform-linters/tflint/master/install_linux.sh -O install_tflint.sh
chmod +x install_tflint.sh
./install_tflint.sh
On a Linux install into ~/Terraform
brew install tflintInstall on a Mac
Using Terraform with Proxmox
Another use case is setting up large numbers of VM/CT on Proxmox nodes. There are two providers today, BPG Version 0.62.0 and Telmate Version 3.0.1-rc3.
That is to be discussed in another post.
What is Ansible?
Ansible is the work-horse for keeping any infra up-to-date and installing things. It's written primarily in Python, originally by Michael DeHaan. It was acquired by Red Hat in 2015.
Ansible is an open-source IT automation engine that automates provisioning, configuration management, application deployment, orchestration, and other IT processes. It is free to use, and the project benefits from the experience and intelligence of its thousands of contributors.
The Red Hat® Ansible Automation Platform is a unified, security-hardened platform for mission-critical automation. This uses the open-source project to create an automated experience for teams from different departments.
Ansible-lint
A linter is designed to catch errors in data before a file is processed. This saves you or your automated workflow from errors.
Installing
sudo apt update && sudo apt install python3.11 && sudo apt install python3-pip⚠️ Warnings
Newer install Python modules using sudo, especially on shared desktops!
Use git ignore for all secrets (keys, tokens and passwords!
pip3 install -U ansibleNot using sudo keeps your machine more secure.
Check for success
which ansibleIt should be in /home/<user>/.local/bin
ansible --versionpip3 install -U ansible-lintMacOS
brew install ansible
brew install ansible-lint
Using Ansible
That is to be discussed in detail in another post.
I like to use Ansible-lint, it helps to find errors. If you're using VS Code or a similar program, add the tools:
- Ansible VS Code Extension by Red Hat,
- it includes Ansible-lint and YAML by Red Hat
- Terraform Extension for Visual Studio Code
Hard-coding credentials into any configuration is not recommended, and risks secret leakage should this file ever be committed to a public version control system.
Create the Ansible files
The hosts-file, usually called the inventory.ini
A list of your nodes, with one server per line, is enough for setting up a functional inventory file. Hostnames and IP addresses are interchangeable:
sudo nano ~/ansible/.inventory.ini 203.0.113.111
203.0.113.112
203.0.113.113
server_hostname
Once you have an inventory file set up, you can use the ansible-inventory command to validate and obtain information about your Ansible inventory
Using a better structure
Use the SSH-key we already set up in Terraform or copy them by editing the hosts ~/.ssh/authorized_keys or copy them to the host by ssh-copy-id <user>@<host>.
sudo nano ~/.inventory.ini [remote]
remote_test
[remote:vars]
ansible_host=IP_ADDRESS_OF_VIRTUAL_MACHINE
ansible_ssh_private_key_file=~/.ssh/YOUR_SSH_PRIVATE_KEY_FILE
ansible_user=YOUR_USERNAMETest for success
ansible all -m ping -i inventory.iniCreate your Playbook
Almost every playbook will begin with declarations similar to this.
hostsdeclares which server's the Ansible control node will target with the playbook.becomestates whether all commands will be done with escalated root privileges.
nano playbook.yml---
- hosts: all
become: true
vars:
created_username: bossPlaybooks are the tools to install the applications on the VPS we created with Terraform. Below is a Playbook Example:
---
- hosts: all
  become: true
  vars:
    created_username: sammy

  tasks:
    - name: Install aptitude
      apt:
        name: aptitude
        state: latest
        update_cache: true

    - name: Setup passwordless sudo
      lineinfile:
        path: /etc/sudoers
        state: present
        regexp: '^%sudo'
        line: '%sudo ALL=(ALL) NOPASSWD: ALL'
        validate: '/usr/sbin/visudo -cf %s'

    - name: Create a new regular user with sudo privileges
      user:
        name: "{{ created_username }}"
        state: present
        groups: sudo
        append: true
        create_home: true

    - name: Set authorized key for remote user
      ansible.posix.authorized_key:
        user: "{{ created_username }}"
        state: present
        key: "{{ lookup('file', lookup('env','HOME') + '/.ssh/id_rsa.pub') }}"

    - name: Disable password authentication for root
      lineinfile:
        path: /etc/ssh/sshd_config
        state: present
        regexp: '^#?PermitRootLogin'
        line: 'PermitRootLogin prohibit-password'

    - name: Update apt and install required system packages
      apt:
        pkg:
          - curl
          - vim
          - git
          - ufw
        state: latest
        update_cache: true

    - name: UFW - Allow SSH connections
      community.general.ufw:
        rule: allow
        name: OpenSSH

    - name: UFW - Enable and deny by default
      community.general.ufw:
        state: enabled
        default: deny
Using Ansible to create a VPS
Create hcloud-server.yml
---
- name: Create Basic Server
  hosts: localhost
  connection: local
  gather_facts: False
  user: root
  vars:
    hcloud_token: YOUR_API_TOKEN
  tasks:
    - name: Create a basic server
      hcloud_server:
          api_token: "{{ hcloud_token }}"
          name: new-server
          server_type: cpx11
          image: ubuntu-24.04
          location: hel1
          ssh_keys:
            - <your ssh key>
          state: present
      register: server
Run it ansible-playbook -v hcloud-server.yml
Note I run Terraform and Ansible from my notebook to be able to use it anywhere. As I have several account on it, I'm installing Terraform and Ansible on the user that I use for these things.
On Proxmox set up a VM for Terraform and Ansible to control the cluster and/or the standalone nodes.
Change keyboard layout on Debian
dpkg-reconfigure localesReferences
Hashicorp: Terraform [1] Vagrant [2] Red Hat: Ansible [3] Hetzner [4] TFLint [5]


